Quantcast
Channel: The Daily Bandha
Viewing all 69 articles
Browse latest View live

A Cool Tip for Deeper Breathing in Yoga

$
0
0
First, heartfelt thanks for all of your “likes” and comments on our Facebook page. Enjoy the free e-book, Anatomy for Yoga, Tips and Techniques
Book 1
!
We’ve heard from practitioners all over the world on how these techniques have enhanced their practice and teaching. This is music to our ears. To show my appreciation, I want to offer a tip that can help you dramatically expand the chest. This cue on engaging the accessory muscles of breathing can provide a quantum leap in the global effect of your yoga practice. First, a little background . . .

As many of you know, I studied yoga for an extended period at the Ramamani Iyengar Memorial Yoga Institute in Pune, India. The Iyengars are true world experts in yogic breathing. During my time there, I was exposed to great teachings of pranayama from Yogacharya Iyengar, his daughter Geeta, and son Prashant. These classes were amazing; their effect would last for days.


I continued to practice pranayama when I returned from India and gradually developed an understanding of the art. During this process, I used my medical training to analyze the breathing techniques. I found that I could use Western science to amplify the effects of pranayama.

Now, part of pranayama involves breathing deeply. The body has a group of muscles that it recruits when we need to take deeper breaths, say after running a sprint. Recruiting these muscles expands the chest to a greater extent than when using the diaphragm alone. The result is increased inspiratory volume and improved lung ventilation (on the alveolar level). It occurred to me that intentionally engaging these breathing muscles would augment the volume of my inhalations during pranayama and asana practice. So I developed a series of cues to activate the various accessory muscles and incorporated them into my practice. The effect was immediate and amazing. After my practice was finished and throughout the day, my breathing felt effortless, leaving me energized.
How cool is that?

Activating the serratus anterior
to expand the lungs.
So, here’s a cue for activating one of my fave accessory muscles—the serratus anterior (SA) and his buddies, the rhomboids. Pause for a second. Rest your hands on your thighs. Now, exhale naturally and then gently draw the shoulders back to bring the scapulae (shoulder blades) towards the spine. As you inhale, imagine pressing the sides of your shoulders and upper arms against an imaginary wall, like a doorframe. Feel how this expands your chest. Repeat this cue two more times before reading on . . .

Okay, Welcome Back . . .

The rhomboids (major and minor) originate from the spinous processes of cervical vertebrae six and seven and thoracic vertebrae one through four. They insert onto the medial border of the scapula and act to stabilize and draw the shoulder blades towards the midline. The serratus anterior originates from ribs one through nine and inserts on the inside of the entire medial border of the scapula. If the scapula is fixed (by engaging the rhomboids) then contracting the serratus anterior lifts and expands the ribcage. Just focus on this action for the moment. (When the shoulder blade is released, the SA rotates and draws thescapula laterally—but that’s another blog postJ.)

Ok, now repeat the steps from above—take a relaxed exhale, then draw the scapulae towards the midline and stabilize them there using the rhomboids (feel how this expands the chest forward). Then as you inhale, attempt to press the shoulders outwards against an imaginary wall. Take a relaxed exhalation and repeat two more times.

Rhomboids stabilizing
the scapulae.
Do you notice how it’s easier to engage these muscles the second time around? That’s why I asked you to take a break, read about the anatomy, and then try it again. During the brief period you were reading, your unconscious brain formed new circuitry to activate these important muscles more efficiently. To see this process of chest expansion in action, we’ve created a video that illustrates this concept with the rhomboids and another accessory muscle of breathing, the pectoralis minor. This will give you an idea of how the ribcage expands when activating the accessories.

Use this cue when you practice this weekend. For example, as you do Surya Namaskar, when you inhale to raise your arms overhead from Tadasana, imagine pressing the shoulders outwards against a wall. Try it in other poses as well, such as Up Dog, Down Dog, and so on. This technique is especially effective for Vinyasa Flow—you guys will be floating!

Life is for enjoyment, friends, so enjoy this technique. Keep the comments coming on Facebook and be sure to visit us for your free e-book and chakra poster!

Namasté,

Ray

Here’s a Tip to Help You Get the Heels Down in Dog Pose

$
0
0
For something to be scientific, it has to be reproducible by another scientist. That’s why I want to express my thanks to all of you who have shared your experiences with these techniques on our Facebook pageFor example, I love the blog. My students appreciate the ‘new’ way that I explain how to move deeper into poses and you always get the credit. Myself, I was doing some of the things you describe naturally; I just couldn't explain them to my students. Like moving the feet away in Uttanasana to open the hips—brilliant! I never connected what I was doing to my feet. I thank you and my students thank you!"

Scientific instructions should work for any style of yoga, in any country. In this case, when you press the feet into the mat and attempt to drag them apart, you activate the gluteus medius and tensor fascia lata. This will automatically produce the effects described by Sue and in our free e-book. So it’s an honor to see this technique being validated. Truths like this exist independent of any individual (including me), but it sure feels good to be acknowledged! 

Namasté Sue!  See you in Scottdale, PA, for the workshop in May.

Now on to the Post . . .

Say you’ve been working hard on your Downward Facing Dog and still can’t get your heels to the floor. This cue can give you and your students that extra bit of length in the calf muscles and enable you to lower the heels.

First, warm up a bit with five or six Sun Salutations (Surya Namaskar A).  This has the physiological effect of acclimating the muscle spindle stretch receptors of the muscles that lengthen, including the calves. Then take Dog Pose and attempt to draw the top surface of the feet towards the shins. This contracts the tibialis anterior muscle (and its synergists), dorsiflexing the ankles. It also signals the muscles at the backs of the calves, the gastroc/soleus complex, to relax through reciprocal inhibition, enabling the heels to lower to the floor. At the same time, engage the quadriceps to straighten the knees and the triceps to straighten the elbows. These actions synergize lowering the heels. We illustrate stepwise tips like this for all kinds of poses in the Mat Companion series. Click here to page through the books.

Tibialis anterior dorsiflexing the ankles to lower the heels (gastroc/soleus lengthening).


Here’s the Anatomy . . .

First let’s look at three muscles that move the ankle: the gastrocnemius, soleus, and tibialis anterior.

The gastrocnemius has two heads: one originates from the back of the femur above the medial femoral condyle, the other from above the lateral condyle. The soleus originates from the head and upper part of the fibula and the upper third of the inside of the tibia. The gastroc and soleus combine to form the Achilles tendon, which inserts onto the back of the calcaneus (heel bone).

For the purposes of this post, the main action of the gastrocnemius/soleus complex is to plantar flex the ankle. Plantar flexion increases the angle between the shin and the top of the foot, as when pushing off during walking. Thus, a tight gastroc/soleus complex can keep you from getting the heels to the floor in Dog Pose. (The gastrocnemius also flexes the knee).

The tibialis anterior is a muscle on the front of the shin. It originates from the lateral (outside) surface of the tibia and the interosseous membrane (which spans the bones of the lower leg). This muscle inserts onto the inside part of the midfoot (the cuneiform) and the first metatarsal (think of the inner middle part of the foot arch). It acts to dorsiflex the ankle, decreasing the angle between the top of the foot and the shin.

The gastroc/soleus and tibialis anterior muscles form an agonist/antagonist pair; i.e., they have opposite actions. This means that contracting one side helps to relax the other (through reciprocal inhibition). That is why attempting to draw the top of the foot towards the shin helps release the calf and enables you to bring the heel closer to the floor. 

Thanks again for your feedback! Check back for the next post, when we’ll show you a cool tip for stabilizing the ankles once you have the heels down. Oh yes, and be sure to visit us on Facebook for your free poster and e-book. Keep the comments coming. We love ‘em!

Namasté,

Ray and Chris

The Importance of Theory (and Another Cool Tip for Deeper Breathing)

$
0
0
First, I want to thank Ashtanga instructor Robin Feinberg for her comment in which she states: “…‘when the going gets tough, Ashtangis breathe deeper’; ‘as your control and depth of Ujjayi grows, so grows your practice’; and to quote Sri K. Pattabhi Jois, ‘Ashtanga yoga is 99% practice, 1% theory. Practice and all is coming.’”…

I would like to focus on the theory part of Master Jois’ iconic statement, because it is theory that informs practice. As I mentioned in the last post, for a scientific principle to be valid, it has to be reproducible by other scientists. Now, take a moment and look at our Facebook page. Go to the “people who like this” section and look at the awesome pictures of yoga on display. Some of the most amazing are Ashtanga practitioners—from all over the world. This is clear evidence of sound theory informing a practice. Master Iyengar’s alignment principles have a similar scientific foundation. Aligning the joints maximizes joint congruency. This decreases the incidence of joint reaction forces being concentrated over a small region of cartilage and helps to prevent injuries in yoga. The same goes for his advice on pranayama (see below).

BTW, I searched Pubmed and found some scientific articles that support the safety and efficacy of deep breathing techniques, especially for the management of hypertension (high blood pressure). I share them with you here. The first discusses the beneficial effects of exercise and respiratory training for patients with severe pulmonary hypertension. The authors conclude, “This study indicates thatexercise and respiratory training as add-on to medical treatment may improve exercise capacity and QoL (quality of life), and that they have a good long-term safety…” The next concludes that “Respiratory retraining using the slow breathing technique appears to be a useful adjunctive for cardio respiratory control in hypertensive patients. The third is entitled “Breathing Control Lowers Blood Pressure” (‘nuff said). You can click through the links to read the full articles. So, we're beginning to see confirmation of practices the yogis have been doing for some time now—exciting stuff! 

Bear in mind that anything as powerful as pranayama can also have adverse effects if practiced recklessly. You can find details of these effects and how to avoid them in B.K.S. Iyengar’s Light on Pranayama (the bible for pranayama). I also had the privilege to discuss my personal experience of some of these effects with Yogacharya Iyengar himself (trembling, salivation, headache). He gave me this pearl: “If you feel these effects, stop for the day. If you don’t feel them, continue on with your practice.”

On to the Tip . . .

Another way to validate a theory is with a concept known as portability. In general, something that works in one lab should work in another (or it is suspect). What does this have to do with yoga? Sound biomechanical theories, such as PNF and reciprocal inhibition, can be incorporated into whatever style you practice and transported across muscle groups as well. On a smaller scale, something that expands the chest in one pose should work to enable a deeper breath in another pose.

Using the accessory muscles of breathing
to expand the chest in Dandasana.
Let’s apply the concept of portability to our practice. Try the cue for activating the accessory muscles of breathing that we illustrated in Tadasana (see “A Cool Tip for Deeper Breathing in Yoga”) and apply it in Dandasana. As you inhale, engage the triceps to extend the elbows and press your hands into the mat. Draw the shoulder blades towards the midline with the rhomboids and middle trapezius and then attempt to drag the hands apart to activate the serratus anterior. Feel how this expands your chest. Release during your exhalation. Refer here for the anatomy particulars on these muscles—they work the same in this as in other poses (an example of portability). Take a look at our free e-book to see how you can use portability for other biomechanical principles, such as reciprocal inhibition and PNF.

Cool, so I’m on to my practice. Check back next week for some info on agonist/antagonist relationships. Be sure to visit us on Facebook for your free e-book and poster.

Namasté,

 Ray

How to Balance Opposites in the Foot and Ankle

$
0
0
I think that one of the keys to a unified theory lies in the name Hatha—sun/moon and balancing opposites. Here’s a tip on balancing them for the foot and ankle.

First, the Anatomy . . .

Peroneus longus (and brevis in light blue).
The peroneus longus originates from the head and upper two thirds of the fibula. It then runs down the outside of the lower leg and under the foot to insert onto the medial cuneiform and base of the first metatarsal at the inside of the foot arch. It acts to evert the foot, plantar flex the ankle, and support the transverse arch of the foot. The peroneus brevis originates from the lower half of the outside of the fibula and inserts onto the base of the fifth metatarsal (on the outer edge of the foot). It acts to evert the ankle (and assists in plantar flexing the ankle).

Tibialis posterior.
The tibialis posterior originates from the back of the upper tibia and fibula and also from the interosseous membrane that spans the two bones.  It wraps around the inside of the ankle behind the medial malleolus to the undersurface of the foot to insert onto the navicular, cuneiforms, cuboid. A fibrous expansion extends its insertion onto the bases of the second, third, and fourth metatarsals. Think “the midfoot” and use the image for reference. The tibialis posterior inverts (supinates) the foot and assists in plantar flexion of the ankle. It supports the transverse and longitudinal arches and is considered to be a key stabilizing muscle of the lower leg (by virtue of spanning between the length of the tibia and fibula).


Tibialis posterior, peroneus longus, and brevis insertions (underfoot).
Here are the Cues . . .

After you have engaged the tibiali anterior to release the gastroc/soleus muscles and lower the heels towards the floor (as described in a previous post), gently engage the peroneus longus and brevis by pressing the ball of the foot into the mat. Then activate the tibialis posterior to distribute the weight across the foot to the outer edge. Place the fleshy parts of the toes onto the mat. I will sometimes  engage the peroneii before I draw the heels to the floor. Then I activate the tibiali anterior to bring the heels down. I finish up with the tibialis posterior to spread the weight across the bottoms of the feet and dynamize the arches. Feel how this stabilizes the feet and ankles.

Remember about portability of techniques between asanas. Once you get a feeling for this in Dog Pose, try it in Trikonasana and other standing poses.

Check back for the next post where I’ll illustrate how to move this balancing of forces up through the knees and into the hips to strengthen the muscles of the thighs and align the knees. Be sure to visit us on Facebook for your free poster and e-book!!

Namasté,
Ray and Chris

Strong Thigh Muscles Benefit People with Knee Osteoarthritis (and a Tip for Engaging the TFL)

$
0
0
A series of recent articles from opinion leaders in the academic medical community have demonstrated the benefits of quad strength for persons with arthritis of the knee joint. One of these studies, which used MRI to directly assess knee cartilage, is particularly important because it sheds new light on an older study—that did not use MRI—that suggested stronger quads were associated with a slightly greater risk of arthritis progression in persons with malaligned knees. Here’s a quote from the Mayo Clinic article, which was published in the December 2008 issue of Arthritis & Rheumatism:

“In summary, in men and women with symptomatic knee OA [osteoarthritis], we found no association between quadriceps strength and cartilage loss at the tibiofemoral joint, including in malaligned knees. However, greater quadriceps strength, which may prevent lateral offset and tilt of the patella, protected against cartilage loss at the lateral compartment of the patellofemoral joint, a frequent site of symptom generation in knee OA. Subjects with greater quadriceps strength were also more likely to have less knee pain and better physical function. Our results suggest that strong quadriceps muscles have an overall beneficial effect on knee OA.”1 For Science Daily’s composite of this article, click here.
Also, see Mayo Clinic researcher Dr. Amin’s comments at The American College of Rheumatology Annual Meeting on Nov. 15, 2006:

“A stronger quadriceps muscle helps keep the patella from moving laterally and tracking abnormally with movement... Our study results emphasize that it’s important to encourage people with knee osteoarthritis to maintain strong quadriceps muscles as recommended by their physician.”

These quotes are linked to the Science Daily summaries of the research. This is an excellent online publication you can use to stay current on scientific developments. They have a lot of integrity in their reporting and also provide full citations and links to the articles they summarize, as I do here for Dr. Amin’s study.

So, current evidence demonstrates that quad strength is not associated with increased cartilage wear—even in malaligned knees. In fact, it appears to protect against it for part of the patellofemoral joint (where the kneecap articulates with the femur). This is one reason I recommend using up-to-date articles from reliable sources like those referenced here to expand your knowledge base. Sound theory informs good practice and teaching.

The flip side is that unsound theory misinforms practice and teaching. For example, if you were to subscribe to the falsehood that people with strong quads and misaligned kneecaps experience rapid progression of the disease—as some are now advocating for yoga—you might discourage your students from using these muscles in their poses. Then you would deny those same students the benefits of strengthening the quads, especially those with arthritis. You might also lose out on aligning the kneecap and reciprocal inhibition of the hamstrings. I’ll go over the importance of integrity in reporting on matters of health and a number of other key points about the knee in a five-part exclusive I’m preparing for the respected Yoga and Health Magazine. Stay tuned . . .

On to the Tip . . .

We’ve gone over the benefits of engaging the quads in a number of posts. These include reciprocal inhibition of the hamstrings, which helps to release the muscles and protect against symptoms of overstretching. Contracting the quads also strengthens them, with the benefits outlined above. Finally, these muscles and their synergists align the bones of the leg and maintain congruency of the knee joint, thus protecting the cartilage. The tensor fascia lata is one of the synergists that can be used to help stabilize the knee.


First, the Anatomy...

The tensor fascia lata can be used as a synergist of the quads for knee extension. This muscle originates from the outer surface of the front of the iliac crest and the anterior superior iliac spine. It inserts onto the fascia lata (iliotibial band). This fibrous band of tissue runs down the lateral thigh and attaches at the upper outer surface of the tibia onto Gerdy’s tubercle (a small protrusion of bone). The TFL acts to flex, abduct, and internally rotate the hip. When you engage it, this also tenses the fascia lata, hence it’s name—TFL. This tensing action is then transmitted to the insertion of the fascia lata on the tibia, aiding to stabilize and refine knee extension.

Here's the Cue...

Using the quadriceps and TFL in Dog Pose.
Warm up first with four or five Sun Salutations to acclimate the stretch receptors of the hamstrings and other muscles that lengthen in Down Dog. Use the tips we have provided in the previous posts to lower the heels and spread the weight evenly across the soles of the feet. Then, keeping your feet fixed on the mat, gently attempt to drag them apart (as shown here). This attempt at abducting the feet engages the TFL and brings added stability to the knee joint. Feel how this also brings kneecaps that are turning outward back to facing directly forward—the optimal position in the pose. This is because engaging the TFL acts to internally rotate the hip joint. Lastly, feel how this cue also refines the hip flexion that is part of the form of Dog Pose. You may recognize this tip from our previous post on nutation. This is yet another example of the "portability" of these techniques that illustrates the interconnectedness of yoga poses.

Thanks for stopping by. Check back for the next post on the big toes and standing forward bends. Also, be sure to visit us on Facebook for your free poster and e-Book!

Namasté,

Ray and Chris

1Shreyasee Amin, Kristin Baker, Jingbo Niu, Margaret Clancy, Joyce Goggins, et al. Quadriceps strength and the risk of cartilage loss and symptom progression in knee osteoarthritis. Arthritis and Rheumatism. Available at: http://goo.gl/o8jEe. Published 30 December 2008.

A Benefit of Using the Big Toes in Yoga

$
0
0
Have you ever noticed how the pelvis seems to drift backwards in standing forward bends, especially Uttanasana? Sometimes you get an assist from a teacher who pushes the pelvis forward from the sacrum to align the hips and leg bones back over the ankles. Oftentimes, however, when they remove this assist, your pelvis drifts back again . . .

Pressing the big toes into the mat
in Uttanasana.
If you’ve had this experience, here’s a cue you can use (for yourself and your students) to align the pelvis and the bones of the lower extremities perpendicular to the floor. As always, warm up with SuryaNamaskaras. Then take Uttanasana. Engage the quadriceps to straighten the knees. This aids to release the hamstrings through reciprocal inhibition and helps to align the bones that form the knee joint. Now press the fleshy part of the big toes firmly into the mat. Feel how this brings the pelvis forward and the legs upright—the desired position of the pose. 

This is an example of balancing opposites in yoga. When you flex forward, the pelvis will naturally drift back a bit to counterbalance the weight of the trunk so that you don’t fall over. This angles the bones of the legs away from perpendicular to the floor. Ideally, you want these bones aligned so that their long axes are perpendicular to the floor—which has several beneficial effects. First, bones have tensile strength that is similar to cast iron and compressive strength similar to reinforced concrete. “Stacking” the bones so that gravity is directed down through the long axis allows you to use this passive bone strength rather than active muscular force to maintain the pose. Second, aligning the bones in this manner more optimally spreads the joint reaction forces evenly across the cartilage of the knee. If you are tilting the leg bones back, these forces are more concentrated at the front of the joint.

Why Does This Work? Physics . . .

The knees, ankles, and toes operate differently than the hips and trunk. Flexing these joints moves the extremity towards the back plane of the body, whereas flexing the hips moves the extremity towards the front plane of the body.

How Can the Small Bones of the Big Toes Accomplish This? Physics . . .

The contractile force of these smaller muscles is magnified by the long lever arm of the leg. The big toes act as a fulcrum to propel the pelvis relatively forward and bring the leg bones upright. Put another way, the pelvis has to come forward to counterbalance the force of the big toe flexors. 

Here’s the Anatomy . . .

The flexors hallucis longus and brevis of the big toe.
The flexor hallucis longus originates from the lower two thirds of the back of the fibula and the interosseous membrane between the tibia and fibula. It inserts onto the base of the distal phalanx of the big toe. This means that it crosses multiple joints, including the ankle, subtalar, and metatarsophalangeal joints—i.e., it is a polyarticular muscle. Accordingly, it can act to flex any of the joints it crosses.

The flexor hallucis brevis originates from the medial and intermediate cuneiform bones and a ligament that runs between the calcaneous and cuboid bones. It then divides into a medial and lateral head. These insert onto the base of the proximal phalanx of the big toe via the medial and lateral sesamoid bones, respectively. (The sesamoid bones are mobile structures embedded in the ligaments). The flexor hallucis brevis acts to flex the metatarsophalangeal joint of the big toe and also supports the longitudinal arch of the foot.


Use Your Big Toe in Other Poses . . .

Using this technique in Ardha Chandrasana.
Try this technique in one-legged asanas like Ardha Chandrasana and these poses. This is another example of the “portability” of scientific principles between the asanas. Combine this tip with the cue for balancing opposites in the foot and ankle. You can also add the technique from our first post on working with the deltoids to deepen Uttanasana. Finally, augment the diaphragm by activating the accessory muscles to breathe deeply in your practice.

Thanks for checking in. Be sure to visit us on Facebook for your free copy of our iconic Chakra poster and free e-book. See you for the next post, when we’ll illustrate an effective way to correct hyperextended joints.

Namasté,

Ray and Chris

A Tip for Helping to Correct Alignment in Hyperextended Elbows and Knees in Yoga

$
0
0
Aligning the bones accesses their inherent strength so that yoga poses ultimately require less muscular effort to maintain. For example, in our last post we gave a tip on using the big toes to correct the tendency for the pelvis to drift back in standing forward bends and one-legged standing poses like Warrior III. This correction brings the leg bones upright and perpendicular to the floor, which better supports the body weight. Aligning the bones in this manner also has the benefit of increasing joint congruency and spreads the joint reaction forces more evenly across the articular cartilage. Conversely, engaging the muscles that align the bones has been demonstrated to have a protective effect on the joint cartilage.

Dog Pose showing the direction of force through hyperextended elbows vs aligned elbows.
Hyperextending the knees or elbows in yoga poses can be disadvantageous because it misdirects the forces that create the form of the asana. For example, if the elbows are hyperextending in Dog Pose, then the force of the hands pushing into the mat is angled inward. Ideally this force should be directed through the long axes of the forearm bones, humerus, and shoulders and then through to the trunk and pelvis. Aligning the bones of the arms helps to create the proper form of Downward Facing Dog. Pressing the body back in this manner then synergizes the stretch of the muscles at the backs of the legs. 


Hyperextending the elbows also has other undesirable effects, such as potentially overstretching the capsule at the front of the joint and concentrating the joint reaction forces abnormally. I will go over the various causes of hyperextended joints in a future post, but for now . . .

Attempt to drag the hands towards each other
to engage the elbow flexors.
On to the Tip . . .

Warm up first with several Surya Namaskaras (Sun Salutations). Then take Dog Pose. Relax the triceps and, with the hands firmly fixed on the mat, gently attempt to drag the palms towards one another. This engages the elbow flexors—the biceps and brachialis muscles—and bends the elbows to counteract hyperextension. Keep the elbow flexors engaged with this cue and then gradually dial in contraction of the triceps to straighten the elbows. The biomechanical term for working in this manner is “co-contraction” or “co-activation.” This concept of simultaneously engaging an agonist/antagonist muscle group is discussed in detail in the Mat Companion series. Click here to see how to use co-contraction to correct hyperextended knees—and a quick tip on using the big toes to refine this action.


Co-contraction of the elbow flexors and extensors.
If you’re teaching this to a student who is hyperextending their elbows, demonstrate the technique first, and then talk them through it. You can also have your student try it with the knees on the floor first—like a modified Child's Pose. This takes the weight off the hands, making the cue a bit easier to access.

A key to integrating these cues into your yoga is to try them once or twice to align the bones in the pose, and then use them again the next time you practice. This trains proprioception and muscle memory so that within a few sessions, practitioners can engage the muscles directly without attempting to drag the hands towards one another. The cue remains as a resource, however, and can be used to refine the movement. This is true for accessing nutation, engaging the tensor fascia lata to stabilize the knees, using the accessorymuscles of breathing to augment the diaphragm, and so on. Once used several times, these techniques become automatic.


Here’s the Anatomy . . .

The biceps brachii muscle has a long and short head. The long head originates from the supraglenoid tubercle of the scapula—a small protrusion of bone at the top of the shoulder socket. The short head originates from the coracoid process of the scapula—a beak-like extension of bone at the front of the shoulder. Both heads combine into a single tendon that inserts onto the radial tuberosity of the radius bone of the forearm. The biceps acts to flex the elbow and supinate the forearm and to flex the shoulder forward. In addition, it acts to adduct and internally rotate the humerus. The long head of the biceps also aids to stabilize the humeral head in the shoulder socket.

The brachialis muscle originates from the distal half of the front of the humerus and inserts onto the ulnar tuberosity, also known as the coronoid (crown-like) process at the front of the elbow. It acts to flex the elbow.

The triceps muscle has three heads. The long head originates from the infraglenoid tuberosity on the bottom part of the shoulder socket. The medial head originates from the back (posterior) part of the humerus, below the radial groove. The lateral head originates from the back part of the humerus above the radial groove.  All three heads combine into a common tendon that inserts onto the olecranon process of the ulna (at the back of the elbow). The tricep
s acts to extend the elbow. The long head also adducts and moves the arm backwards and can aid to stabilize the scapula.

Thanks for stopping by. See you for the next post when we’ll discussa practical application of satya, the second of Patanjali’s five codes of ethical behavior. Also note that volume two of our free interactive e-book will be available with the next post! Be sure to tell your friends about our blog and visit us on Facebook for your free poster and Anatomy for Yoga Tips and Techniques, Volume I e-book.

Namasté,

Ray and Chris

Balancing the Forearms, Wrists, and Hands in Dog Pose

$
0
0
A starting point for combining Western science with yoga lies in the term Ha/Tha. This Sanskrit word means Sun/Moon or Yin/Yang and implies a balancing of energies or forces. Balance creates stillness. Apply this concept in your yoga practice by examining the various forces operating around a given joint in a pose, for example, the feet and ankles in Downward Facing Dog. You can also use it to correct hyperextending knees and elbows.

So, look at the elements that contribute energy or force throughout the body—including gravity and muscular effort—and the transmission of those forces from the muscle-tendon unit to the bones. Focus on those you can consciously affect—contracting and lengthening skeletal muscles, for example. In general, once you have the form of a pose, you want to minimize the muscular effort required to be in the asana and maximize the use of the inherent strength of the bones by aligning them. For an example of this, look at  how to use the big toes to align the bones of the legs in Uttanasana.

What about poses where a particular movement predominates, for example, in Urdhva Dhanurasana where the hip joints are more extended than flexed? Consider a recipe for food.You wouldn’t necessarily use equal portions of salt and pepper to create the final taste. In Urdhva Dhanurasana, contraction of the hip extensors predominates while the hip flexors lengthen. Balance in a pose such as this is the right amount of engagement combined with the right amount of release. All of thisproduces a motor and sensory imprint on the brain and establishes the mind—body “connection” ofyoga.

Now, let’s look at how to use this principle for the forearms, wrists, and hands.

Try This in Downward Facing Dog . . .


Close-up of pronator quadratus and flexor carpi radialis.

Forearm pronators in Dog Pose.
Gently press the mounds at the base of the index fingers into the mat and slightly flex the wrists. This engages the muscles that “pronate” the forearms, or turn the palms to face down—the pronators teres and quadratus and the flexor carpi radialis. Then spread the force evenly across the palms to the little finger sides of the hands. This contracts the muscles that “supinate” the forearms, or turn the palms to face up—the biceps and supinator. Gently attempting to drag the hands towards one another activates the biceps. You can refine supination by extending the thumbs up and away from the mat for a moment and then laying them back down. This engages the extensor pollicis longus. Feel how these actions balance the energies of the forearms, wrists, and hands. Try this concept in other poses such as Adho Mukha Vrksasana and Urdhva Dhanurasana.


Close-up of biceps brachii and supinator. 

Forearm supinators in Dog Pose.


To read about the anatomy and see this in Full Arm Balance and Urdhva Dhanurasana, go here.

Thanks for stopping by. See you for the next post when we’ll discusshow to use the wrist flexors in Dog Pose and also release volume two of our free interactive eBook.  Be sure to tell your friends about our blog and visit us on Facebook for your free poster and Anatomy for Yoga Tips and Techniques, Book 1 eBook.

Namasté,

Ray and Chris

Satya, Biomechanics, and Yoga

$
0
0
“One who shows a high degree of right communication will not fail in his actions.” 
(T.K.V. Desikachar’s translation of Yoga Sutra II.36)

Patanjali’s Yoga Sutras have much practical wisdom that can be directly applied to life.In fact, evolution of a civilization (or its destruction) can usually be traced to satya (truthfulness) or asatya (untruthfulness). A similar dynamic exists for an individual’s personal evolution.

Satya and asatya also have practical benefits and consequences for sustainable design of the practice and teaching of yoga, because truth and theory go hand in hand. Base your teaching on sound theory (satya) and the benefits will automatically manifest in your practice.By the same token, if your theory is based on falsehoods (asatya), the benefits won’t manifest. You can see examples of both satya and asatya in our posts on “The Importance of Theory” and “Strong Thigh Muscles Benefit People with Knee Osteoarthritis.”

Satya is also said to be "that which has no distortion." Relating to yoga instruction, this means clarity of expression. Precise cues elicit a predictable response. Vague or distorted cues elicit confusion. And no matter what your personal style of communication, you can always benefit from knowing the biomechanical basis for what you’re teaching.

In my experience, the closer your instructions are to activities that students routinely do or can easily access, the more likely they will understand the techniques and benefit from the session. An example would be a cue for expanding the thorax to deepen the breath. If clearly communicated, this technique will work for most of your students (even if you don’t explain the science behind it). Understanding the anatomy and biomechanics, however, enables you to answer students’ questions about how the body works with direct and credible terminology. Knowing the science behind your instructions builds self-confidence as well as students’ confidence in you as a teacher.

Yoga works with the body and Western science has much wisdom about how the body works. Think of a combination lock in which a sequence of numbers is used to open the lock. The poses and breathing techniques work together in the same way. Combine them properly and the tumblers fall into place; this precipitates a cascade of beneficial physiological and biochemical changes, including an overall sense of well-being.   

To quote Nicolai Bachman’s translation of Sutra II.36: “When established in truthfulness, one can be sure of the results of action.”
Now On To a Tip For Using the Wrist Flexors in Dog Pose . . .

Sometimes you hear an instruction to “lift the elbows” or “lift the wrists” in Dog Pose. Normally, lifting the elbow entails lifting the entire arm in front of you—forward flexion of the shoulder. This is done primarily through the action of the anterior (front) third of the deltoids. Engaging these muscles with the hands fixed on the mat lowers the elbows. To lift the wrists and elbows in Dog Pose, contract the wrist flexors. This stabilizes the wrists and, at the same time, strengthens these flexor muscles.

Here’s aTip for Lifting and Stabilizing the Wrists . . .

Once you have balanced pronation and supination of the forearms, engage the wrist flexors by gently pressing the mounds at the base of the fingers into your mat. Then press the palmar surfaces of the fingers into the floor. Do not actually raise your palms off the mat during this technique. You will feel your wrists lift slightly.

Gently press the mounds at the base of the fingers into the mat.
Next,combine stabilizing the forearms, wrists, and hands with bringing the heels to the floor and stabilizing the feet. If you are practicing Vinyasa Flow, try activating the wrist flexors just before jumping. Feel how this action draws you forward, creating momentum for your jump through. Try this cue in a modified Child's Pose to get a feel for it without weight on the hands. If you have discomfort in the wrists or hands, come out of the pose.

Here’s the Anatomy . . .

Several muscles contribute to flexing the wrist. These include the flexors carpi radialis and ulnaris, the palmaris longus, the flexors digitorum superficialis and profundus, and the flexor pollicis longus. The anatomy is somewhat complex, and it’s not necessary to memorize all of the details to benefit—just remember that these muscles all cross the wrist and thus can flex it.

And For Anatomy Buffs . . .

The flexors carpi radialis and ulnaris and the palmaris longus originate from the medial epicondyle on the inside of the elbow and cross the wrist. The flexor carpi radialis inserts onto the second and third metacarpal bases. The flexor carpi ulnaris inserts onto the pisiform and hamate bones and base of the fifth metacarpal.The palmaris longus inserts onto the flexor retinaculum and palmar aponeurosis.

The flexor digitorum superficialis has three heads: the humeral head originates from the medial epicondyle, the ulnar head originates from the coronoid process, and the radial head originates distal to the radial tuberosity. This muscle then branches out to insert onto the sides of the fingers at the middle phalanx. The flexor digitorum profundus originates from the proximal two thirds of the flexor surface of the ulna and the interosseous membrane. It inserts onto the palmar surface of the distal phalanges.

The flexor pollicis longus originates from the middle part of the anterior surface of the radius and the interosseous membrane and inserts onto the palmar surface of the distal phalanx of the thumb.

Thanks for stopping by. Be sure to download volume two of our free interactive eBook.  Also, don’t forget to tell your friends about our blog and to visit us on Facebook for your free chakra poster.

Namasté,

Ray and Chris

How to Use the Adductor Muscles to Refine Downward Dog

$
0
0
Co-activation in Downward Facing Dog pose.
In our blog post, "Strong Thigh Muscles Benefit People with Knee Osteoarthritis,” we gave a tip for activating the tensor fascia lata in Downward Facing Dog. This synergizes the quadriceps for extending the knees, aids in flexing and internally rotating the hips, and helps to align the kneecaps to face forward. You can further refine alignment in this pose by using the adductors longus and brevis and their synergist, the pectineus. Co-activating these muscles and the TFL balances external and internal rotation of the femurs while at the same time synergizing hip flexion.


First the Anatomy . . .

The adductors longus and brevis originate from the superior and inferior pubic rami, respectively. The longus inserts onto the middle third of the linea aspera, a ridge of bone on the inside of the femur. The brevis inserts onto the upper third of this ridge. Both muscles act to adduct (draw the thighs together), flex, and externally rotate the hip joint. They also stabilize the pelvis.

The pectineus originates from the pectin of the pubis and inserts onto the pectineal line on the inside of the femur, running from the lesser trochanter to the linea aspera. This muscle adducts, flexes, and externally rotates the hip and stabilizes the pelvis.

Adductors longus and brevis
and the pectineus in Utkatasana.
Here’s the Cue . . .

Use Utkatasana to get the hang of isolating the proximal adductor group. Warm up with Surya Namaskara A (do several). Then move to Surya Namaskara B. When you take Utkatasana, on your exhalation, gently press the knees together to contract the adductors longus and brevis and the pectineus. Note how this action becomes progressively refined with each cycle and with each practice session. You should feel more stable in the pose.

Navasana can also be used to gain awareness of the proximal adductors. Squeeze the knees together and feel the muscles contract at the top insides of the thighs. This helps to flex the hips and stabilize the pose. If you’re new to Navasana, try one of the intermediate variations illustrated below and in the Yoga Mat Companion series.

Engaging the adductor group in Utkatasana and Navasana brings awareness and control of these muscles. Once you get a feel for this, contract them directly to refine alignment of the leg bones in Downward Facing Dog. You can apply this same principle in Urdhva Hastasana (Tadasana with the arms raised overhead) and other poses. Click here for details. This is an example of the concept of "portability" of the techniques between poses.

Adductors longus and brevis and the pectineus in Navasana.

Thanks for checking in. We’ll see you for the next post when we go over more details on nutation and stabilizing the pelvis in twists. Be sure to download volume two of our free interactive eBook.  Also, don’t forget to tell your friends about our blog and to visit us on Facebook for your free chakra poster.

Namasté,

Ray and Chris

Shoulder Kinematics in Yoga, Part I

$
0
0
The shoulder is the most mobile joint in the body. It is a combination of several articulations: the glenohumeral, scapulothoracic, sternoclavicular, and acromioclavicular joints (click here to see these). Each of these contributes to shoulder and arm movement via a process known as joint “coupling.” For example, when you raise the arms over the head in Urdhva Hastasana, the clavicle pivots on the sternum (breastbone), the scapula rotates on the chest wall, and the head of the humerus moves within the shoulder joint. All of these work together simultaneously in what is known as scapulohumeral rhythm. In general, 60 degrees of this action comes from movement of the shoulder blade on the chest wall (scapulothoracic motion) and 120 degrees from the ball and socket of the shoulder (glenohumeral motion). During this process, the clavicle rotates on its long axis approximately 25 degrees and the humerus externally rotates about 45 degrees. Scapulohumeral rhythm is illustrated in the video below.


So we can see that the shoulder is a complex structure, with many factors contributing to movement, or potentially restricting it. It’s easier to understand a complex structure by breaking it down into its component parts and then reconstructing them into the whole. This gives a new understanding of their function. For the shoulder, we’ll begin by focusing on the skeletal anatomy of the glenohumeral joint.

Here’s the Anatomy . . .

The glenohumeral joint comprises the humeral head and the glenoid fossa of the scapula, which together form a shallow ball and socket joint. The proximal humerus also has two protuberances to which the muscles of the rotator cuff attach. These are the greater and lesser tuberosities. To see the anatomy of the rotator cuff, click here.

Another important structure of the scapula is the acromion process. This shelf-like projection of bone forms a roof over the top of the glenohumeral joint. It is also the attachment site for the deltoid and part of the trapezius. The subacromial bursa lies between the acromion and the proximal humerus (the humeral head and the greater tuberosity). It is a sac-like structure that facilitates gliding of the greater tuberosity and tendons of the supraspinatus and infraspinatus muscles on the undersurface of the acromion.

                               The greater tuberosity (1)                                             The subacromial bursa (2) and acromion process (3)

This Brings Us To Subacromial Impingement . . .

When the arm is raised, either to the side or in front of the body, the greater tuberosity can “impinge” on the undersurface of the acromion, compressing the subacromial bursa and irritating the supraspinatus tendon.This is most likely to happen if the humerus is internally rotated. Externally rotating the upper arm bone draws the greater tuberosity out of the way of the acromion and aids to prevent impingement. The acromion comes in several different shapes, ranging from flat to curved, with curved acromions being associated with a greater incidence of subacromial impingement.

The first image shows impingement of the subacromial bursa with the humerus internally rotated.
The second image illustrates external rotation of the humeral head preventing impingement 


So What Does This Have To Do With Yoga . . .

The question has been raised as to whether persons with a curved acromion are limited in their ability to perform certain asanas. For example, the inference that appears to have entered the yogic nomenclature is that if you cannot bring your arms vertical in a pose like Urdhva Dhanurasana, you must have a curved (not a flat) acromion. This is incorrect. First, it is well-established through many studies that a curved acromion does not affect the functional range of motion of a healthy shoulder. People with curved acromions can raise their arms overhead just as far as those with a flat acromion. Second, it is impossible to tell the shape of someone’s acromion process by observing them in a yoga pose. Acromial morphology is something that is determined with a specialized X-ray.

So to answer the question, “In a healthy shoulder, do curved acromions affect the ability to raise your arms overhead in a pose such as Urdhva Dhanurasana?” The answer is no. A curved acromion does not affect range of motion in a healthy shoulder and thus is not the reason why someone cannot bring their arms to vertical in Upward Facing Bow. There are many possible explanations for this limitation, including tightness in various muscles or ligaments about the shoulder, but a curved acromion is not one of them.  

How Do We Prevent Impingement?

Now let’s consider how this relates to actual practice. Particularly in Vinyasa, there is a tendency to do the same movement many times, which can lead to repetitive stress injury, such as inflammation of the subacromial bursa and supraspinatus tendon—“rotator cuff syndrome” in the orthopedic nomenclature.  You can help to avoid this by engaging the infraspinatus and teres minor muscles and, to a lesser extent, the posterior third of the deltoid. These muscles act to externally rotate the humerus and bring the greater tuberosity away from the undersurface of the acromion. We illustrate this movement here in Urdhva Hastasana. To read about the anatomy and to see this concept in action in Dog Pose and Full Arm Balance, click here.

Thanks for checking in. We’ll see you for the next post when we go over the muscles that move and stabilize the scapula. Be sure to download volume two of our free interactive eBookAlso, don’t forget to tell your friends about our blog and to visit us on Facebook for your free chakra poster.

Namasté,

Ray and Chris 

Shoulder Kinematics in Yoga Part II: The Lower Trapezius and Serratus Anterior

$
0
0
Our last blog post used a video to illustrate shoulder kinematics in 3D and reviewed how to externally rotate the humerus to protect against impingement. This week we look at the scapular motion on the ribcage and the role of the lower third of the trapezius in drawing the shoulders away from the neck. This motion is called scapular depression,and it is frequently used in yoga, especially when the arms are overhead. Scapular depression helps to maintain freedom of movement in the cervical spine, either to lift the head and look up (in Urdhva Hastasana) or to relax the head down (as in Dog Pose).

Here’s the Anatomy . . .

When you raise the arms overhead, the scapulae elevate, protract, and rotate. This is through the action of several muscles, including the upper trapezius and the levator scapulae. Scapular rotation occurs through sequential actions of the upper, middle, and lower thirds of the trapezius and the serratus anterior. Protraction is mainly through the work of the serratus anterior.

Now, let’s focus on the lower third of the trapezius and its interaction with the serratus anterior when the arms are overhead. This part of the trapezius both depresses and retracts the scapulae. Thus, you can use it to draw the shoulders away from the neck and towards the midline. Retraction opposes the action of the serratus anterior in drawing the scapulae away from the midline. So combining these movements aids to stabilize the shoulder blades. Once the scapulae are fixed in place, the pull of the serratus anterior can be directed to expanding the thorax. In this manner, the serratus anterior becomes an accessory muscle of breathing and augments the diaphragm for inhalation.

Now the Cue . . .

It is fairly easy to depress and adduct the scapulae. Do this by drawing the shoulders down the back and towards the midline. Activating the serratus anterior to expand the thorax requires more training, but it can be learned quickly using the tips illustrated in Dandasana and Tadasana. Once you get the hang of engaging this muscle, use it to expand the chest while drawing the shoulders away from the neck. Try this first in Urdhva Hastasana, as shown. When you’re comfortable with drawing the shoulders down and expanding the chest in this pose, try it in Downward Facing Dog. Then combine these actions with engaging the wrist flexors and balancing the forearms. Click here to learn more about the anatomy and how to use this technique in Full Arm Balance as well.


Thanks for stopping by. Check back next week for Part III of Shoulder Kinematics in Yoga, in which we’ll discuss a pathological condition of the shoulder. Be sure to download volume two of our free interactive eBook. Also, don’t forget to tell your friends about our blog and to visit us on Facebook for your free chakra poster.

Namasté,

Ray and Chris

Using the TFL to Refine Utthita Parsvakonasana

$
0
0
Many of the standing poses have a lunge component; that is, the forward hip and knee flex while the back hip and knee extend. It is not unusual in these types of asanas for the forward knee to drift inward, with the pelvis moving in the opposite direction. An example of this is Utthita Parsvakonasana (Extended Lateral Angle Pose).

Positioning the knee over the ankle aligns the leg bones, especially the femur and tibia. This brings the anatomic and mechanical axes closer together, so that support in the pose is derived more from the strength of the bones than from muscular effort. Additionally, allowing the knee to drift inward can place stress on the lateral compartment of the joint. Adjusting the position of the femur and the tibia aids to distribute the joint reaction forces over a greater surface area.

Click for larger image.
Here’s the Anatomy . . . 

The tensor fascia lata (TFL) originates from the front part of the outer surface of the iliac crest and the anterior superior iliac spine. It inserts onto the fascia lata (iliotibial band). The fascia lata continues down the thigh to insert onto the front outside of the upper tibia at Gerdy’s tubercle. The TFL abducts, flexes, and internally rotates the hip joint. It can also synergize the quadriceps to extend the knee when it is flexing less than 30 degrees. If the knee is flexing greater than 30 degrees, then the TFL can act as a knee flexor.


Here’s the Cue

Click for larger image.
In my personal practice, I achieve this alignment by engaging the tensor fascia lata on the bent leg. To activate this muscle I straighten the elbow and then gently press the outside of the knee against the arm, as shown. This abducts the thigh at the hip joint. Because the arm keeps the knee from moving backwards, the abduction component of the TFL has the biomechanical effect of drawing the pelvis forward. This helps to open the front of the body in the asana. Additionally, activating the tensor fascia lata synergizes the psoas in flexing the hip and tilting the pelvis. Tilting the pelvis forward in this manner laterally flexes the trunk and helps to turn the torso efficiently in the pose. The gluteus minimus, gluteus medius, and gluteus maximus muscles all contribute to these actions.

I follow-up contracting the TFL with gently engaging the back-leg gluteus maximus to extend and externally rotate the hip. These combined movements aid to stabilize the pelvis and lengthen the adductor muscles.


Click here to see the TFL in action in Downward Facing Dog.

Practicing with cues that engage muscle groups enhances the mind—body connection created by the pose. I use Tadasana as a barometer to gauge this awakening by returning to it between the individual asanas.

Always, in your particular case, consult your health care provider before practicing yoga or any other exercise program. Always practice yoga under the direct supervision of a qualified instructor. See full disclaimer here.

Thanks for stopping by. Check back next week when we'll go over working with the TFL and its contributors in other poses. Be sure to download our free interactive eBook. Also, don’t forget to tell your friends about our blog and to visit us on Facebook for your free chakra poster (we ask that you pay shipping and handling :)).

Namasté,

Ray and Chris

Balancing Freedom and Restraint in Yoga

$
0
0
The work of legendary furniture designers Charles and Ray Eames has been described as a balance of freedom and restraint.  Mr. Eames was once asked: “Have you ever been forced to accept compromises?” He responded: “I don’t remember ever being forced to accept compromises, but I have willingly accepted constraints.”

Practicing yoga also involves working within constraints--those of the general form of the human body and also our personal limitations. Yoga balances freedom and restraint.

Knowledge of the body shows us where to expand and where to restrict movement. It also allows us to design a practice to fit our individual needs. That’s why working with a modified version of a particular pose is not a compromise—it’s accepting constraints. I don’t abandon a beneficial asana simply because it’s difficult. Rather, I use awareness of my limitations as a guide for determining how to work in the pose.

For example, if I’m working towards Lotus Pose, I apply biomechanics and physiological reflex arcs to gain freedom of movement in the hips while at the same time using the muscular stabilizers and my hands to ensure congruency of the knee as a hinge. This is an example of balancing freedom with restraint. Since we also benefit from preparing the body for a pose, the journey itself becomes the reward.


Always, in your particular case, consult your health care provider before practicing yoga or any other exercise program. Always practice yoga under the direct supervision of a qualified instructor. See full disclaimer here.

Thanks for stopping by. Check in for our next post, when we'll go over more details on the hip abductors. Be sure to download our free interactive eBook. Also, don’t forget to tell your friends about our blog and to visit us on Facebook for your free chakra poster (we ask that you pay shipping and handling :)).

Namasté,

Ray and Chris

1De Pree, Hugh. Business as Usual. Zeeland (MI): Herman Miller; 1986.

Antagonist/Synergist Combinations in Yoga

$
0
0
In this post we explore the relationship between the tensor fascia lata (TFL) and the gluteus maximus. In addition I add a cue for engaging the adductor magnus as a synergist of the gluteus maximus. Knowledge of these relationships can be used to refine and stabilize postures with a lunge component, such as Warrior II.

The "Deltoid" of the Hip . . .

You might think of the TFL as akin to the anterior deltoid of the shoulder in that it flexes and internally rotates the joint. The gluteus maximus is similar to the posterior deltoid in that it extends and externally rotates the articulation. Both muscles can abduct the hip. They are thus antagonists for flexion/extension and rotation and synergists for abduction.

The deltoid of the shoulder and the "deltoid" of the hip.
Click image for larger view.

The gluteus medius and minimus lie between the TFL and the gluteus maximus and are comparable to the central portion of the deltoid. They are abductors and, depending on the position of the hip joint, synergists of the TFL or gluteus maximus. For example, if the hip is flexing and internally rotating, the gluteus medius and minimus synergize the TFL for these actions. If the hip is extending and externally rotating, they synergize the gluteus maximus. For this reason, the combination of the tensor fascia lata and gluteals is sometimes referred to as the “deltoid” of the hip.

The front hip in Warrior II flexes, abducts, and externally rotates. This combination of movements is known as “circumduction” and it involves the contributions of several muscles. The tensor fascia lata and gluteals produce the abduction component. Depending on the position of the joint, each of these muscles has several possible actions which can synergize or oppose one of the other muscle’s actions. Throughout the range of motion of the hip, the TFL and gluteus maximus form an antagonist/synergist pair.


Here’s the Cue . . . 

In Warriors I and II, I bring the front knee in line with the hip and ankle and then gently press the sole of the foot into the mat. This activates the TFL and gluteus maximus, respectively (the quadriceps also engage). Press the back foot into the mat to stabilize it and then gently attempt to drag it away from the front foot. This acts to extend and abduct the hip and stabilize the pelvis. I balance these cues for the front and back legs and ease back on muscular force as I attain stillness in the pose.

Engaging the gluteus maximus and tensor fascia lata in Warrior II.
Click image for larger view.

Adding the Adductor Magnus…

As an additional refinement, I engage the adductor magnus by gently attempting to drag or “scrub” the back foot inward towards the midline (adducting it). Because the foot is constrained by the mat, the force of this action is transmitted to the origin of the muscle, as shown here. I have found that this cue works especially well in Warrior I for refining the position of the pelvis.

Engaging the back-leg adductor magnus in Warrior I.
Click image for larger view.

The overall effect of these actions is to produce a series of forces that stabilize the asana from the foundation to the core. I get a feel for these cues first by using them in a shallower variation of the pose and build the muscular engagement gradually. This helps with stability and awareness.

Always, in your particular case, consult your health care provider before practicing yoga or any other exercise program. Always practice yoga under the direct supervision of a qualified instructor. See full disclaimer here.

Thanks for stopping by. Check back next week when we'll go over using these techniques in Parivrtta Trikonasana. Be sure to download our free interactive eBook. Also, don’t forget to tell your friends about our blog and to visit us on Facebook for your free chakra poster (we ask that you pay shipping and handling :)).

Namasté,

Ray and Chris

Sitting Up Straight and Expanding the Chest Forward in Sukhasana

$
0
0
Slumping the back and collapsing the chest is a common occurrence in Sukhasana, especially in those who are new to yoga. Factors that can contribute to this posture include fatigue, defeated mental state, and tight muscle groups. Many yoga poses are designed to counteract these factors, Sukhasana being one of them. Sitting up in Easy Cross-Legged Pose aids to bring the spinal column into alignment, so that the vertebral bodies and their discs support the torso; expanding the chest forward enhances breathing. With practice this can lead to a comfortable, easy position that is reflected on the central nervous system—an example of the mind/body connection in yoga.


Here’s the Cue . . .

Place the hands with the palms facing down on the knees in Chin Mudra. Then, while holding onto the knees, attempt to draw the hands back towards the torso. This engages the latissimus dorsi. The hands are constrained, so the force of contracting the latissimus is transmitted to its origin along the midline of the back. The result is what is known in kinesiology as a “closed chain” movement, whereby the origin of the muscle moves (instead of the insertion). Activating the lats in this manner lifts the spine and expands the chest forward. If you tend to hyperextend the lumbar, then engage the abdominals to counteract this. Note the effect.


Slumping tilts the pelvis backwards into retroversion, so that one is sitting on the back part of the ischial tuberosities (the sitting bones). A portion of the latissimus dorsi originates from the back of the iliac crest, so that activating this muscle also tilts the pelvis forward, bringing the sitting bones more upright.

Lats in Tadasana
This technique is portable to other poses. In Tadasana, for example, simply fix the palms against the sides of the hips and attempt to drag them backwards. Note how the chest expands forward and the back straightens. See this concept in action for Sukhasana in the video above.

Here’s the Anatomy . . .

The latissimus dorsi originates from the spinous processes of thoracic vertebrae 6—12, lumbar vertebrae 1—5 (via the thoracolumbar fascia), ribs 9—12, the supraspinous ligament, and the posterior third of the ilium. It inserts onto the intertubercular groove on the humerus and the deep fascia of the arm. The latissimus dorsi extends, adducts, and internally rotates the shoulder (open chain movement). It extends the spine and lifts and tilts the pelvis forward (closed chain movement) and is also an accessory muscle of respiration.

Always, in your particular case, consult your health care provider before practicing yoga or any other exercise program. Always practice yoga under the direct supervision of a qualified instructor. See full disclaimer here.

Thanks for stopping by. Check back for our next post when we’ll give a finishing touch for Dog Pose. Be sure to download one of our free interactive eBooks. Also, don’t forget to tell your friends about our blog and to visit us on Facebook for your free chakra poster (we ask that you pay shipping and handling :) ).

Namasté,

Ray and Chris

Refining the Pelvis in Twisting Standing Poses

$
0
0
Yoga poses are "kinetic keys" that unlock and open the mind/body connection. Precise and accurate renditions of the asanas are more effective for unlocking the doors to the yoga experience. For examle, in a previous blog post we illustrate how to draw the front knee back and the pelvis forward in Utthita Parsvakonasana by pressing the outside of the knee into the arm. This engages the abductor muscles of the hip and brings the pelvis, knee, and ankle into alignment while stabilizing the pose. It also aids to open the front of the body and is an example of using a constraint (the knee against the arm) to create freedom.

Just as the knee tends to drift inward in Utthita Parsvakonasana and  Warrior I and II, so the pelvis tends to drift away from the midline in Parivrtta Trikonasana. In this post we explore connecting the upper and lower extremities while simulaneously engaging the hip abductors to draw the pelvis into an alignment with the legs.

Here’s the Anatomy . . . 

The upper appedicular skeleton is composed of the shoulder girdle and arms. The lower appendicular skeleton comprises the pelvic girdle and legs. The axial skeleton is made up of the pelvic girdle, spine, ribcage, and skull. Consequently, connecting the upper and lower extremities (the hand to the foot or elbow to the knee) can be used to influence the position of the trunk.

Here’s the Cue . . .

Always warm up first to acclimate the stretch receptors within the muscles and lengthen the myofascial connective tissue. I use five Sun Salutations or Surya Namaskaras A, but you can also do several Dog Poses in succession. Then I practice some standing poses that have the pelvis facing forward—such as Trikonasana and Warrior II—followed by an asana that turns the pelvis, such as Warrior I. The psoas awakening series illustrates this concept. Warming up in this manner prepares the body for turning poses like Parivrtta Trikonasana. Get a feel for rotating the trunk by bringing the opposite hand to the knee or lower leg in an intermediate variation of the pose. This connects the upper and lower appendicular skeletons.

Click image for larger view of the oblique abdominals.
Engage the abdominals to turn the torso. This involves activating the lower-side internal oblique and upper-side external oblique muscles. Flex the forward hip by contracting the front-leg psoas and its synergists. The cue I use for this is to gently draw the trunk towards the thigh and imagine lifting the leg towards the trunk. Co-activating the psoas and oblique abdominals flexes the hips and trunk and turns the body from the core. These muscles also work with the erector spinae and quadratus lumborum to stabilize the lumbar spine.

Click image for larger view of the psoas and tensor fascia lata.
With the core muscles engaging, the next step is to gently press the hand against the outer side of the foot, ankle, or knee by contracting the triceps and forearm muscles as shown. At the same time, I press the front foot into the mat and gently attempt to drag it towards the hand. This combination forms a lock between the upper and lower extremities. Because the foot is constrained to the mat, the force of engaging the abductor muscles is transmitted to the pelvis, drawing it towards the midline. Finally, I attempt to drag the back foot towards the midline. My foot won't move, but this cue engages the adductor muscles of the back leg, further drawing the pelvis towards the center of the body.

Click image for larger view of engaging the abductors and adductors.
Always, in your particular case, consult your health care provider before practicing yoga or any other exercise program. Always practice yoga under the direct supervision of a qualified instructor. See full disclaimer here.

Thanks for stopping by. Check in next week when I show a finishing touch that I use for Dog Pose. Be sure to download one of our free interactive eBooks. Also, don’t forget to tell your friends about our blog and to visit us on Facebook for your free chakra poster (we ask that you pay shipping and handling :)).

Namasté,

Ray and Chris

Co-activating the Gluts and Abs in Chaturanga Dandasana

$
0
0
In a previous blog post, we discussed the yogic concept of satya, or truthfulness. On this, the sutras say, “When established in truthfulness, one can be sure of the results of action” (Nicolai Bachman’s translation of Sutra II.36).

I mention this because, during a recent workshop series, the question was posed, “What is the difference between caution and fear?” Participants responded without hesitation that caution stems from knowledge, wisdom, and truth. Conversely, fear and fear-based actions come from a lack of knowledge, wisdom, or truth. In other words, fear is an illusion. Caution enables; fear cripples. Satya succeeds because the generational forces of the universe, in some manner or another, line up behind it. Asatya (untruthfulness) fails because those same forces align against it.

Then, some individuals encourage and manipulate the fear of others (fear mongers). Sociopathic corporations and individuals often resort to this form of asatya when they realize that they lack the ability to compete fairly or are afraid that someone else will gain power; they fear losing control or influence over others, mainly for monetary gain. Consequently, the fear monger acts out of fear and heads down the slippery slope of asatya. For example, they might exaggerate or fabricate scientific data to cast a false light onto something or someone they fear. Ironically, in the process, they often succeed in exposing and encouraging their own fears. An entity exposed for abusing its position of trust by deliberately misleading others will lose that position. That is how the spiritually bankrupt become, simply, bankrupt.

On the other hand, Hatha Yoga is established in truth (satya). Of course it has risks--all physical activities have the risk of causing injury. Hatha Yoga has survived through the millennia because its benefits far outweigh the risks, especially when it is practiced intelligently, using common sense and an accurate knowledge of the body. For example, in an article that appeared in USA Today, which also interviews yoga Master Bikram Choudhury, basketball legend Kareem Abdul Jabbar describes his yoga experience:
"I believe that yoga is one of the reasons that I was able to play as long and as healthy as I did… Yoga is somewhat hard to quantify in terms of benefits because you see them in all the injuries you don't get… For me, I noticed improvement in my posture—that was key for me because I had been having lower back problems... After I started doing yoga positions—asanas—all that changed. My health greatly improved overall."1
Elite athletes do not spend their time cringing in fear over the possibility of injuring themselves during their activities—that would precipitate injuries. They are conscious of the risks and take steps to minimize them through the right dose of caution, scientific training and a sound knowledge of the body. If an injury should arise, they work through it and often emerge stronger. As with Jabbar, many athletes now also include yoga in their training regimen to help reduce the risk of injuries and improve their performance.

Jabbar’s positive experience with yoga and his back problem has also been validated for others in the peer reviewed scientific literature, including a study published in the November 2011 issue of the Annals of Internal Medicine, entitled “Yoga for Chronic Low Back Pain A Randomized Trial2. This study demonstrated the safety and efficacy of yoga for the management of chronic low back pain. A summary of this article is available on the website of the Iyengar Yoga Association of the UK and The British Wheel of Yoga; you can download the full version in PDF format here.

Safety and efficacy of any intervention confirms that it is established in truthfulness or satya. Note that peer reviewed articles do not engage in fear mongering. Neither do they overstate the benefits. Instead, they elucidate the benefits and identify the risks of an intervention through a dispassionate scientific approach. This direct and honest methodology enables us, through further study, to improve the efficacy and find ways to reduce the risks. With this in mind, let’s take a look at the benefits of Chaturanga Dandasana and a tip that can be used to enhance them.
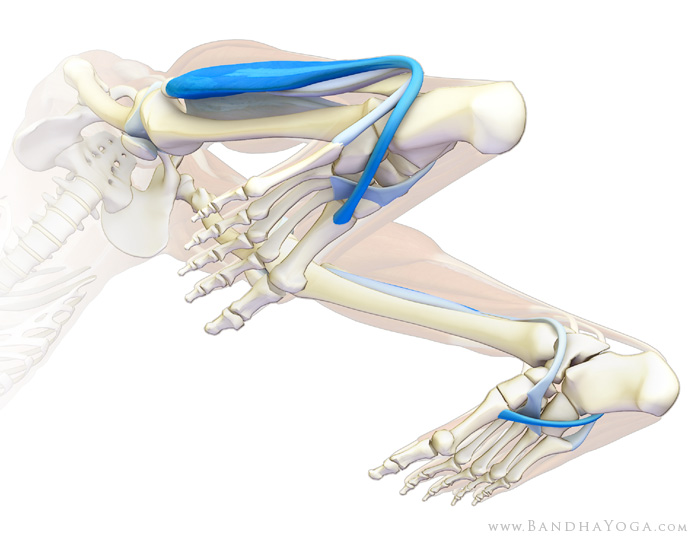
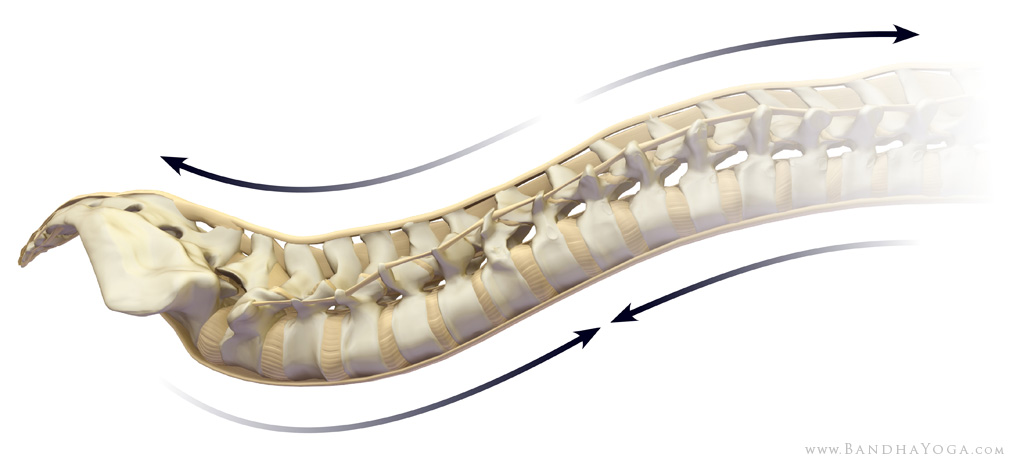
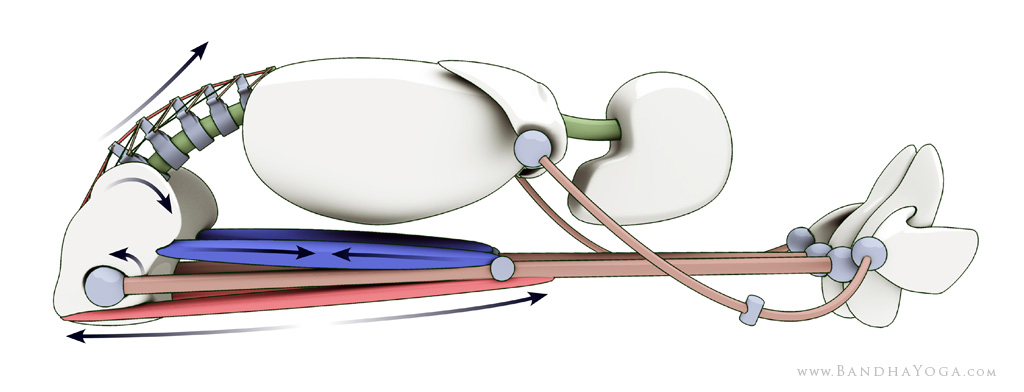
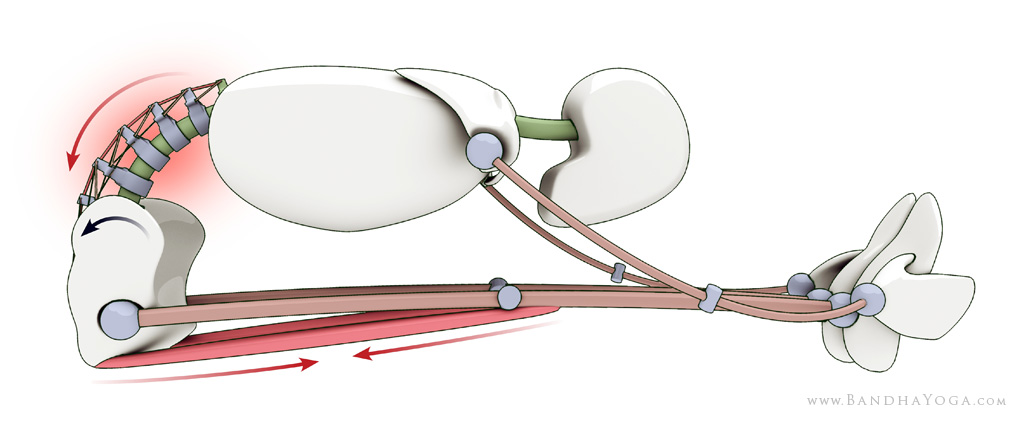
The spine illustrating tension (dorsal) and compression (ventral) relationship.
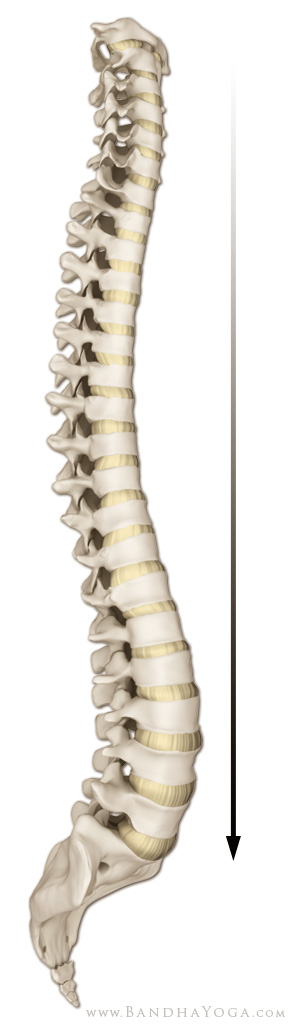
The spine as a weight bearing column.

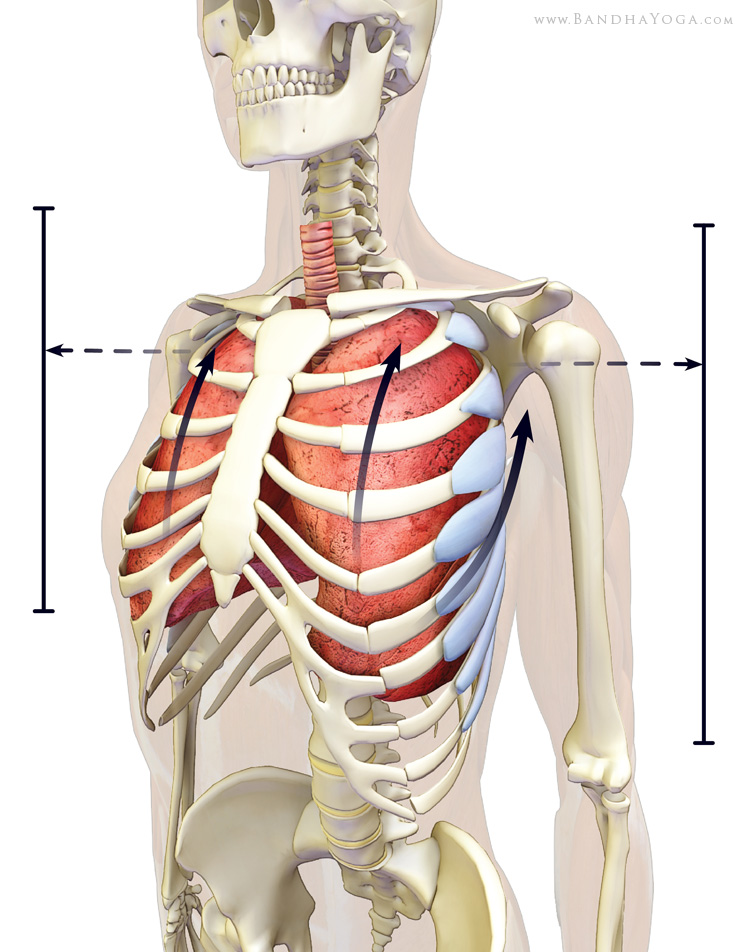
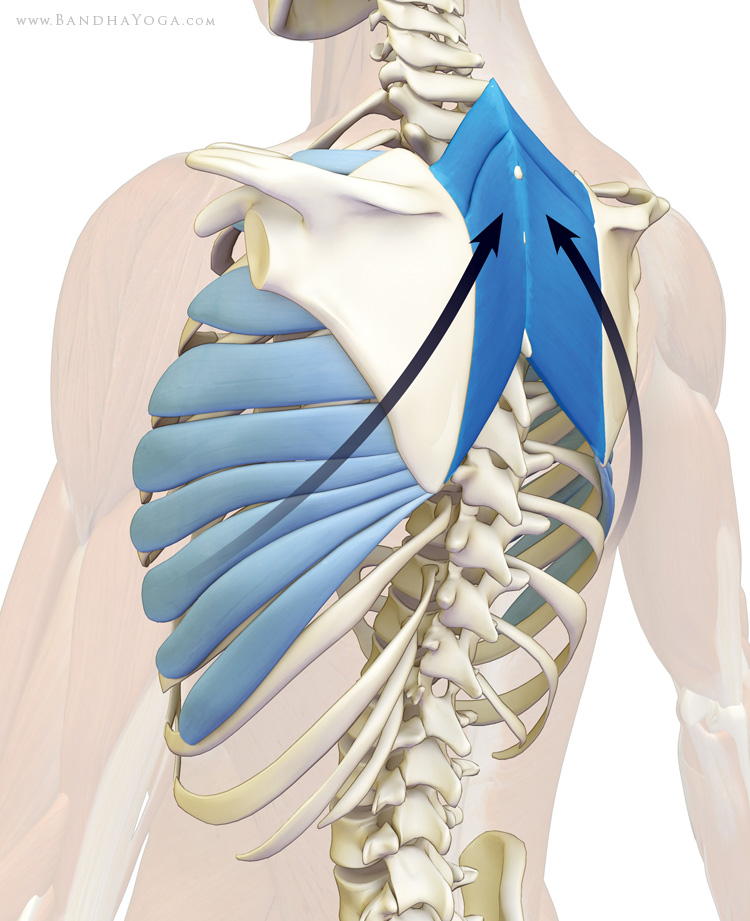
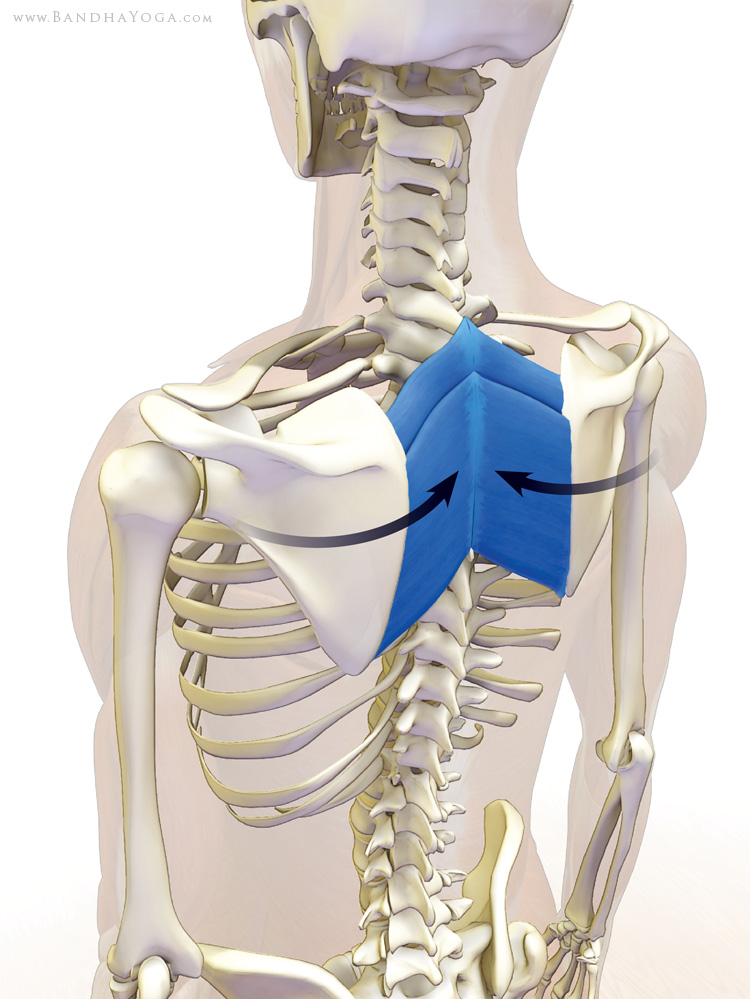
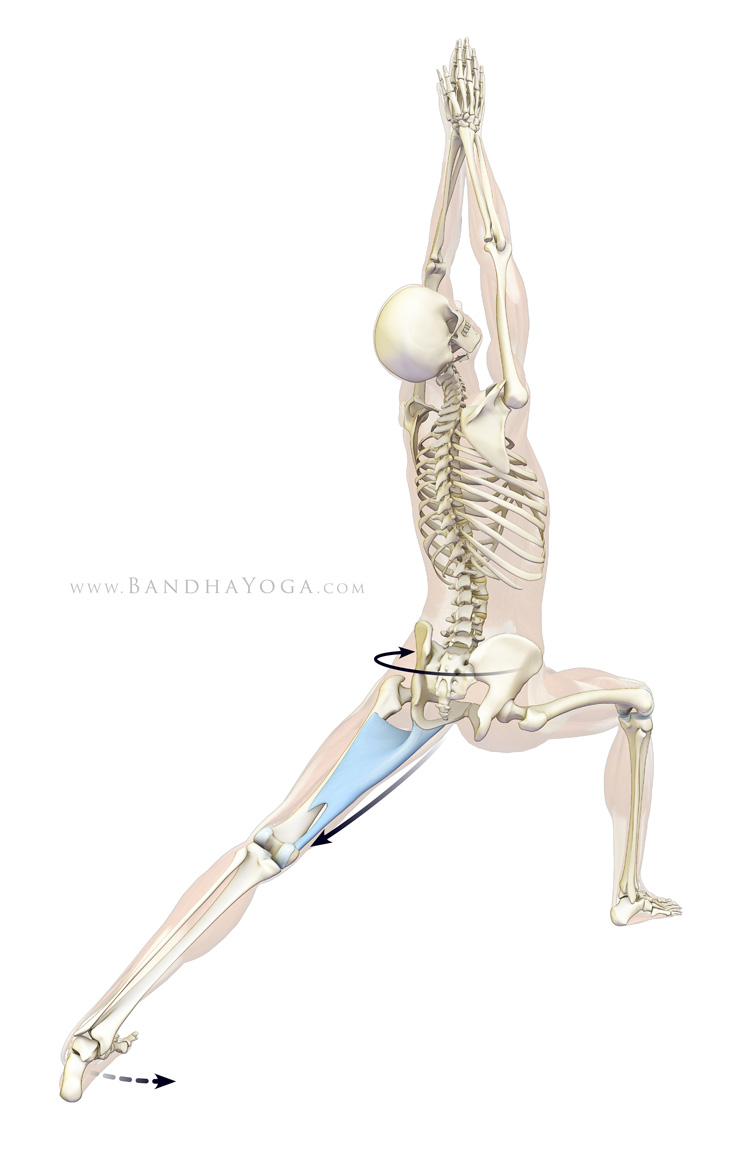
As we evolved from quadrupeds (walking on all fours) to erect bipeds, the spine has transitioned from a suspension bridge type of structure, using tension/compression relationships, to a weight-bearing column. This change exposes the various structures of the spine to different potential stresses. For example, the “sway back” position results from a weak abdominal core. For this reason, back rehabilitation programs always incorporate abdominal strengthening exercises. In other words, conditioning the front helps to protect the back.

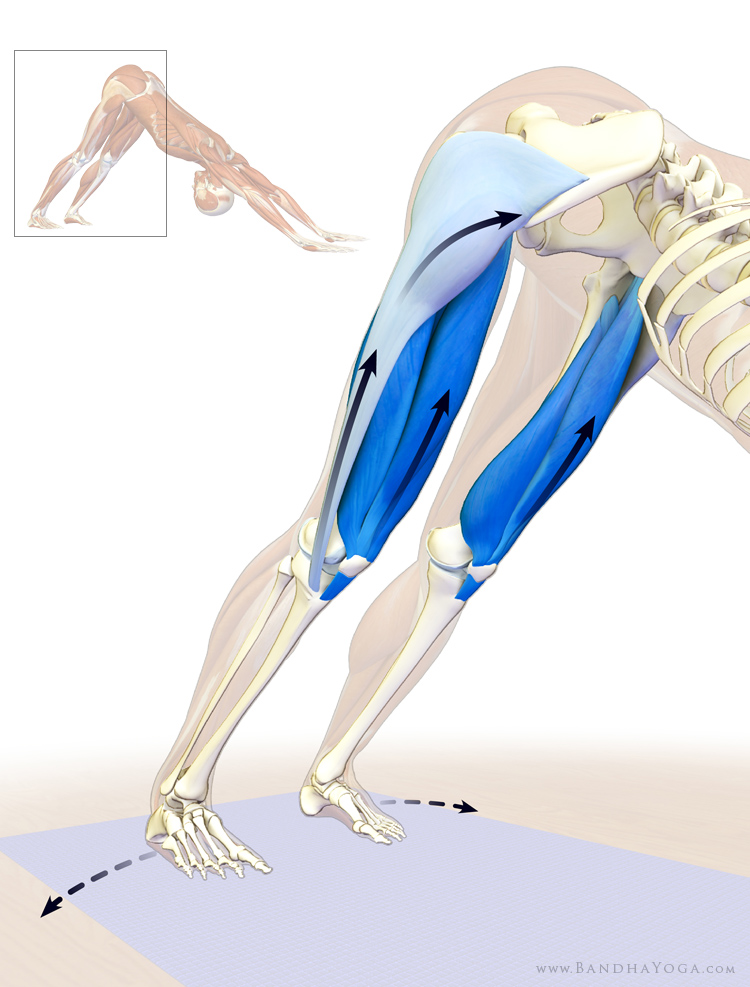
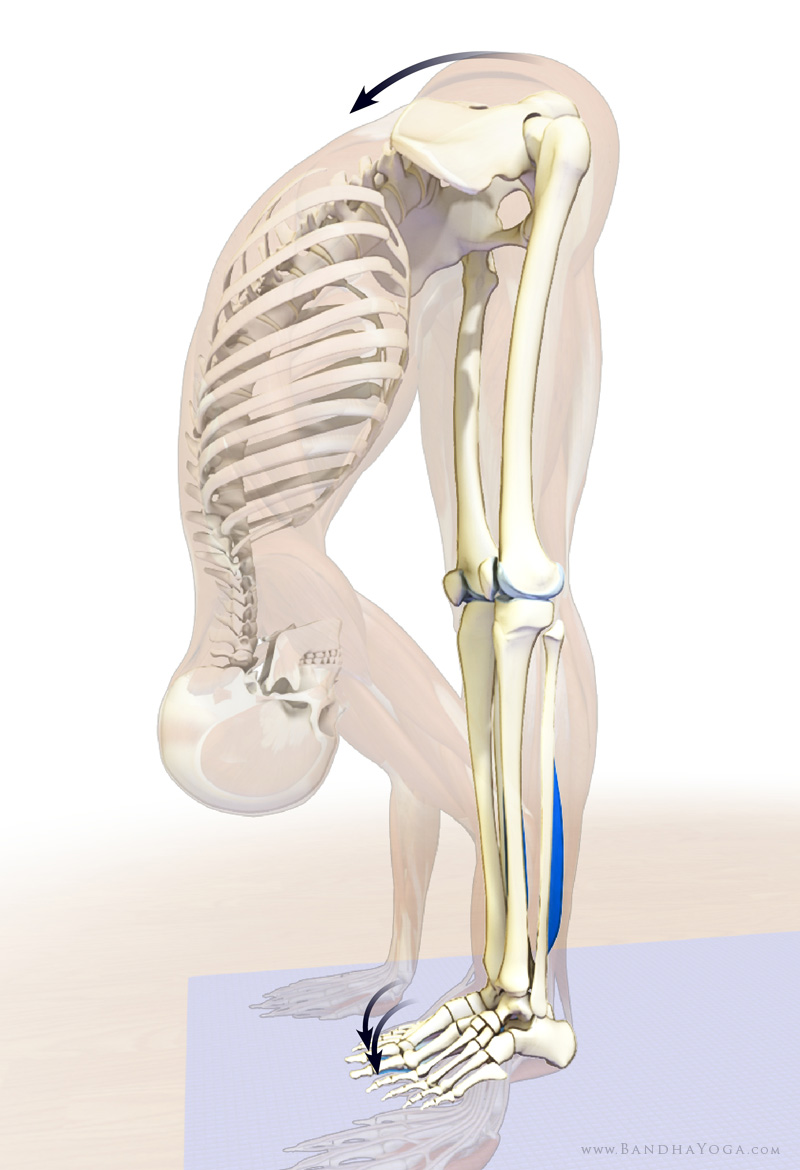
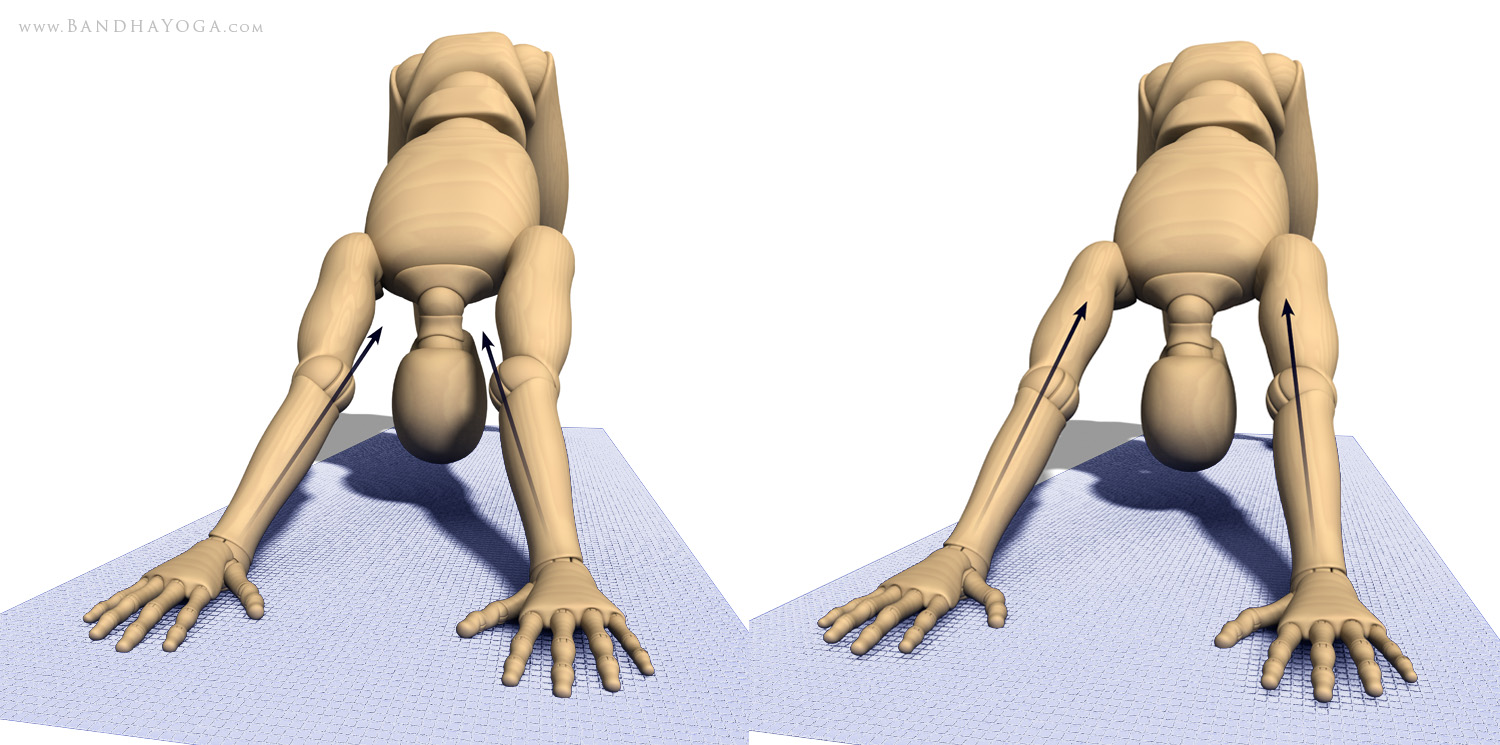
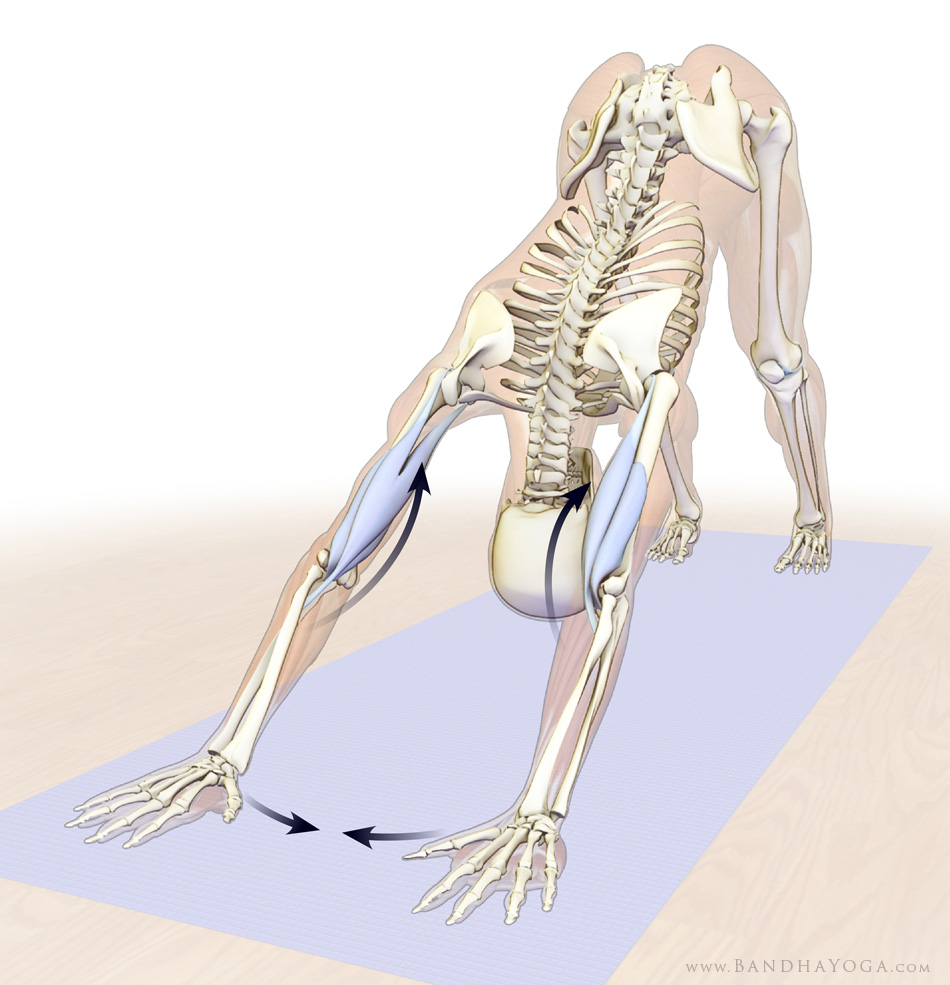
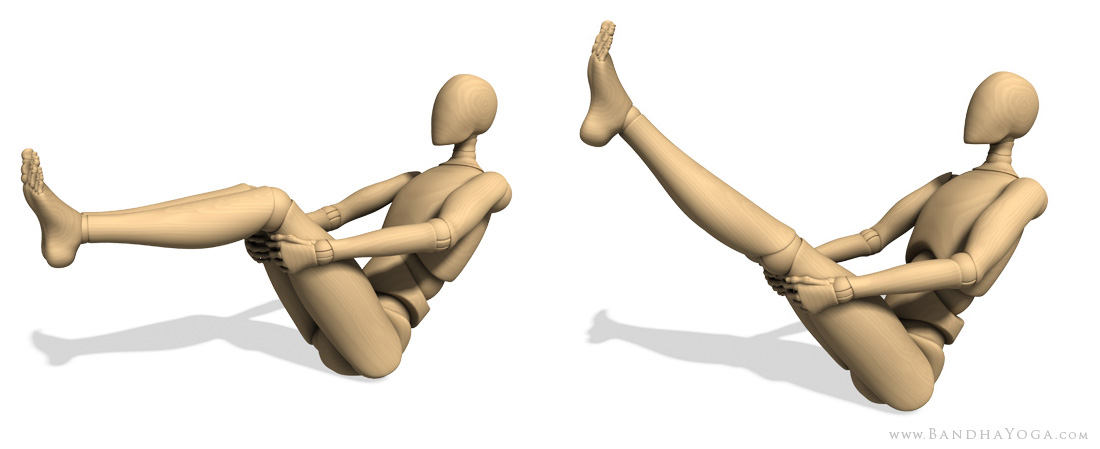
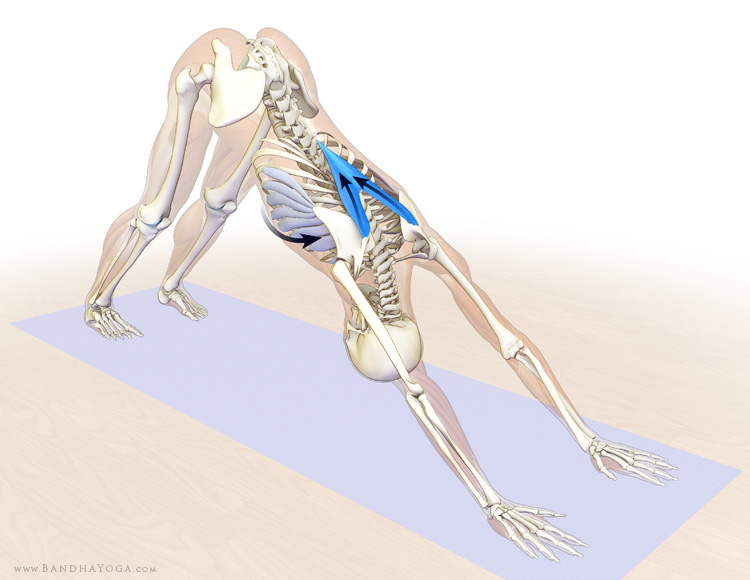
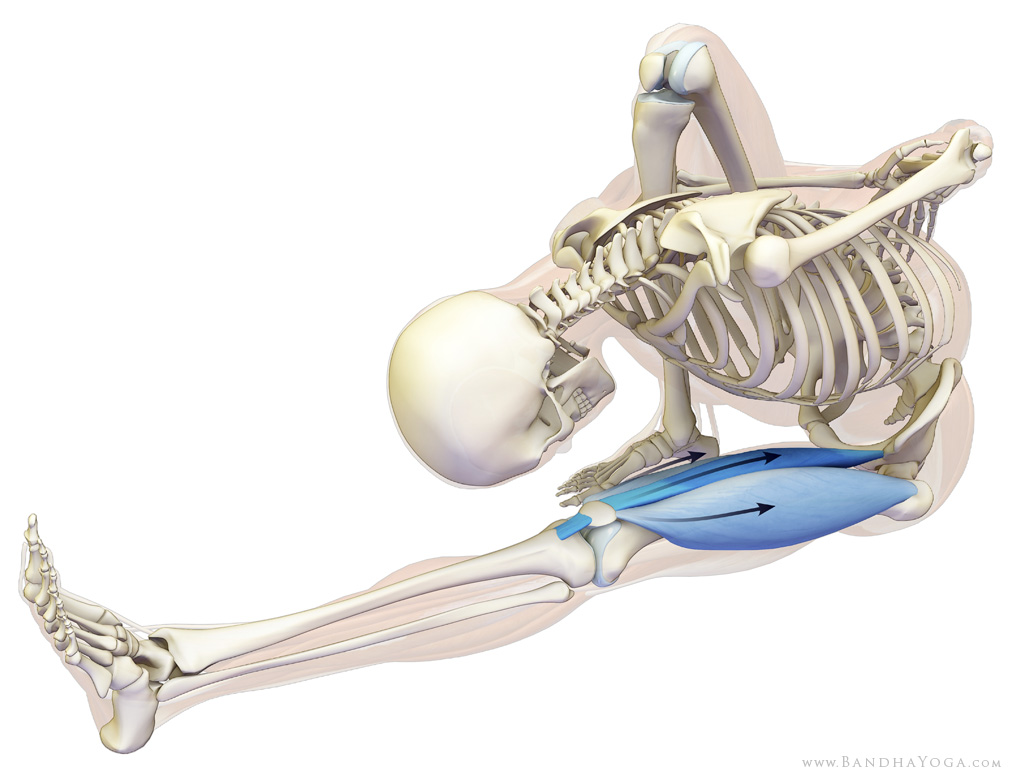
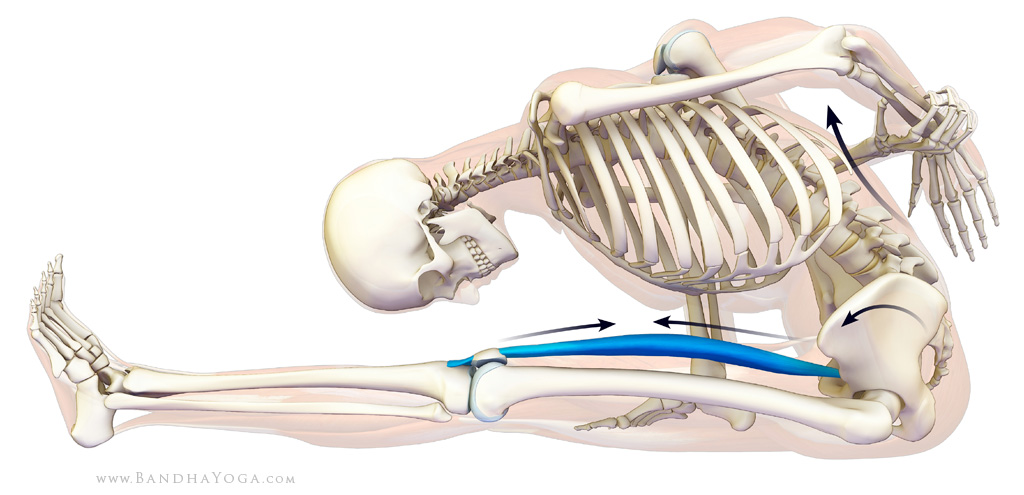
Chaturanga, or its variations, represent an asana that can be used to develop and condition the abdominals and to stabilize the lumbar spine. Practiced properly, it reproduces the quadruped position and temporarily relieves the biped stress on the spine. At the same time, it strengthens the abdominal core.

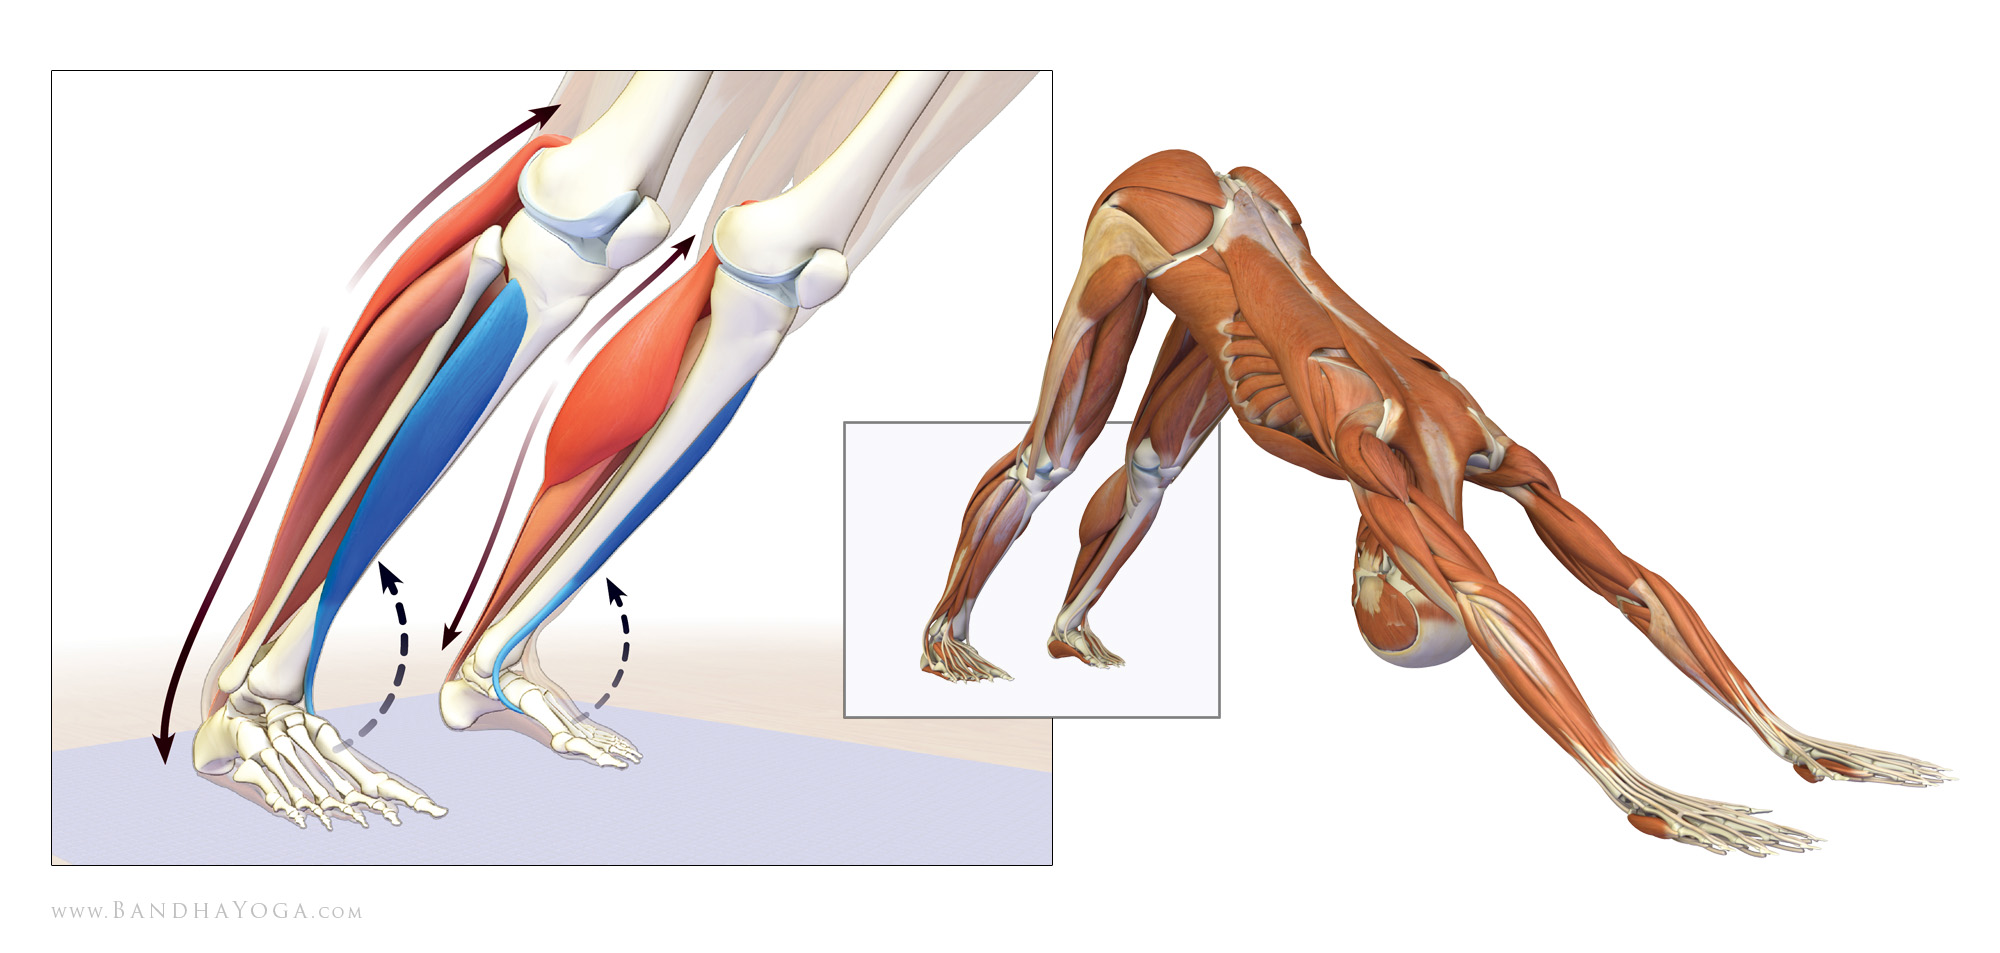
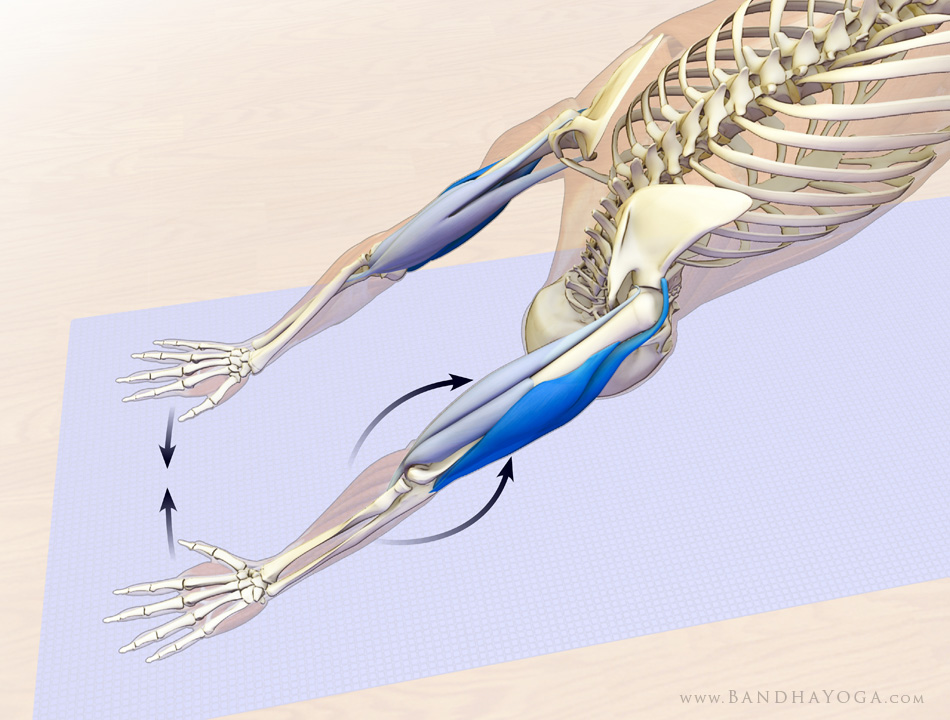
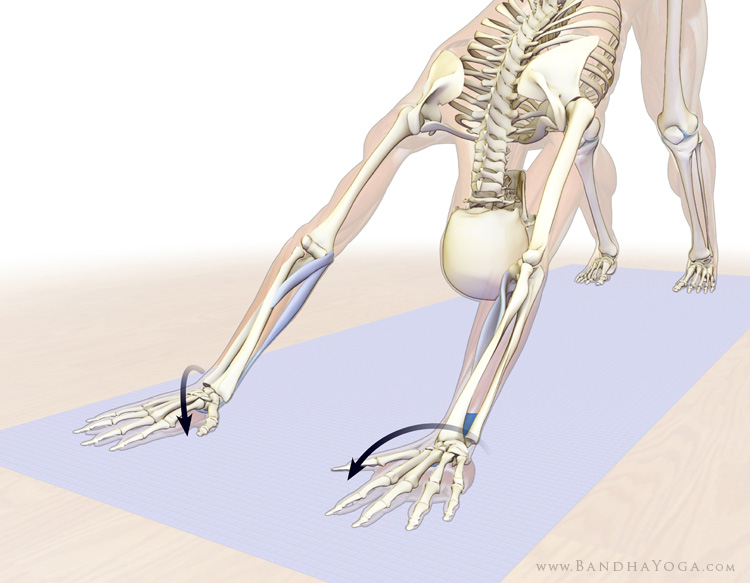
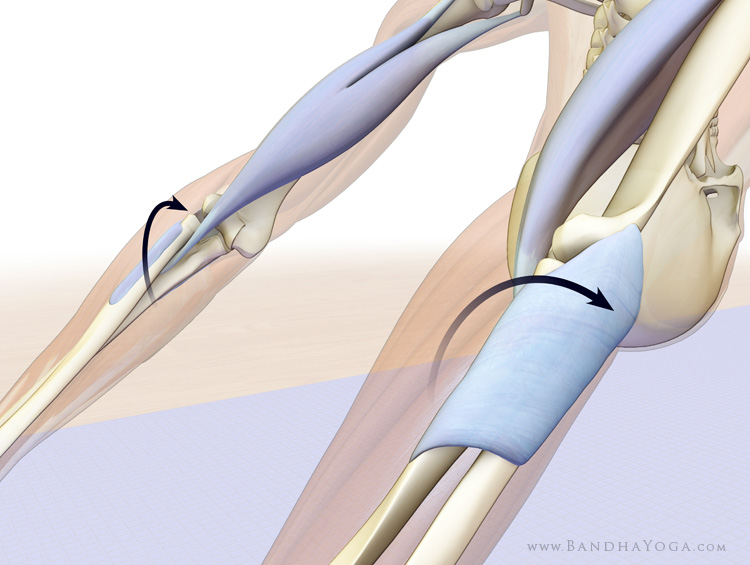
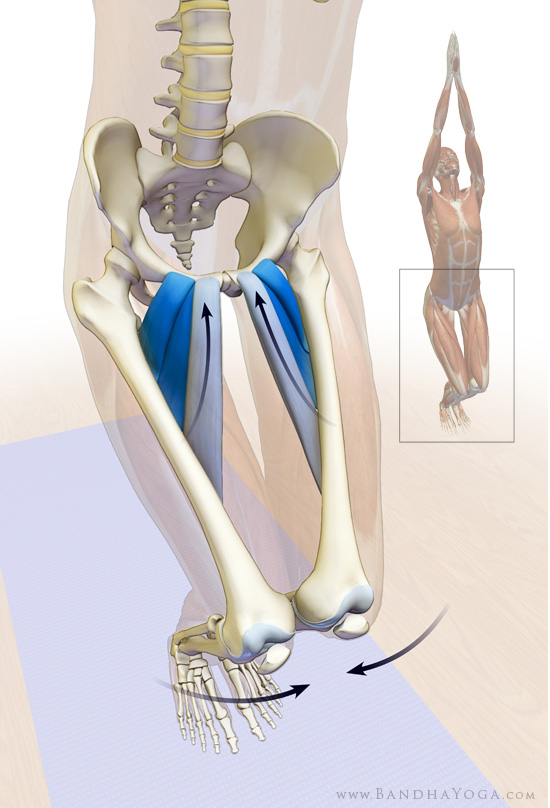
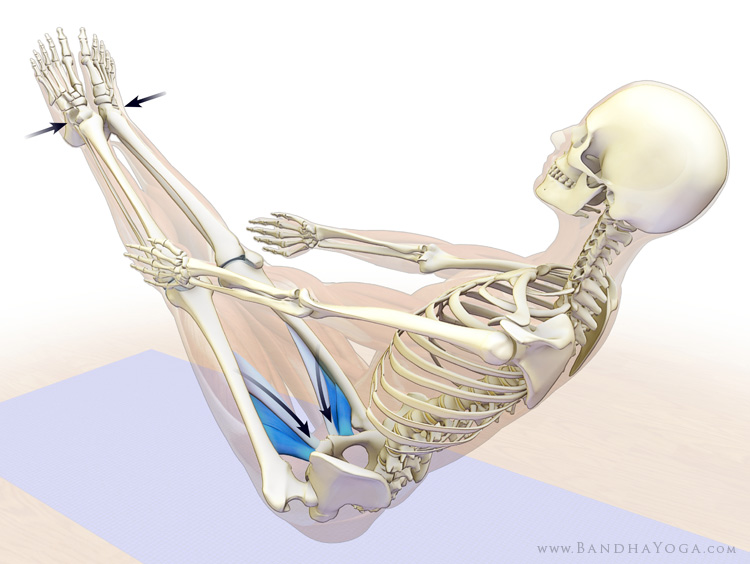
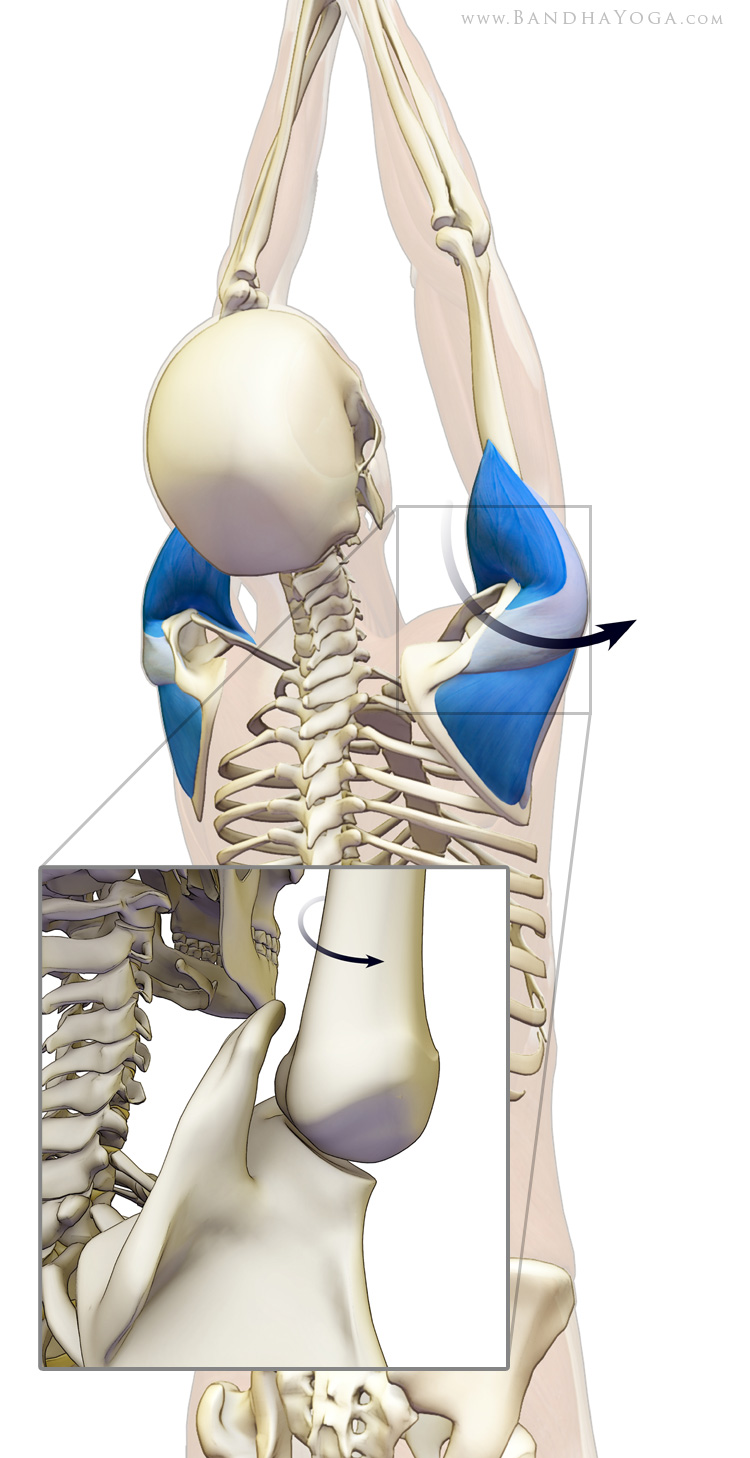
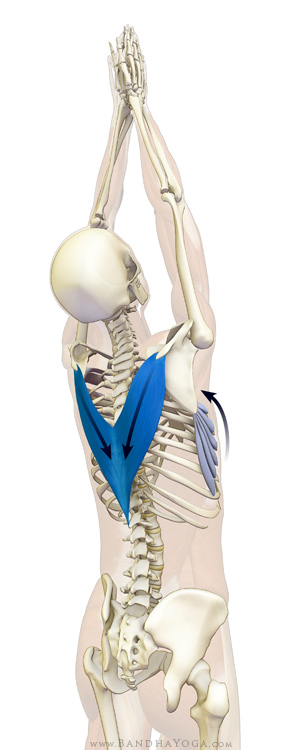
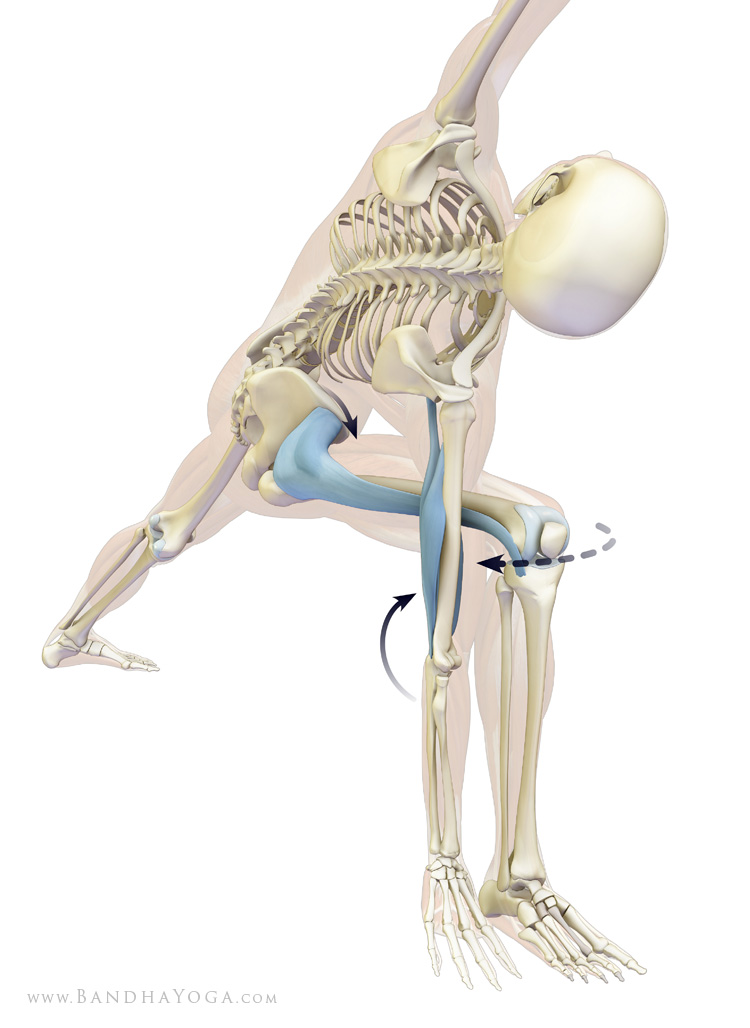
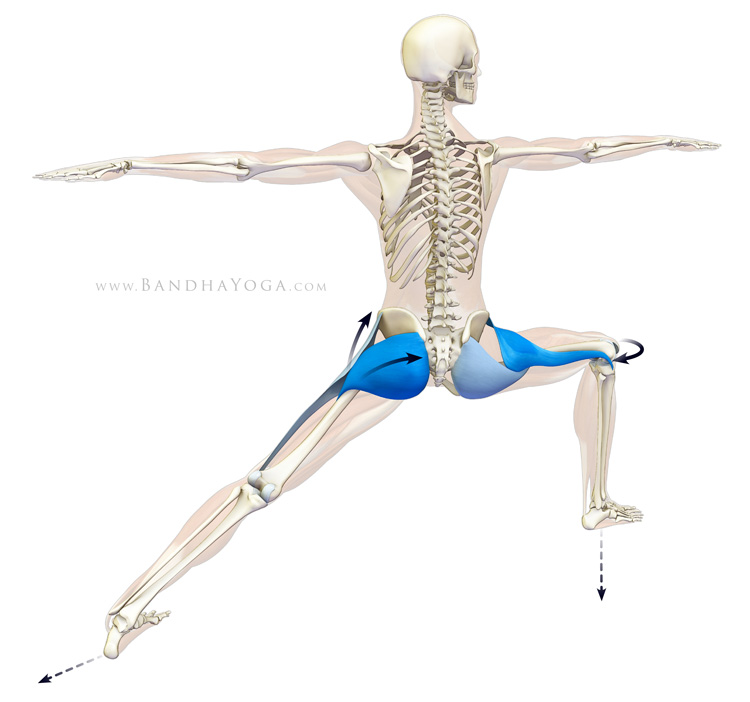
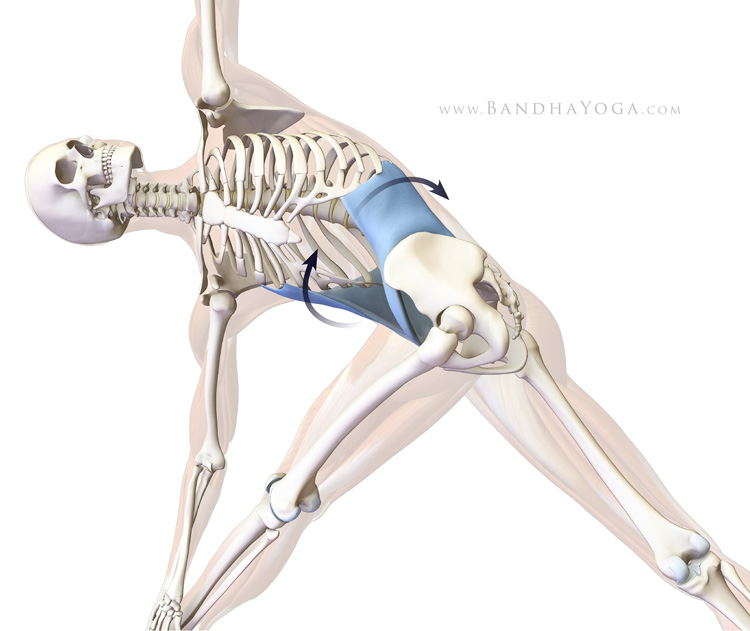
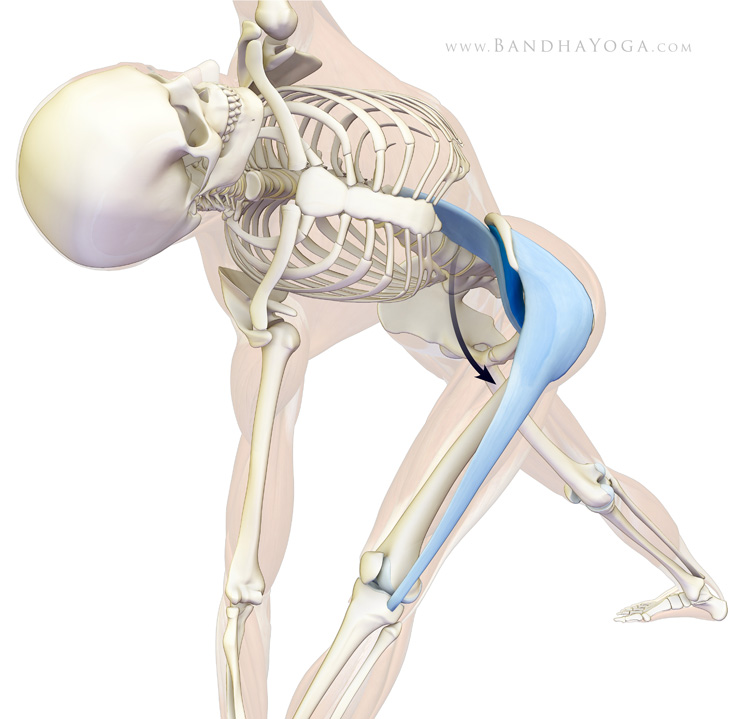
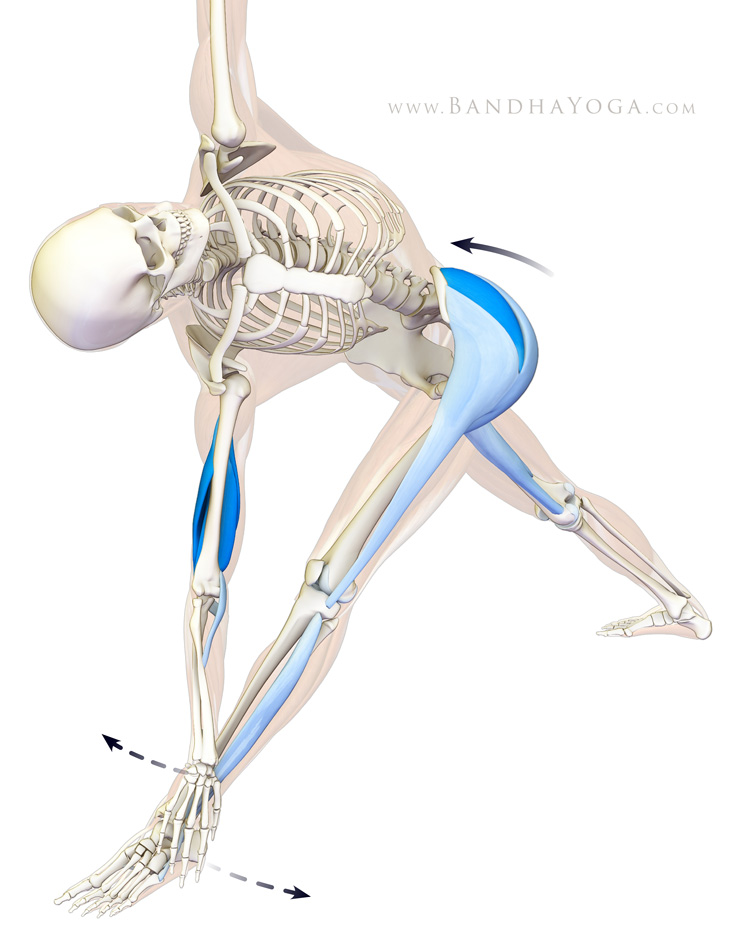
Chaturanga is designed to create a “staff” with the body, hence its name: “Four Limbed Staff Pose”. There is a tendency, however, to deviate from the proper position by hyperextending the lumbar and lifting the tailbone into the air in the pose. This arises from primarily using the hip flexors (including the psoas) to maintain the posture, which then tilts the pelvis forward and extends the lumbar. This tendency can be balanced and corrected by co-activating the gluteus maximus and rectus abdominis in Chaturanga. Engaging these muscles counteracts lumbar hyperextension, conditions the abdominals, and re-establishes the tension/compression relationships within the vertebral column to support the pose.

I do this by firmly engaging the abdominals and then incorporating contraction of the gluteus maximus to tilt the pelvis back and down, thus avoiding hyperextension of the lumbar spine. For those of you practicing in a Vinyasa tradition, gently tuck the tailbone to engage the gluteus maximus and contract the abdominals as you exhale and lower into Chaturanga. Note the sense of stability this provides for the lumbar. This technique can also work by engaging the same muscles in the preparatory pose, with the trunk remaining on the floor. Build and release muscular engagement gradually--this is key.
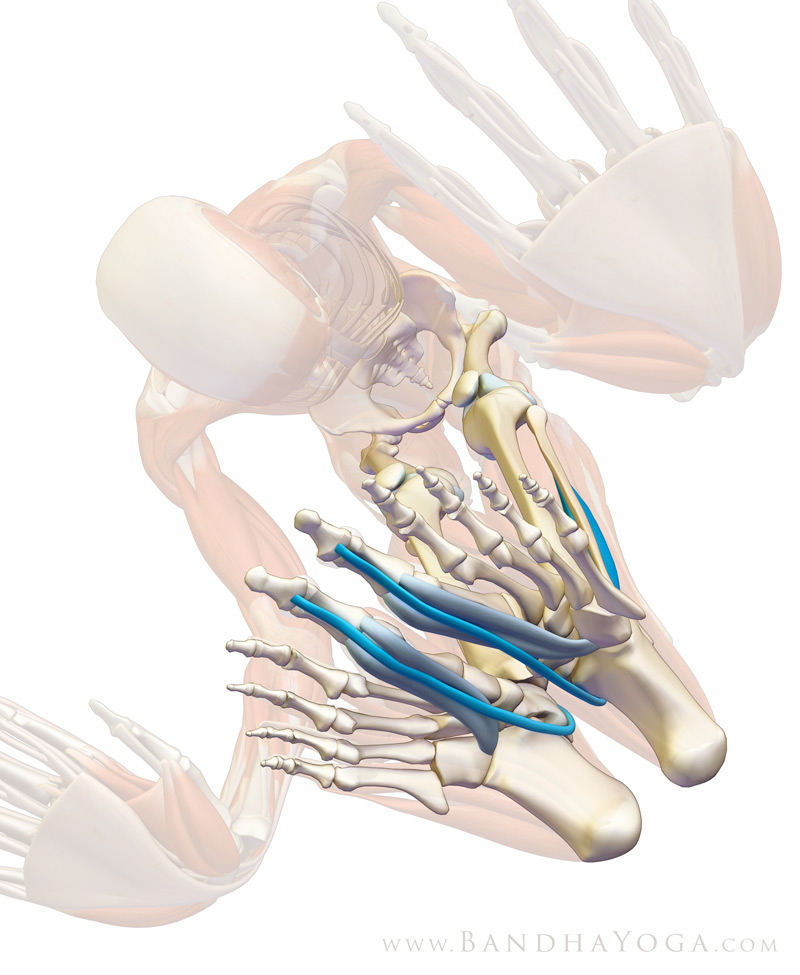
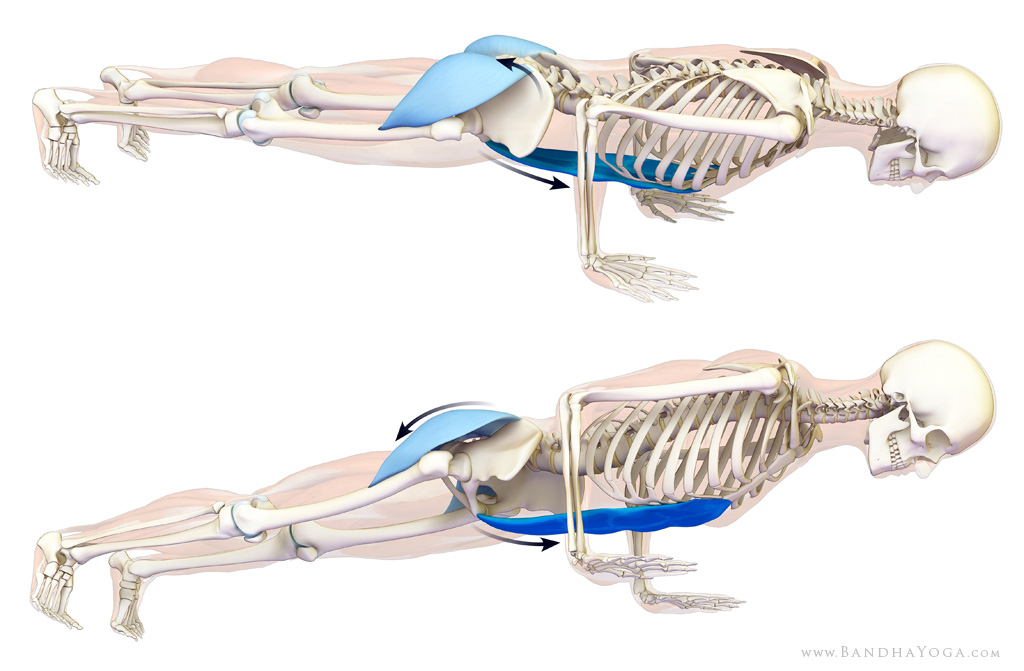
Engaging the rectus abdominis and gluteus maximus in Chaturanga Dandasana.

Here’s the Anatomy…

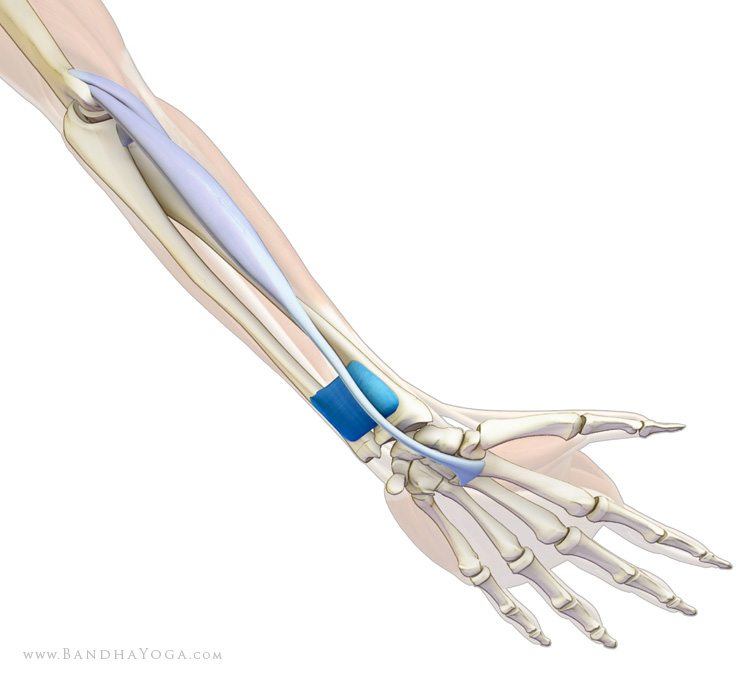
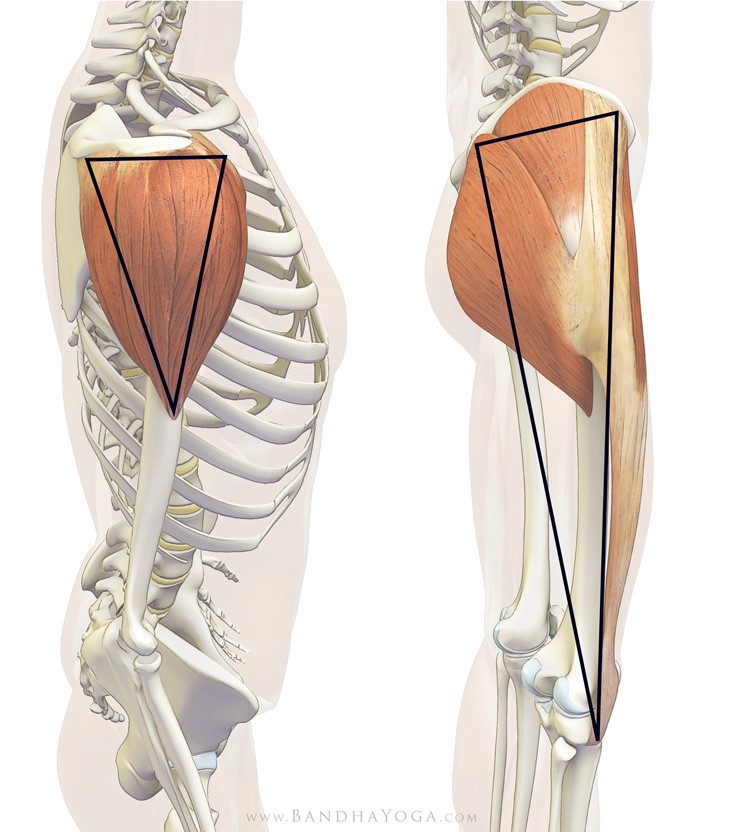
The rectus abdominis extends from the pubis to the cartilage of the fifth, sixth, and seventh ribs and the sternum. It draws the symphysis pubis upward, flexes the trunk of the body, and acts as an accessory muscle of expiration. The gluteus maximus originates on the back surface of the sacrum and ilium and the thoracolumbar fascia; it inserts onto the iliotibial band and the gluteal tuberosity of the femur. This muscle extends and externally rotates the femur, and it tilts the pelvis back and downward. Tilting the pelvis back and down relieves hyperextension of the lumbar through joint coupling. This is known as “lumbo-pelvic rhythm,” wherein tilting the pelvis forward or back extends or flexes the lumbar, respectively.

If you suffer from back pain, be sure to consult your physician to determine the cause; work under the guidance of a physician to manage your pain (see our full disclaimer here).

It is great to see you all again! Be sure to visit us on Facebook to download a free copy of our e-books. Check back next week when we’ll go over some pointers on the transversus abdominis and internal oblique muscles.

Namaste’

Ray and Chris


.1. John Morgan and Stephen A. Shoop, M.D., “Kareem Abdul-Jabbar Is Hot for Yoga,” News, Travel, Weather, Entertainment, Sports, Technology, U.S. & World. USATODAY.com, 27 Sept. 2003, http://www.usatoday.com/news/health/spotlighthealth/2003-09-26-jabbar_x.htm (accessed January 4, 2012).


.2. Helen E. Tilbrook, BSc, MSc; Helen Cox, BSc, MSc; Catherine E. Hewitt, BSc, MSc, PhD; Arthur Ricky Kang’ombe, BSc, MSc;Ling-Hsiang Chuang, BSc, MSc, PhD; Shalmini Jayakody, BSc, MSc; John D. Aplin, MA, PhD; Anna Semlyen, BA, MSc;Alison Trewhela, DBL, CSL; Ian Watt, BSc (Med Sci), MB, ChB, MPH; and David J. Torgerson, MSc, PhD., “Yoga for Chronic Low Back Pain a Randomized Trial” Ann Intern Med. 2011 Nov 1;155(9):569-78 PMID: 22041945

The Benefits of Engaging the Quads in Forward Bends (and the risks of misguided cautions)

$
0
0

In our last post we mentioned that true caution is based on accurate knowledge and wisdom; practicing it in yoga enhances benefits and minimizes risks. In this post, we talk about misguided caution and provide a couple of examples. This type of caution is usually based on fear: If you do “this”, a bad thing will happen. In fact, misguided cautions can enhance the risks and diminish the benefits of yoga because following them, among other things, diverts your focus from what is important. Think about it like this: You’re driving along the freeway and, for no reason, your passenger gets scared and yells, “STOP!” So you put on the brakes when you should apply the gas. The result is a pile-up. It's a type of passive aggressive way to decrease benefits and increase risks.

Two widely circulated examples of misguided caution relate to engaging the quadriceps in various yoga poses. One is that people with strong quads and misaligned kneecaps experience rapid progression of arthritis, and the second is that we should avoid contracting the rectus femoris in forward bends because it can cause “congestion”. Neither of these misconceptions has any basis in science, yet they are prevalent and have been incorporated into the curriculum of yoga, creating a conflict among teachers and practitioners. This has resulted in many teachers discouraging students from engaging these important muscles for fear of potential injury. I’ll address each of these “cautions” in turn later in the post, but in order to help resolve this conflict, let’s go over some of the basic science for the muscles and joints and then look at the benefits of engaging the quadriceps in a forward bend like Marichyasana I.

As I discuss in my books, joint stability is determined for each individual articulation by a combination of three factors: bone shape (ball and socket vs. hinge, etc.), the capsule and ligaments, and the muscles. At the joint, the bones are covered with articular cartilage. This cartilage and the ligaments surrounding the joints should be protected during a stretch. Stretching ligaments beyond about 6% of their normal length (from which they still recoil) can result in loss of their contribution to stability, especially if done on a regular basis. Unstable joints become incongruent; their surfaces do not match perfectly according to their design. When joint surfaces become incongruent, this can damage the articular cartilage and lead to arthritis. The muscular stabilizers form a type of dynamic sleeve around the joints and aid in protecting them by maintaining joint congruency. This concept is well supported, especially by experts in body weight training (a time-honored system similar to gymnastics that uses the body weight itself for conditioning, rather than external weights).

The beneficial effect of activity—which necessarily includes muscular engagement, especially the quadriceps—on joint cartilage is also supported by the peer-reviewed medical literature, including a recent review1 of articles evaluating the effect of activity on the knee joint. The theory behind this is that cartilage responds positively to judiciously applied forces. One of the reviewed articles states:

In conclusion, we demonstrated a protective effect of past and current vigorous physical activity on knee cartilage in healthy, community-based adults with no history of knee injury or disease.2


The quadriceps stabilizing the knee joint in Marichyasana I.

Next, let’s take a look at the cascade of beneficial effects that ensues when you do engage the quadriceps of the extended knee in Marichyasana I. This includes: 1) improved joint alignment and stability at the knee; 2) release of the hamstrings through reciprocal inhibition (so that lengthening occurs in the muscle belly, rather than overstretching in the tendons); and 3) the rectus femoris synergizes the psoas in flexing the hip and tilting the pelvis forward. This aids in preventing hyperflexion of the lumbar spine in the pose through joint coupling (lumbar-pelvic rhythm). (For those who tend to hyperextend the knee, use co-contraction of the quadriceps and hamstrings to maintain alignment).

The rectus femoris synergizing anterior tilt of the pelvis.

This is only one example of one muscle benefitting a pose; obviously we don’t engage all of the muscles at once in any given pose and may even relax completely in certain restorative poses. What I recommend is incorporating periodic muscular engagement into your practice—I call this “walking around the pose”. In addition to the benefits described, practicing in this way establishes the mind-body connection and focuses attention, thus creating a meditative state within a hatha yoga practice. The Mat Companion series takes you through the muscles involved in stabilizing the joints in the asanas as well as cues for engaging them—and much more. Feel free to browse through this collection at the Bandha Yoga website.

Now, let’s look at the two examples of misguided caution that we cited earlier:
The first states that “people with strong quads and misaligned kneecaps experience rapid progression of the disease” (arthritis). This is apparently a distorted interpretation of a peer-reviewed article (to put it charitably) that was circulated in 2011. I discussed it in a previous blog post.

The second implies that contracting one of the heads of the quadriceps, the rectus femoris, causes “congestion”. Congestion, in the medical sense, is caused by an upstream blockage to the flow of blood (or lymph). A blood clot within a vein or a mass lesion (such as a tumor) pressing on it from the outside can cause congestion. It can also be caused at the capillary level through various pathological processes. Congestion is not caused by muscle contraction.

The rectus femoris in relation to the femoral artery and vein and inguinal lymph nodes.

In fact, engaging muscles (like the rectus femoris) produces a “pumping” effect on both the lymphatics and veins, which improves venous flow and relieves“congestion”. One of the reasons that we mobilize patients as soon as possible after surgery is to access the pumping effect of muscle contraction and so prevent the development of venous thrombosis (a clot forming due to venous stasis).

Diagram of veins with one-way valves demonstrating pumping action of muscle contraction.

Furthermore, the rectus femoris shares the same innervation as the other three heads of the quadriceps (the posterior division of the femoral nerve). Therefore, you cannot relax it without relaxing the rest of the quadriceps (even if you wanted to). Thus, attempting to relax the rectus femoris in isolation (to avoid “congestion”) is an example of attempting the impossible, out of fear of the imaginary, while at the same time avoiding the beneficial.

The risks of following either of these misguided cautions include: 1) diminished alignment at the knee, with potential adverse effects on the cartilage and ligaments; 2) overstretching of the hamstring tendons; 3) decreased anterior tilt of the pelvis resulting in lumbar hyperflexion (in forward bends); 4) loss of the pumping effect on the veins; etc. You get the picture.

Friends, the prevalence of knee pain is on the rise, as confirmed in the December 6, 2011 issue of the Annals of Internal Medicine.3Basing your practice and teaching on unsound theory has the potential to contribute to this pile-up, especially considering the number of people doing yoga today. Conversely, basing it on sound theory has the potential to provide some relief.

If you do suffer from knee pain or an injury, consult your physician; always work under a physician’s guidance to manage your condition.

Great to see you all and many thanks for your support and comments on our last post! Be sure to visit us on Facebook for your free Chakra poster and e-book. See you next week, when we’ll go over a technique for improving muscle control and proprioception that you can learn in Chaturanga and then apply to any pose!

Namaste’

Ray and Chris

.1. Urquhart DM, Tobing JF, Hanna FS, Berry P, Wluka AE, Ding C, Cicuttini FM. What is the effect of physical activity on the knee joint? A systematic review. Med Sci Sports Exerc. 2011 Mar, 43(3):432-42.

.2. Racunica TL, Teichtahl AJ, Wang Y, et al. Effect of physical activity on articular knee joint structures in community-based adults. Arthritis Rheum. 2007, 57:1261–8.

.3. Uyen-Sa D.T. Nguyen, DSc; Yuqing Zhang, DSc; Yanyan Zhu, PhD; Jingbo Niu, MD, DSc; Bin Zhang, ScD; and David T. Felson, MD, MPH.Increasing prevalence of knee pain and symptomatic knee osteoarthritis: Survey and cohort data. Annals of Internal Medicine. December 6, 2011, 155(11): 725-732.

Preventative Strategies for Lower Back Strains in Yoga: Part One

$
0
0
In this post we take a look at one of the leading causes for emergency room visits from yoga—lower back strains—and examine preventative strategies that may help in reducing the risk of this injury while enhancing the benefits of Hatha yoga practice. This series begins with info on joint rhythms and how understanding them can help in preventing injury.

Also, I would like to recommend reading Dana Santas interview in Men’s Health magazine entitled “Will Yoga Really Wreck Your Body?”1 Dana is an experienced yoga practitioner and teacher who works with elite athletes from a number of professional sports. She is a great resource for information on integrating yoga into sports training regimens. Next, please read (and circulate) Jason Amis’ counterpoint to a recent article published in the New York Times, which includes a clear and in-depth analysis of much of the data that was referenced. Extremely well done – Kudos! 

Jason provided me with the NEISS data relating to emergency rooms visits for yoga injuries in 2010 and I’ve done some preliminary analysis, which I will share with you. Data like this is extremely valuable, because it allows us to find ways to identify risks and then reflect on how to prevent them – a variation for the yoga community on the Sanskrit term “Atma Vichara,” or self inquiry. Here are my impressions: first, I was impressed by the relative safety of the practice compared to other activities. Second, it was clear to me that many of the injuries resulting in ER visits were potentially preventable. Think of it this way: there are injuries that are unpredictable, like stubbing your toe (also reported as an ER visit related to yoga), and there are those that are potentially preventable through application of common sense and knowledge of the body. Analysis of data like this provides an opportunity to identify preventable injuries and eliminate unsound practices that may have caused them in the first instance. 

For example, lower back strains were the most common single diagnosis reported in the data for ER visits relating to yoga for 2010 (from the NEISS report). In fact, back strains are also a common workplace injury and much research is focused on the prevention thereof. Nevertheless, people still often strain their back at work, especially during situations in which they forget or are unable to implement preventative measures.


There is never any reason to rush or force oneself into a yoga pose, so it is possible that many of the back strains that occurred were preventable through working with proper technique, using modified poses where indicated and not rushing. Then, the practice becomes potentially therapeutic for the lower back, as has been demonstrated, rather than injurious.

Since I suspect that a percentage of these lower back strains may have arisen during forward bending poses, let’s begin by looking at the concept of lumbar-pelvic and pelvic-femoral rhythm in the forward bend Paschimottanasana.  


Pashimottanasana illustrating lumbar-pelvic and pelvic-femoral rhythm.

Lumbar-pelvic rhythm refers to a type of joint coupling whereby tilting the pelvis in one direction produces a corresponding movement in the lumbar. Tilting the pelvis back (tucking the tailbone) produces flexion of the lumbar vertebrae. Tilting the pelvis forward produces extension. (I give a practical example of the former in a previous post on engaging the abs and gluts in Chaturanga.)


Pelvic-femoral rhythm refers to joint coupling at the hip whereby flexing the femur produces a corresponding forward tilt of the pelvis – and vice versa for extending the femur.


I access these rhythms when I work with yoga poses – especially forward bends – by gently engaging muscles that improve hip flexion and anterior tilt of the pelvis (joint coupling between the pelvis and the hip) and releasing the muscles that can limit hip flexion. In this manner, the forward bend comes more from the hip than the lumbar spine.


The hamstrings, for example, are hip extensors. They can limit hip flexion. Contracting the quadriceps contributes to releasing them through reciprocal inhibition. One head of the quadriceps, the rectus femoris, is also a synergist of hip flexion (and anterior tilt of the pelvis). Thus, engaging the quadriceps helps to produce forward bending from the hips rather than the lumbar. In general, when practicing forward bends, movement of the pelvis on the hips should be equal to or greater than movement of the lumbar spine in relation to the pelvis, otherwise flexion is concentrated in the lower back.

Pashimottanasana illustrating joint rhythm with quadriceps engaged. 

As an aside, I also use periodic gentle muscular engagement of the quads when I am practicing a longer duration relaxed forward bend that is directed towards lengthening myofascial sheaths. Periodically engaging the agonists – or yang side of a stretch – does not diminish the lengthening on the antagonist (yin) side. In fact, it can enhance it both biomechanically and physiologically. This engagement also re-establishes alignment and mental focus. The Mat Companion Series provides a step wise approach to understanding the various muscles in the poses from this perspective as well.

Now, let’s look at what happens when we eliminate engaging the quads, for example, out of fear that the rectus femoris will cause “congestion”. We lose reciprocal inhibition of the hamstrings, which remain tight through the action of the muscle spindle in a stretch. This limits hip flexion. We also lose the contribution of the rectus femoris to hip flexion and forward tilt of the pelvis. The result is that the forward bend is produced more from the lumbar than the hips, which may contribute to lower back strain. Thus, avoiding an imaginary problem potentially causes a real one. For more info on the rectus femoris not causing “congestion”, see our blog post on how misguided cautions decrease benefits and increase risks.

Pashimottanasana illustrating joint rhythm without engaging the quadriceps. Note the increased lumbar flexion.

Unsound theory is like a fly in the ointment. These things become “memes” that get circulated as if they were based on truth. And although such theories are often not based in reality, they can have manifestations in the real world, including a potentially increased incidence of back strains and other injuries. These problems then get sensationalized in the media and so on. Ironically, such media coverage can lead to well considered analysis – like Jason’s– which then helps to identify and eliminate potentially harmful disinformation and implement an affirmative strategy of prevention.


If you suffer from back pain, be sure to consult your physician to determine the cause; work under the guidance of a physician to manage your pain (see our full disclaimer here).


Great seeing you all again! Check in next week for Part Two of this series on preventative strategies for lower back strains in yoga. Also, be sure to visit us on Facebook for your free Chakra poster and e-book.


Namaste’ 

Ray and Chris


1. Greenfield, Paige. "Will Yoga Actually Wreck Your Body? | Men's Health News." Men's Health Magazine. 20 Jan. 2012. Web. 24 Jan. 2012. <http://news.menshealth.com/yoga-men-injuries/2012/01/20/>.
Viewing all 69 articles
Browse latest View live


Latest Images