Bandha Yoga QuickQuiz # 7: Your Gluteus Medius Muscle
↧
↧
Your Glutes in Backbends: Part I
Hello Friends,
In this post we take a look at the glute max in backbends and how to avoid splaying out your knees in poses like Urdhva danurasana (Wheel). I give you some cues for sequencing muscle engagement and also address a misconception about contracting your adductor muscles.
For decades now we’ve heard the instruction in yoga, “soften your glutes in backbends” with no valid explanation why. Your hips are extending in backbends, and your gluteus maximus is the prime mover for that action. Why wouldn’t you want to contract the very muscle that creates that movement?
Let's look closer. When you deliberately soften your glutes, then the hip extension comes from the hamstrings, because your hamstrings work as synergists to the gluteus maximus for this action. So, why not just use your hamstrings to extend the hips and avoid getting scolded for using the prime movers (glutes)? Well, if you do that enough, you potentially set up a muscle imbalance that can lead to “synergistic dominance” whereby the hamstrings become the prime mover of this action. In the hip joint, this can result in abnormal kinematics and, ultimately, pain. I’ll go over some other problems with doing backbends without the glutes in Part II of this series.
One side effect of using your gluteus maximus is that it is also a powerful external rotator of the hip. Thus, when you engage your glute max in a backbend, your hips will rotate outward and your knees tend to splay apart.
Do we care if the knees splay out? Well, it depends on your objective in the pose. Recent literature shows that if the femurs are parallel, you fire your entire gluteus maximus, whereas when they are splayed apart, you fire mainly the upper portion (Selkowitz, 2016).
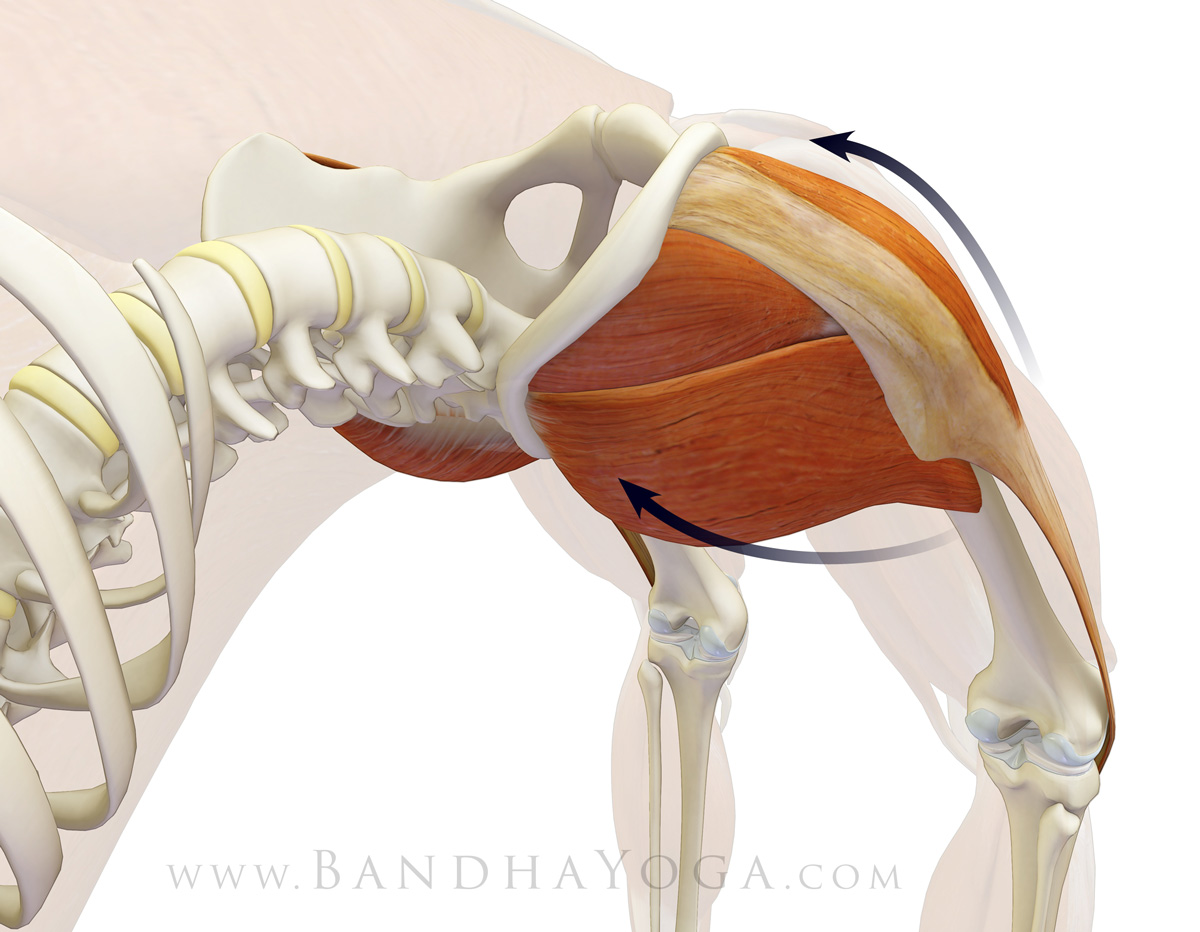
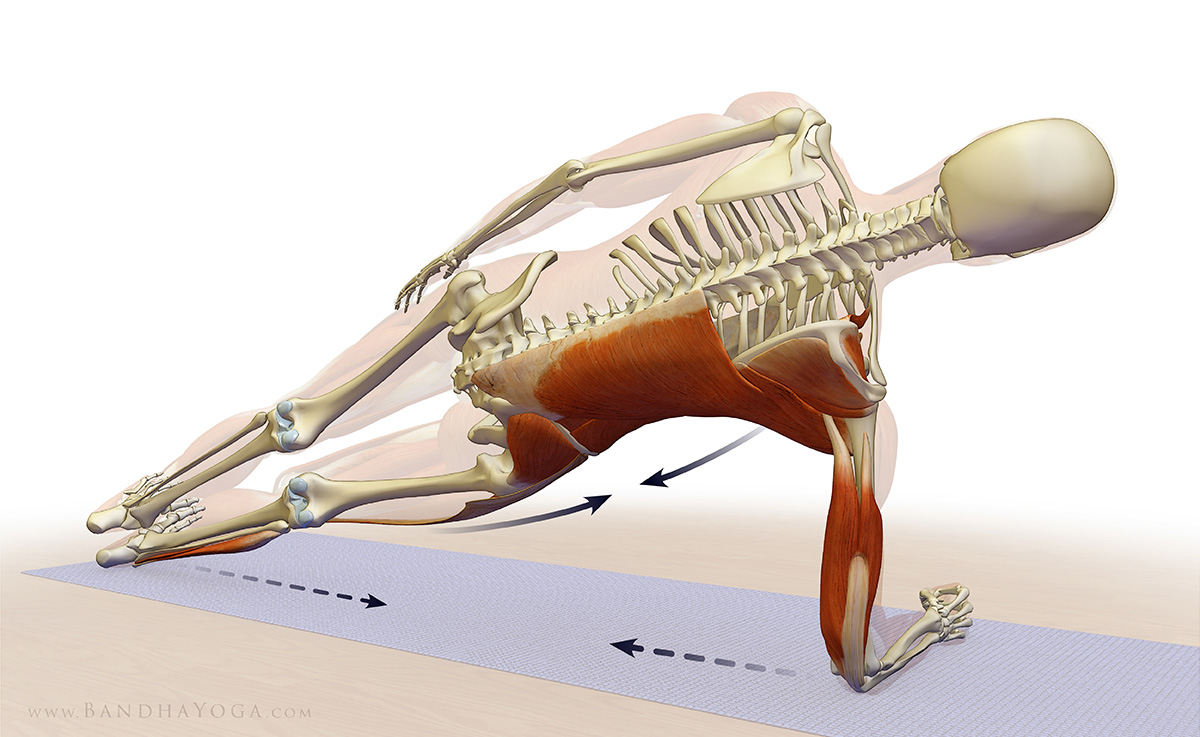
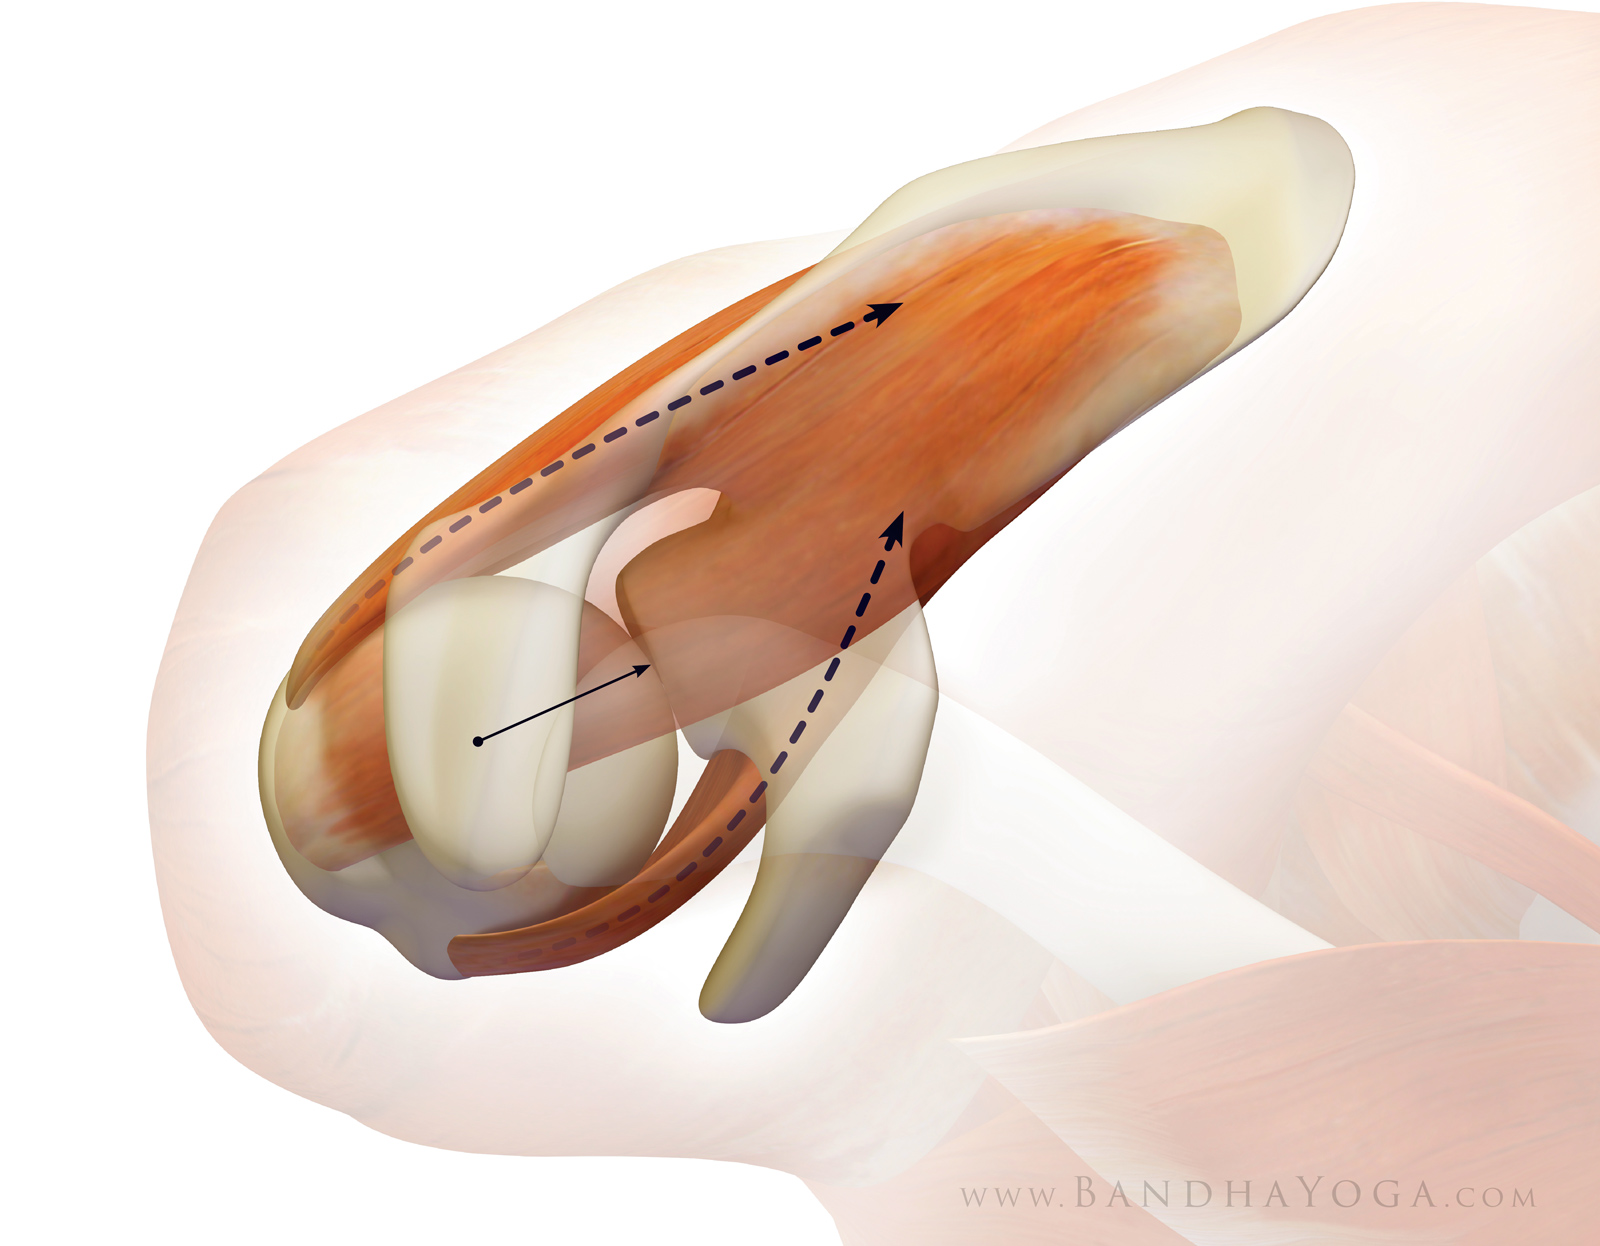
The “solution” that is usually proposed for this is to have folks try to squeeze a block between their knees to get them to “fire those adductors!” In India, this instruction was often accompanied by much shouting at the frustrated person attempting it. There is a reason, however, why this cue works so poorly, despite the yelling. That is because when your hips are extended (in a backbend), the orientation of the adductor muscle fibers makes them become external rotators of the hip and synergize the gluteus maximus in splaying your knees apart. So it’s a bit like hitting the brakes and gas at the same time. Frustrating. Figure 1 illustrates this.
In this post we take a look at the glute max in backbends and how to avoid splaying out your knees in poses like Urdhva danurasana (Wheel). I give you some cues for sequencing muscle engagement and also address a misconception about contracting your adductor muscles.
For decades now we’ve heard the instruction in yoga, “soften your glutes in backbends” with no valid explanation why. Your hips are extending in backbends, and your gluteus maximus is the prime mover for that action. Why wouldn’t you want to contract the very muscle that creates that movement?
Let's look closer. When you deliberately soften your glutes, then the hip extension comes from the hamstrings, because your hamstrings work as synergists to the gluteus maximus for this action. So, why not just use your hamstrings to extend the hips and avoid getting scolded for using the prime movers (glutes)? Well, if you do that enough, you potentially set up a muscle imbalance that can lead to “synergistic dominance” whereby the hamstrings become the prime mover of this action. In the hip joint, this can result in abnormal kinematics and, ultimately, pain. I’ll go over some other problems with doing backbends without the glutes in Part II of this series.
One side effect of using your gluteus maximus is that it is also a powerful external rotator of the hip. Thus, when you engage your glute max in a backbend, your hips will rotate outward and your knees tend to splay apart.
Do we care if the knees splay out? Well, it depends on your objective in the pose. Recent literature shows that if the femurs are parallel, you fire your entire gluteus maximus, whereas when they are splayed apart, you fire mainly the upper portion (Selkowitz, 2016).
The “solution” that is usually proposed for this is to have folks try to squeeze a block between their knees to get them to “fire those adductors!” In India, this instruction was often accompanied by much shouting at the frustrated person attempting it. There is a reason, however, why this cue works so poorly, despite the yelling. That is because when your hips are extended (in a backbend), the orientation of the adductor muscle fibers makes them become external rotators of the hip and synergize the gluteus maximus in splaying your knees apart. So it’s a bit like hitting the brakes and gas at the same time. Frustrating. Figure 1 illustrates this.
 |
| Figure 1: Note the orientation of the fibers of the adductor group and how contracting these muscles leads to splaying out of the knees in backbends. |
The real counterbalance for the gluteus maximus causing the knees to splay apart is to contract the muscles that internally rotate the hips, namely, the TFL and front part of the gluteus medius.
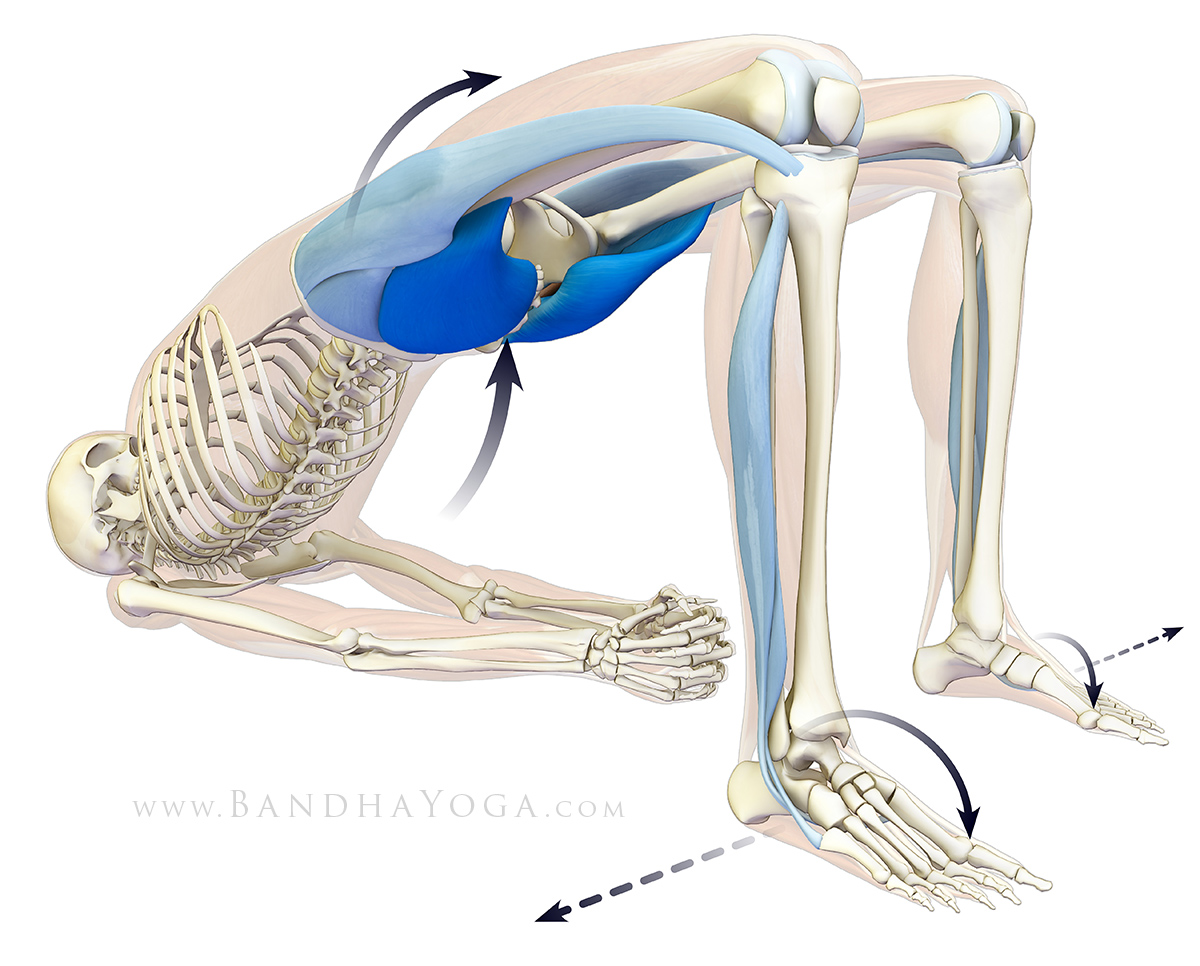
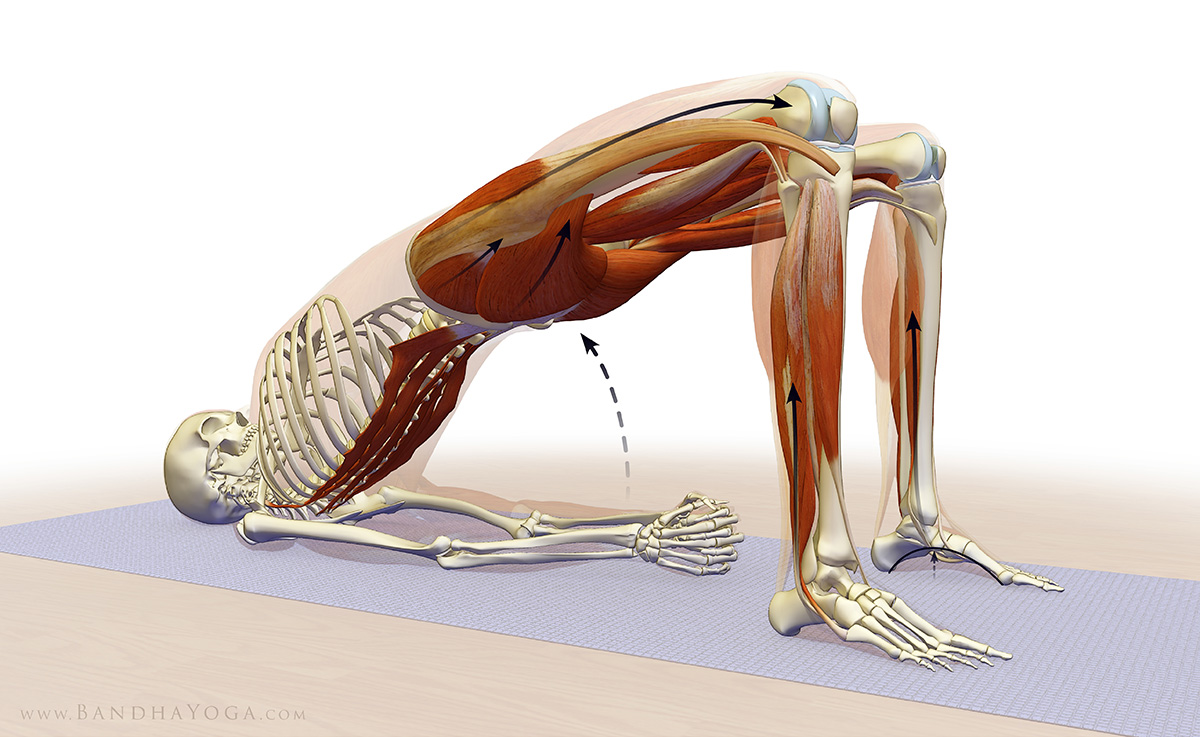
This cue works well, but it must be implemented in a sequence to function optimally. You have to engage the hip internal rotators before going up into the backbend. It's difficult to engage them once you are up in the pose because when the hips are extending, the TFL and front part of the gluteus medius are at a biomechanical disadvantage for initiating contraction. Thus, you want to first train the cue to engage these muscles with the hips flexed, where it is easy to contract them. Then bring in the glute max to do the backbend. I’ve taught this sequence all over the world and had great feedback. Done properly, the muscles form a “sheath” that lifts the pelvis in a balanced and stable fashion. (Figure 2)
This cue works well, but it must be implemented in a sequence to function optimally. You have to engage the hip internal rotators before going up into the backbend. It's difficult to engage them once you are up in the pose because when the hips are extending, the TFL and front part of the gluteus medius are at a biomechanical disadvantage for initiating contraction. Thus, you want to first train the cue to engage these muscles with the hips flexed, where it is easy to contract them. Then bring in the glute max to do the backbend. I’ve taught this sequence all over the world and had great feedback. Done properly, the muscles form a “sheath” that lifts the pelvis in a balanced and stable fashion. (Figure 2)
 |
| Figure 2: Note how the muscles at the front of the hips internally rotate the thighs to balance external rotation from the gluteus maximus. |
Here’s the sequence.
Step 1)
Lie on your back and bend your knees so that your feet are flat on the ground as shown. Place your hands on the front part of the pelvis to feel your internal rotators contract. Now, on exhalation, press the feet down and attempt to scrub them apart while allowing you knees to roll inward. Don’t actually move your feet. You should be able to feel your TFL contract. Release on the inhalation and repeat for about 10 times to train the action. Press your feet down and then attempt to scrub them away from the midline. The feet should remain fixed on your mat, as your knees roll inward and you should feel your muscles contract if you've got it.
 |
| Figure 3: Press your feet down and attempt to drag them apart as you allow your knees to roll inward. Place your hands on the front of your hips to feel the TFL and front of the gluteus medius contract with this action. |
Step 2)
Follow the instruction from step 1, maintain the cue of pushing away from the midline with your feet and then dial in contraction of the gluteus maximus to lift the pelvis. You will be pushing down and away from the midline to engage your internal rotators and then engaging your glute max to extend the hips. Go up on the exhalation and down on inhalation. Try this about 10 times (2-3 sets). I recommend working with this set of cues for a few days before integrating them into a full back bend. Once you get it, then try the block thing (if you want). You’ll find it works better this way.
(NB: if you experience knee pain in this pose, try pressing down with the heels more--this often helps.)
 |
| Figure 4: This illustrates the sheath of muscle surrounding the pelvis and lifting it into the bridge. |
I hope you enjoy this post. Use muscle engagement as a barometer to help identify imbalances between the two sides of the body. Then carefully work to balance things. This is one of the benefits of practicing Hatha Yoga using knowledge of anatomy and biomechanics.
Good to see you all again. Check back for Part II in the sequence when I will go over the role of the deep external rotators and discuss synergistic dominance of the hamstrings in more detail.
All the Best,
Ray Long, MD
References:
1) Selkowitz, D. M., Beneck, G. J., & Powers, C. M. (2016). Comparison of Electromyographic Activity of the Superior and Inferior Portions of the Gluteus Maximus Muscle During Common Therapeutic Exercises. Journal of Orthopaedic & Sports Physical Therapy, 46(9), 794-799. doi:10.2519/jospt.2016.6493
↧
Around Your Core in 4 Minutes
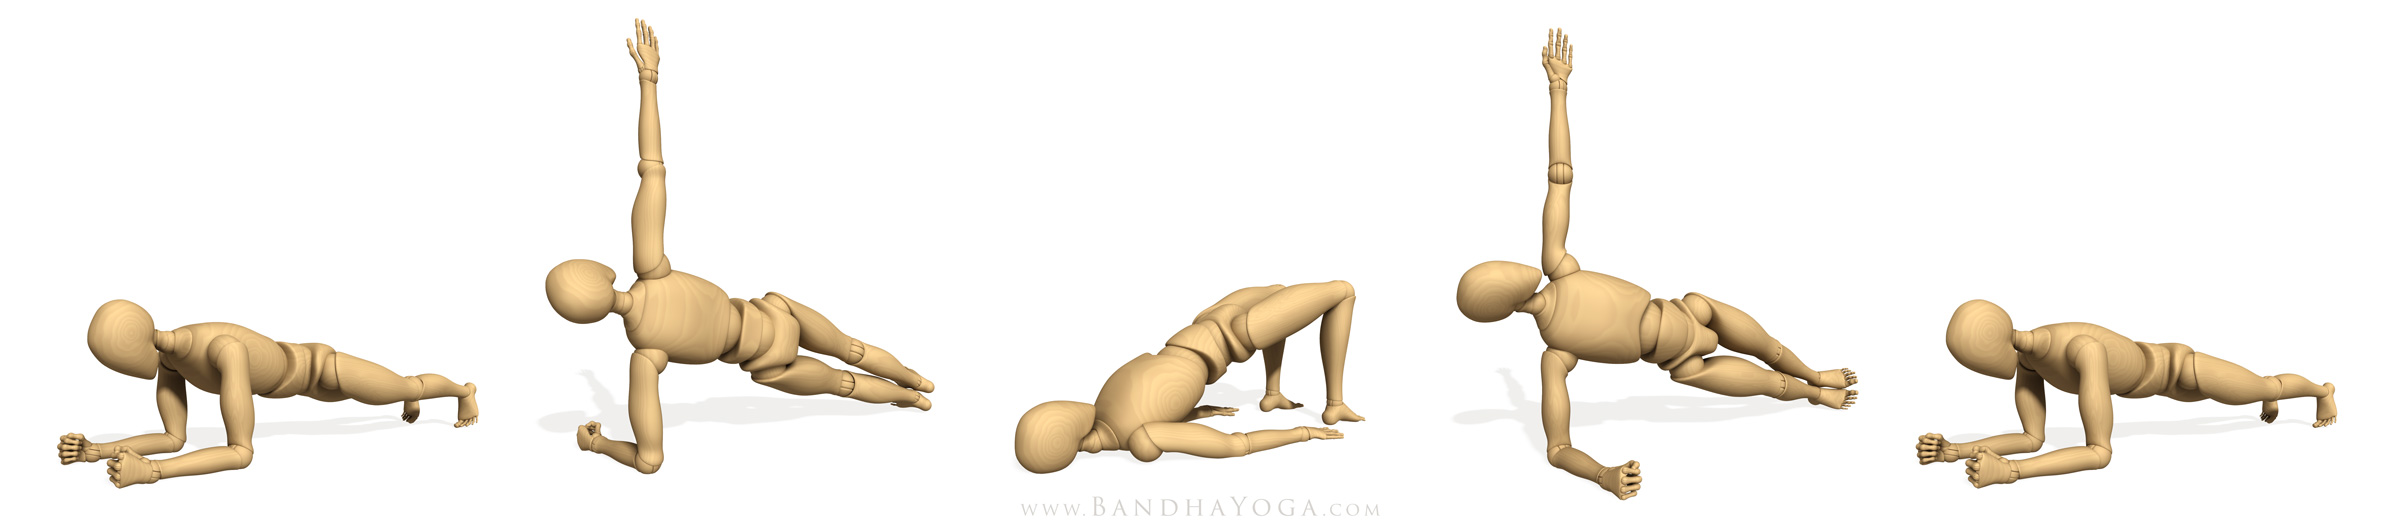 |
| Figure 1: The "Around Your Core" sequence. |
I want to share one of my favorite core workouts. I use this at the end of practice to integrate the shoulders, core and lower extremities. Let’s get right into it…
1) Start with forearm plank. Tighten your glutes and abs as you attempt to drag your forearms towards your feet. This is an isometric contraction of the core muscles shown below. At the same time, co-activate the muscles of your rotator cuff by attempting to “windshield wiper” your forearms in while resisting this action in the opposite direction (Figure 2). Hold for 10-30 seconds the come down and rest for 10 seconds. Click here to learn the key cues to activate your pose as well as the muscle subsystems it amplifies…
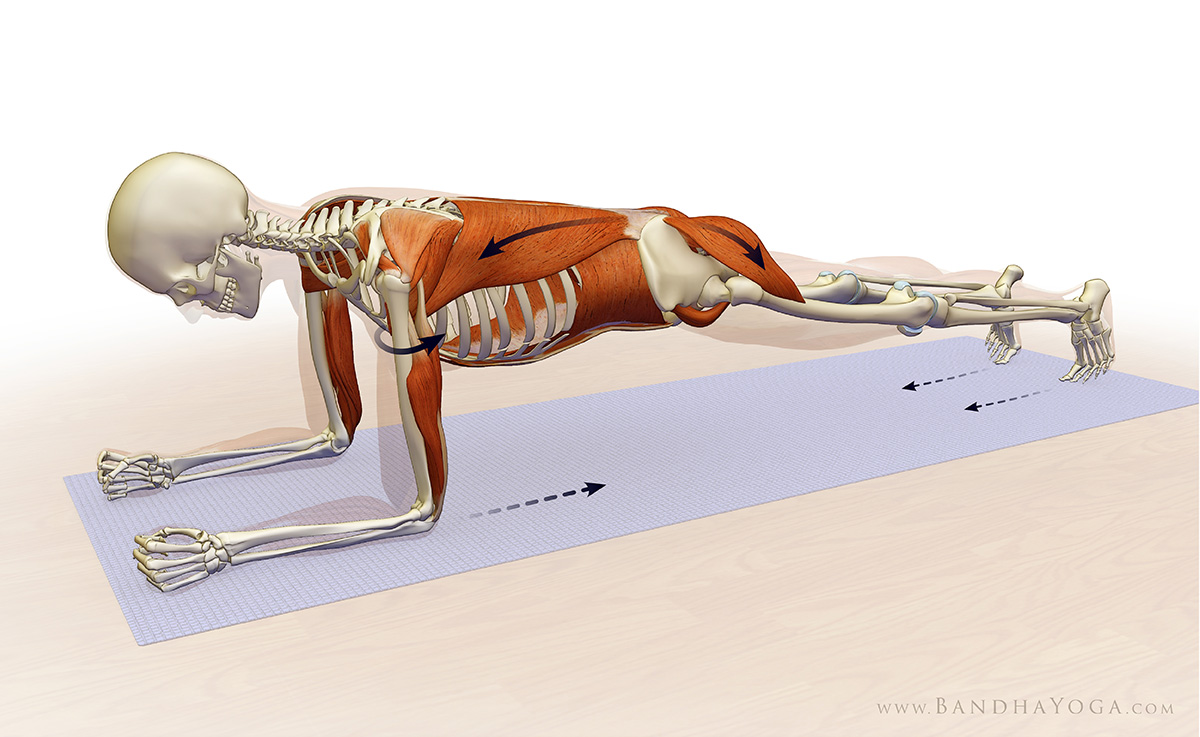 |
| Figure 2: Forearm plank. Attempt to drag your forearms towards your feet. |
2) Now go to plank pose on your right side. Press the edge of your right foot into the mat and lift your pelvis. Attempt to drag your forearm towards your foot. Co-activate the rotator cuff by attempting to “windshield wiper” your forearm in internal rotation while resisting with external rotation (Figure 3). Hold for 10-30 seconds the come down and rest for 10 seconds. Click here to learn the key cues to activate your pose as well as the muscle subsystems it amplifies…
 |
| Figure 3: Side plank. Attempt to drag your forearm toward your foot and your foot toward your forearm. |
3) Next, go to Bridge Pose (Setu bandha Sarvangasana). Engage the muscles that surround your pelvis (including the glute max and internal rotators) and connect them to your back muscles. Hold for 10-30 seconds the come down and rest for 10 seconds. Click here to learn the key cues to activate your pose as well as the progression for contracting the correct individual muscles—this is key!
 |
| Figure 4: Bridge pose. Engage your glutes. |
Added Bonus: engage the muscles on the sides of your lower legs to lift your feet arches. Click here to learn more about this important cue.
 |
| Figure 5: Engage the muscles on the sides of the lower leg to lift your arch. |
4) Next roll over to left side forearm plank. Hold for 10-30 seconds then come down and rest for 10 seconds.
5) Return to forearm plank and repeat the sequence, this time starting with left side plank pose.
Keep your breathing smooth throughout this sequence. Be sure to check out the details in the links above. Start with 10-30 seconds in each pose and build to 1-2 minutes. The adjustments in the links are the keys to integrating the extremities and core. For more cues to help you get the most from your practice, page through the Yoga Mat Companion Series and the Key Muscles and Poses of Yoga.
All the Best,
Ray Long, MD
↧
Shoulder Biomechanics Part IV: The Deltoid--Rotator Cuff Connection
The “force couple” is a biomechanical concept whereby groups of muscles work together around a joint to produce coordinated movement. In this blog post, I discuss the force couple between the rotator cuff and the deltoid muscle, which works in concert with other muscles around the scapula to produce movements such as raising the arm overhead.
The shoulder joint proper is a ball and socket joint comprised of the humeral head which articulates with the shallow glenoid fossa (socket) of the scapula. The bone shapes of the shoulder joint allow for a high degree of motion. Contrast this with the hip joint, where the socket is much deeper and constraining on motion. In addition to the bony stabilizers, there are also soft tissue stabilizers such as ligaments and the labrum and muscular dynamic stabilizers. Figure 1 illustrates the bones of the shoulder. Click here for more on this in relation to your Down Dog.
In the force couple between the deltoid muscle and the rotator cuff, the rotator cuff stabilizes the humeral head against the glenoid fossa. The deltoid muscle then levers the humeral head off the glenoid fossa to raise the arm. At the same time, the scapula and clavicle rotate to aid in producing movement, a process known as scapulohumeral rhythm (click here for more on this subject).
Figure 2 illustrates the subscapularis and infraspinatus muscles acting together to stabilize the humeral head in the glenoid fossa. Click here for more information on the these muscles of the rotator cuff.
Figure 3 illustrates the force couple between the rotator cuff and the deltoid muscle. Click here to learn about the supraspinatus muscle of the rotator cuff. As the deltoid contracts to raise the arm, the rotator cuff contracts to stabilize the humeral head in the socket. All of this happens automatically--the brain is hard wired for this force couple.
Injury to the rotator cuff, such as a tear or inflammation can lead to less efficient stabilization of the humeral head in the socket. As a consequence, when the deltoid contracts, instead of levering the humeral head off the glenoid, the force of the deltoid contraction causes the head of the humerus to shift upwards into the subacromial space. This can lead to impingement of the rotator cuff on the undersurface of the acromion, thus exacerbating the condition. To compensate, the body uses abnormal movement of the scapula in an attempt to stablize the humeral head in the socket. This abnormal movement of the scapula on the chest wall is known as “scapulothoracic dyskinesia”. I examine for this by comparing the movement of the normal and injured side from the back while having the patient raise the arms overhead.
I hope this post helps you build your fund of knowledge regarding shoulder biomechanics. Stay tuned for my next post where I discuss some of the yoga poses that can be used to stretch and strengthen the rotator cuff. Learn more about anatomy, biomechanics and physiology for your yoga in “The Key Muscles of Yoga”, “The Key Poses of Yoga” and the Yoga Mat Companion Series. Click on any of these books to page through.
Thanks for stopping by--look forward to seeing you for my next post!
Ray Long, MD
The shoulder joint proper is a ball and socket joint comprised of the humeral head which articulates with the shallow glenoid fossa (socket) of the scapula. The bone shapes of the shoulder joint allow for a high degree of motion. Contrast this with the hip joint, where the socket is much deeper and constraining on motion. In addition to the bony stabilizers, there are also soft tissue stabilizers such as ligaments and the labrum and muscular dynamic stabilizers. Figure 1 illustrates the bones of the shoulder. Click here for more on this in relation to your Down Dog.
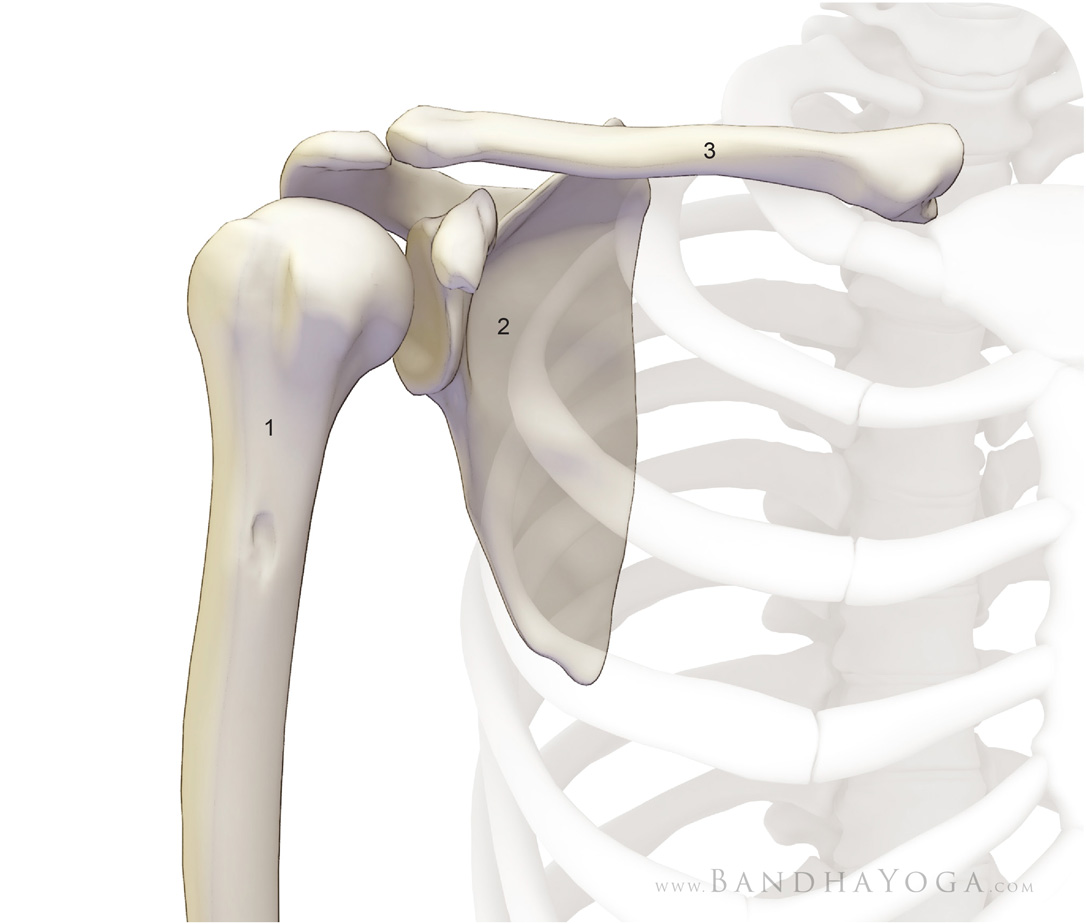 |
| Figure 1 - (1) humerus. (2) scapula. (3) clavicle. |
In the force couple between the deltoid muscle and the rotator cuff, the rotator cuff stabilizes the humeral head against the glenoid fossa. The deltoid muscle then levers the humeral head off the glenoid fossa to raise the arm. At the same time, the scapula and clavicle rotate to aid in producing movement, a process known as scapulohumeral rhythm (click here for more on this subject).
Figure 2 illustrates the subscapularis and infraspinatus muscles acting together to stabilize the humeral head in the glenoid fossa. Click here for more information on the these muscles of the rotator cuff.
 |
| Figure 2 - The Subscapularis / Infraspinatus force couple. |
Figure 3 illustrates the force couple between the rotator cuff and the deltoid muscle. Click here to learn about the supraspinatus muscle of the rotator cuff. As the deltoid contracts to raise the arm, the rotator cuff contracts to stabilize the humeral head in the socket. All of this happens automatically--the brain is hard wired for this force couple.
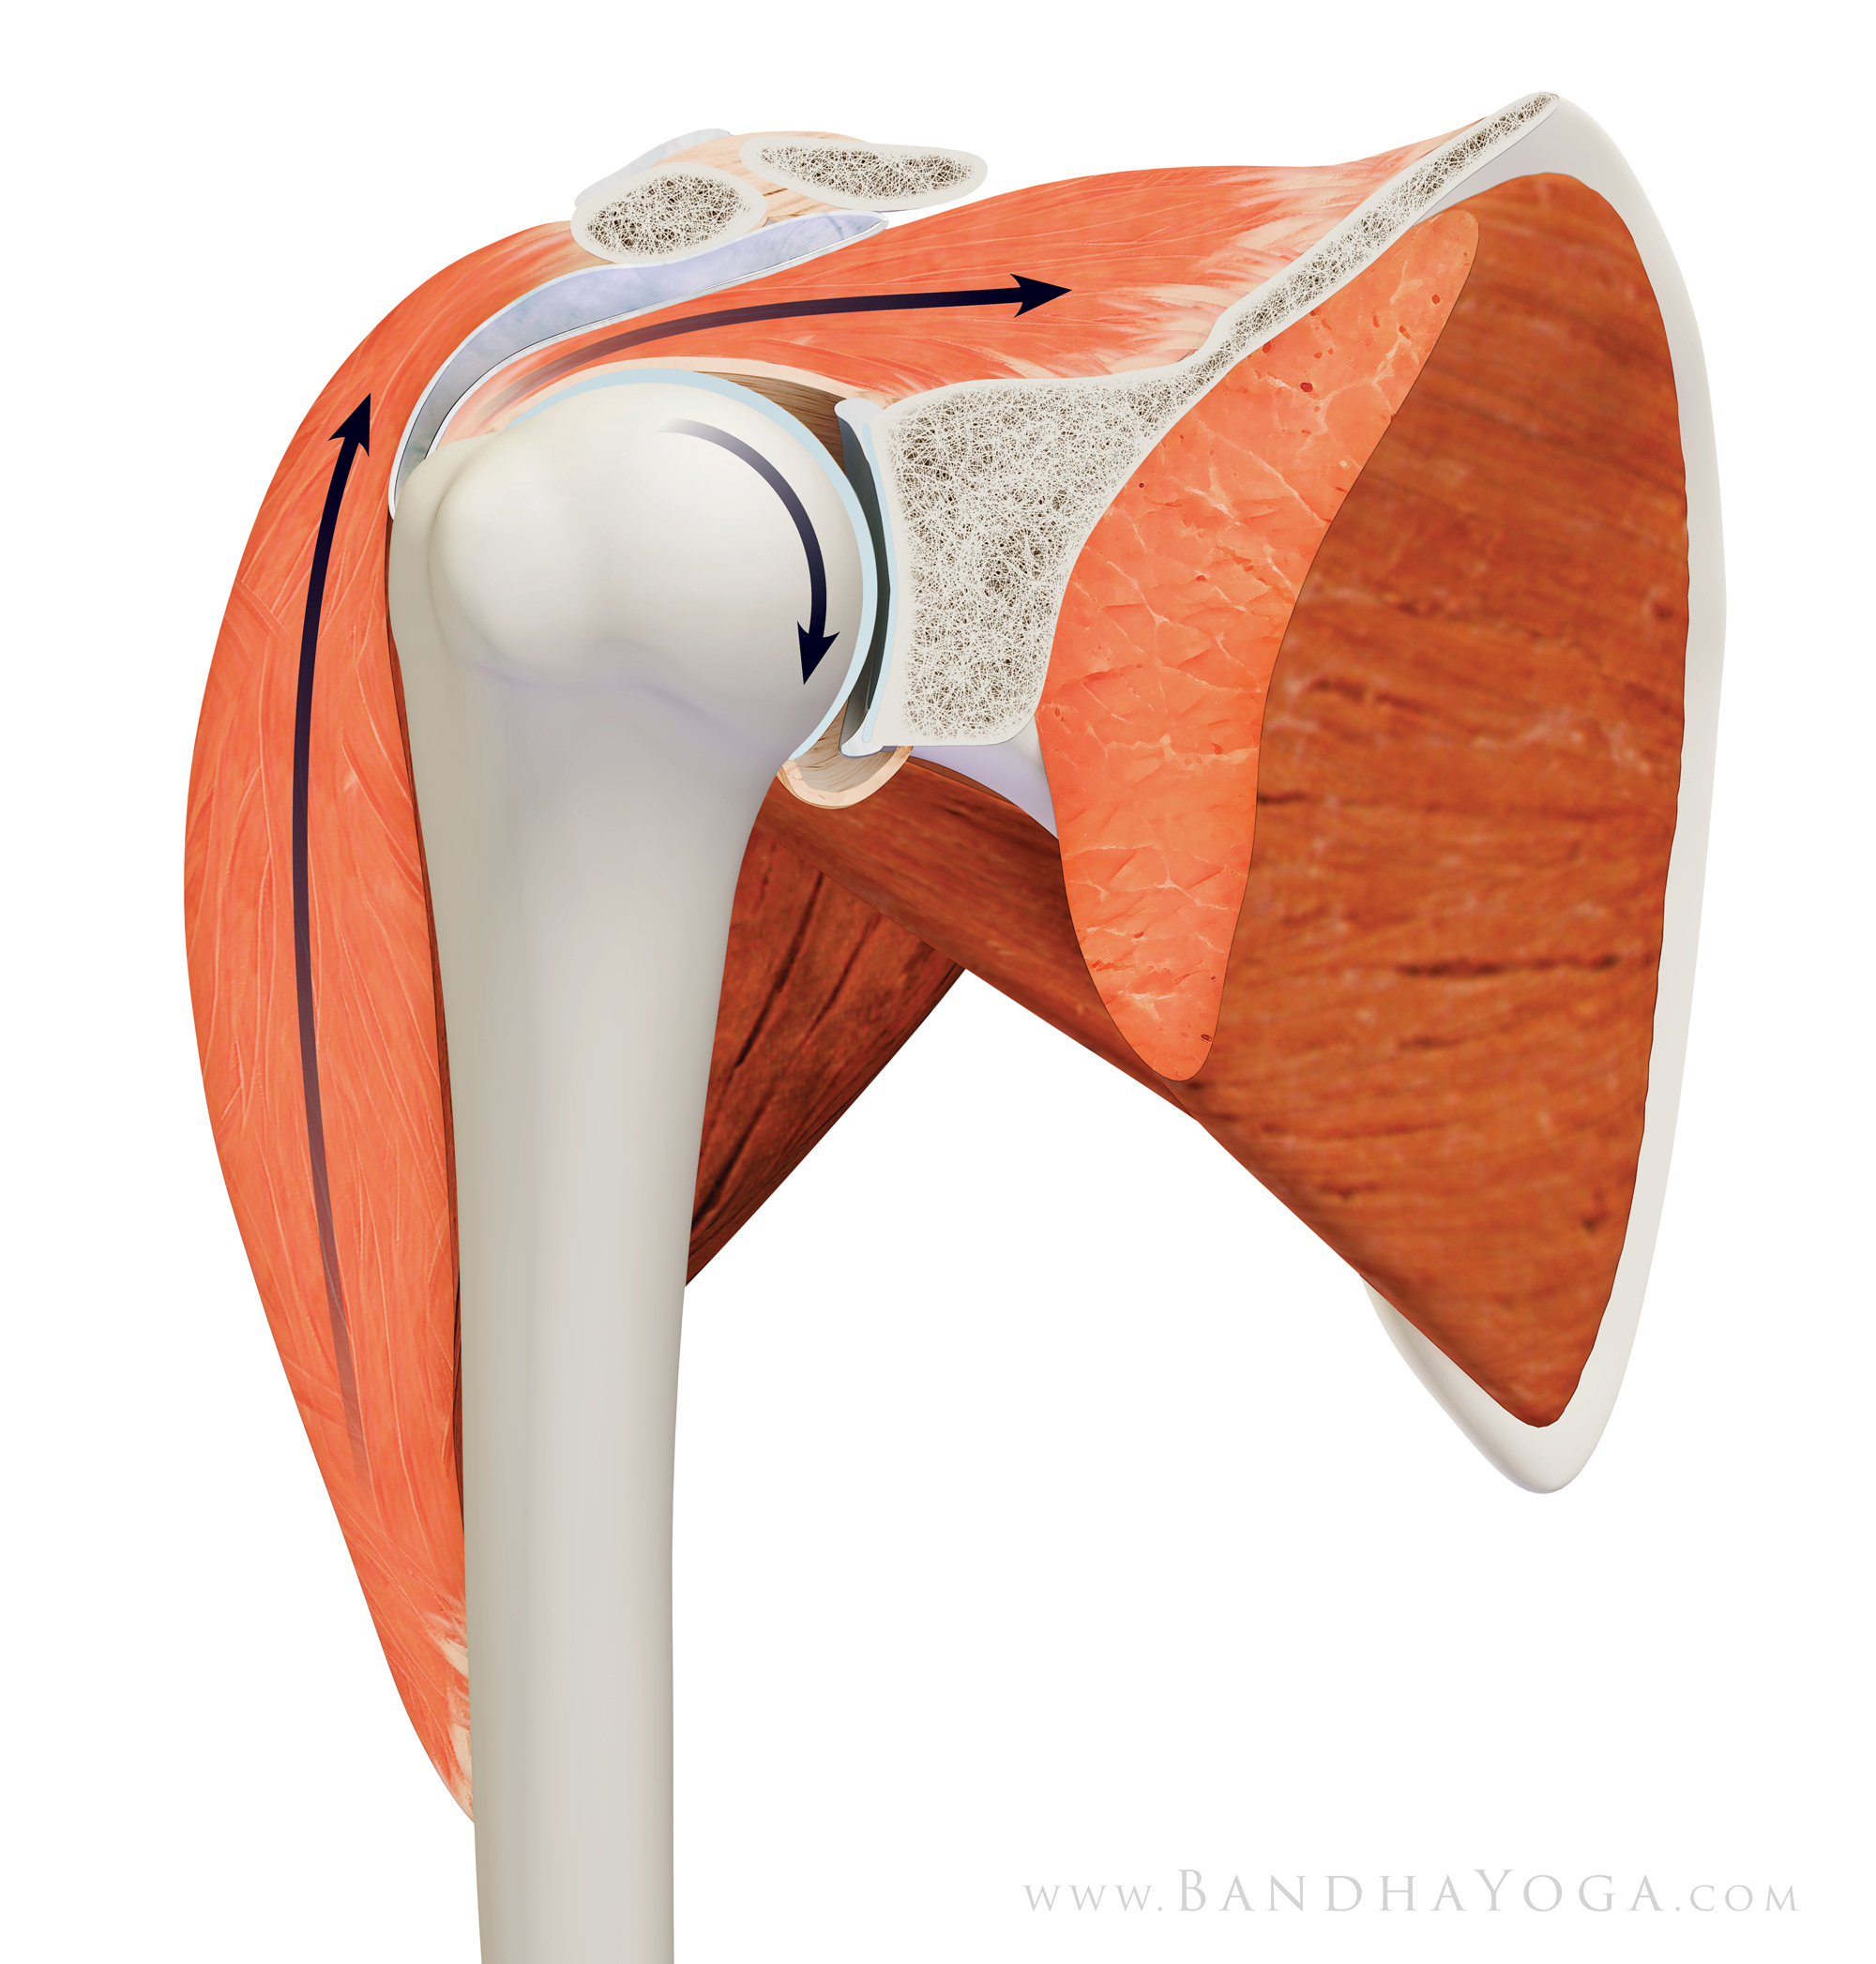 |
| Figure 3 - The Deltoid / Supraspinatus force couple. |
Injury to the rotator cuff, such as a tear or inflammation can lead to less efficient stabilization of the humeral head in the socket. As a consequence, when the deltoid contracts, instead of levering the humeral head off the glenoid, the force of the deltoid contraction causes the head of the humerus to shift upwards into the subacromial space. This can lead to impingement of the rotator cuff on the undersurface of the acromion, thus exacerbating the condition. To compensate, the body uses abnormal movement of the scapula in an attempt to stablize the humeral head in the socket. This abnormal movement of the scapula on the chest wall is known as “scapulothoracic dyskinesia”. I examine for this by comparing the movement of the normal and injured side from the back while having the patient raise the arms overhead.
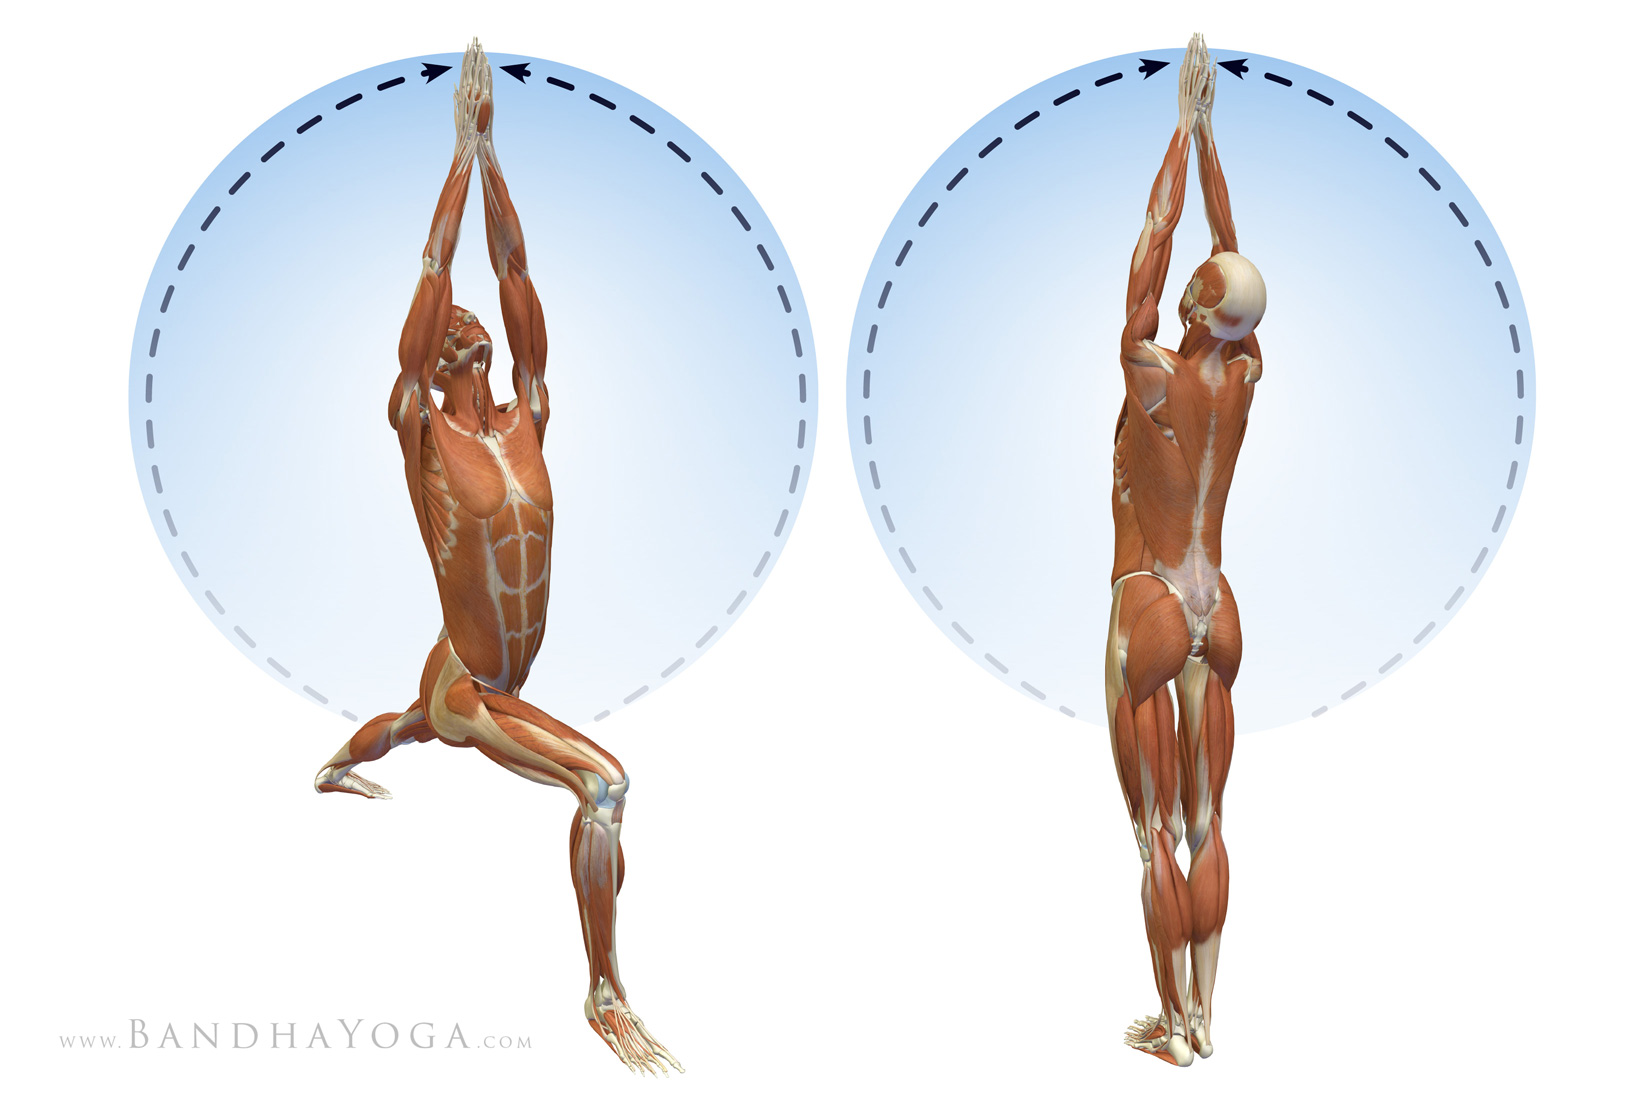 |
| Figure 4 - Raising the arms over the head in Warrior I and Tadasana. |
I hope this post helps you build your fund of knowledge regarding shoulder biomechanics. Stay tuned for my next post where I discuss some of the yoga poses that can be used to stretch and strengthen the rotator cuff. Learn more about anatomy, biomechanics and physiology for your yoga in “The Key Muscles of Yoga”, “The Key Poses of Yoga” and the Yoga Mat Companion Series. Click on any of these books to page through.
Thanks for stopping by--look forward to seeing you for my next post!
Ray Long, MD
↧
Hurricane Michael: View from the Eyewall
Hello Friends,
I’m writing from Panama City, FL. Last week, we got hit by Hurricane Michael. Please share this everywhere.
Most of you know me from writing about anatomy and yoga. My day (and night) job is an orthopedic trauma surgeon. I was on duty in Panama City for Hurricane Michael and wanted to share with you the experience and some things you probably won’t read in the news.
Here’s the timeline:
Tuesday October 9, 2018:
What had started as a tropical depression a few days earlier was now looking like a hurricane headed for the Panhandle of Florida. Folks were beginning to evacuate if they could. I had a busy morning clinic and it was clear that the patients and staff were worried. I had one surgical case I put on for after the clinic, a badly fractured femur in a really sweet lady. I needed to get her surgery done before the storm hit.
I operated on her in the afternoon, bridging the fracture with a retrograde nail. During the case, my phone went off with the caller ID “Mom”. I told my Mom through the speaker not to worry, I’d be in a safe place for the storm and finished up the case. There were a couple more consults to see and patients to round on, so I got home later in the evening and finished my notes from there.
I spent the night at my place on Panama City Beach. Checking the progress of the storm, I saw reports that it was heading for Panama City and coming in as a CAT 3 hurricane, with estimated landfall in the early afternoon EST. I looked at the weather map and, sure enough, it was going to hit my city. Before bed, I packed some extra scrubs in a sports bag and put some bottles of kombucha along with a couple of paleo MRE’s in a cooler in the fridge.
Wednesday October 10, 2018:
I was up at 5:00 AM when my phone beeped with a text from Rob, the senior partner in our trauma group up in Georgia. It was a checklist of things to do and have ready for what might well be a mass casualty situation. For years Rob had been one of Delta Force’s surgeons, deployed to numerous hotspots around the world. He was well versed on these real life scenarios. I went out on the balcony to go over his text.
The sky was grey. There was hardly any wind--just the occasional wispy gust. An light rain was falling. I looked down at the ocean to a mesmerizing sight. Rolling in from the horizon were sets of massive 25 foot waves (the news would later report that they were actually measured at 30 feet--before the measuring device broke).
In the distance, across the expanse of the Gulf, I could see what looked like a massive storm heading in. The ominous view across the ocean, along with Rob’s text, gave me a sinking feeling in my stomach that Hurricane Michael would be bad.
I grabbed my bags and headed out. The condo complex was silent because everyone had evacuated. The only sign of life was a crew of storm chasers, kitted out with weather gear and supplies on their 4-wheel drive, and bivouacked on the ground floor. We exchanged a few words, told each other to stay safe and then I wheeled out onto Thomas Drive. I think this is some of their footage from outside my complex.
The beach town was deserted--not a car or person in sight. I gunned the Hellcat through all of the red lights and got to the Hathaway Bridge. The wind was just starting to pick up. The bridge was empty except another storm chaser who was parked and measuring wind speed. As I turned off the bridge, Florida Governor Rick Scott sent out a text on the emergency broadcasting system reading: “the time to evacuate has come and gone. Seek shelter now!”
Panama City Florida is a working class town. We have a lot of Mom and Pop businesses. There are a lot of folks here for the military bases. Many of the people who live here are employed by the two major hospitals, Gulf Coast (my hospital) and Bay Medical. As a testament to the strong family values here, they passed an ordinance banning alcohol on the beach during Spring Break, due to the bad stuff that was happening. That probably cost some tourism dollars but they passed the ordinance anyway. We don’t have a Starbucks, or an Apple Store, or a Whole Foods.
I can say that the folks from Panama City are great to have as patients. They nearly always thank me, no matter how dire their circumstances. A day doesn’t go by that I’m not made to feel like a hero. The nurses and other staff are great too, as you will see below.
When I arrived at the hospital a few minutes later, Hurricane Michael had gathered force and was now coming in as a Category 4, with sustained winds in excess of 155 mph. It looked like it would hit us around 1:00 pm EST. I rounded on my patients, including my lady with the femur fracture. She had been too sedated right after surgery the day before, so I explained what I had done for her injury. She patted me on the arm and thanked me. Three new patients had come in overnight, two with hip fractures and another with an elbow fracture (distal humerus). I got them tucked in, planning to do surgery after the storm.
I gave my Mom a call to tell her I was safe and not to worry. The cell phone went dead and, at around that point, the building began to shake. I was heading down to the emergency department when wind and water started pouring through the ceiling of my office.
As I made my way through the short corridor to the main hospital, I caught a glimpse of the hurricane outside. It looked like a fast moving train, with large trees bent over horizontal at their trunks--or flying through the air--and it was going non-stop.
The first floor of the hospital was a bustle of activity. A line of people were moving the chairs from the waiting area into the corridor. I joined the line and helped drag some of the chairs and got word that we were evacuating the third floor patients to the first floor, and those that could sit would be in the chairs.
The hurricane had apparently breached the third floor. The nurses had barricaded the doors to the rooms it breached to prevent it from entering the hallway (where the patients had been moved to). The nurses did great work during this crisis situation. Things had to move fast and they got this initial evacuation done, while keeping the patients calm and safe.
By then the outside power was down and we were on generator. Water was also down, due to the uprooted trees. Word came in that Michael had shattered the windows at one of the nearby hotels, causing lacerations to around twenty people. I went to the emergency room to prepare. We put together the things we needed, including suture kits, lap pads, tubs of four by fours for compression. I had the tourniquets ready from the operating room, should I need them. Next, word came through that the roof of a nursing home had collapsed, with patients inside.
The problem was that the storm was still raging unabated like a freight train and the streets were impassable for EMS (or anyone else) due to power lines and trees being down across the roads. There was no possibility of transporting the patients to us--or us to them. All we could do was wait it out.
Finally, the storm passed. I went over to my office, which had about four inches of water on the floor and the ceiling sagging down. The sky showed through a hole in the roof. Then I walked outside to an apocalyptic scene. Trees were down everywhere, entangled power lines covered the streets. Cars were lifted up onto the curbs, trucks on their sides, windows smashed in. My car had sustained a severe bonk from a tree or something on the passenger side and had a jagged crease from a bash across the hood. Normally, that would have pissed me off. After this storm, I didn’t give it a second thought.
Patients started to come in. A woman had been crouched, seeking shelter in her house when the roof blew off. Water poured in and when she tried to get up, she slipped and fell, severely fracturing her wrist. Later, she had wandered out into the darkness to seek help. A police officer patrolling found her, put her in his car and navigated the power line strewn streets to bring her to the hospital. Amazing.
We did our best to comfort her and, under conscious sedation, I reduced the fracture and splinted her wrist. She told me what happened, how she had no means or place to evacuate to and how her roof had been blown off. I mentioned in passing that the roof of my office had been damaged too. She immediately said she would pray for me and thanked me for helping her. This woman had lost everything and was injured and yet was concerned for me. As I said, there are some amazing people in this town.
The Coast Guard brought in a patient that had been extricated from a house by a PJ who had been lowered down with a basket from a helicopter. As soon as the patient was transferred, the Coast Guard team was out the door on another run without batting an eye. We had someone struck by a tree with severe head and other injuries, another person crushed between vehicles, other patients with fractures. I found out that nobody was injured at the nursing home. A few of the laceration patients made it in and were sewn up by the ER docs.
Throughout the build up to and during the storm, the nurses and other hospital staff were staying in the hospital and sleeping in shifts on air mattresses and cots. The cafeteria staff were great. We formed up a chow line and made our way through. The staff made us great meals and always served us with smiles. To put this in perspective, most of the nurses and other hospital staff are local residents, many with young kids. They were working and focused on helping others, at the same time not knowing what was happening to their own homes and families during this raging storm.
Thursday October 11, 2018:
One of the nurses gave me a pillow and, around 3 am, I crashed out on the gurney in the pediatric trauma room. I got up at 6 AM to the news that we would be evacuating all of the patients to Tallahassee and Fort Walton Beach. The nurses lined up, one to a patient, getting ready to take them out to the helicopters that were landing. The head nurse, who must surely be former military, was giving orders to the team leaders, who then organized the teams, twelve patients at a time, each with their nurse. They carried off the evacuation without a hitch.
A few days later I saw an article on the net entitled “Doctors Evacuate Patients from Panama City Hospitals”. I had to laugh. The nurses did it all. It should have read “Doctors stay out of way as patients are evacuated…”
That night I made my way back to my place on the beach. It was a surreal scene snaking down 23rd Street, with high tension lines, trees and telephone poles reducing the road to one lane in some places. When I got home, I saw that there was no power or water, and the darkened buildings were empty. I walked up the eleven flights to my place. It was intact except a little water leakage. The night was like a scene out of “Blade Runner”, a huge building standing silent against a clear starry sky. Looking back at the darkened city, the only lights were the blue flashing lights of police cars and ambulances.
Rescue personnel are still trying to get through the many nearly impassable streets, and the death toll rises daily. The power is still out in much of the area, including much of Panama City, though it is back now on the beach. People are now coming in with the injuries we expect in the aftermath of a hurricane--fractures from falls from roofs, rattlesnake bites, chainsaw injuries, dehydration. The serious have to be transferred to hospitals outside the area.
Here's some video footage that I took during the storm and of the aftermath.
And here's another video right after the storm passed.
The media cycle is moving on but it’s going to be a long road back for this area of the world. Many of the folks who live here, good people who live from paycheck to paycheck, are truly left with nothing. I’m particularly concerned for the incredibly dedicated hospital staff who may have lost much or all in this storm. I just wanted to give you a view of what happened. I have started a GoFundMe campaign in support of the hospital staff affected by the hurricane. All funds collected will go to the HCA Hope Fund, which helps families of staff who are displaced. Click here to help.
Please help out in any way you can and please spread the word around the world.
Thanks,
Ray Long, MD
↧
↧
Co-activate Your Psoas and Quads in Trikonasana
Hello Friends,
Sometimes doing just one pose can set you up for the whole day. In this post, let’s look at Trikonasana or Triangle Pose and a powerful cue for stabilizing your pelvis and lumbar.Understanding tips like this one also sharpens your knowledge of anatomical and biomechanical principles.
The principle at work here is that of muscle co-contraction. This cue co-contracts or activates two separate muscles, namely, the psoas and quadriceps of the forward leg. As a consequence, you will feel a deep stability in your hip joint and a connection from your leg to your lumbar spine.
Here's the cue:
Extend your forward leg knee by contracting the quadriceps. At the same time, press down with your torso through the arm into the hand, and onto your shin. This activates your psoas (and iliacus), tilting the pelvis over the forward leg and, by lumbopelvic rhythm, drawing the lumbar out of hyperflexion. Feel how this connection stabilizes your pelvis and lumbar and awakens the forward leg in the pose.
In the beginning, it may be difficult to get the hang of activating your psoas. Get a feel for this by bending the knee and pressing down on the thigh through your elbow as shown here. Click here for an entire series of poses you can use to awaken your psoas.
I hope you enjoy this cue. Think about what's happening biomechanically while you work with this. Thanks as well to everyone for your support of the folks in Panama City who were affected by Hurricane Michael. Check back next week to see how to integrate the back leg into this cue for Trikonasana.
All the Best,
Ray Long, MD
Sometimes doing just one pose can set you up for the whole day. In this post, let’s look at Trikonasana or Triangle Pose and a powerful cue for stabilizing your pelvis and lumbar.Understanding tips like this one also sharpens your knowledge of anatomical and biomechanical principles.
The principle at work here is that of muscle co-contraction. This cue co-contracts or activates two separate muscles, namely, the psoas and quadriceps of the forward leg. As a consequence, you will feel a deep stability in your hip joint and a connection from your leg to your lumbar spine.
Here's the cue:
Extend your forward leg knee by contracting the quadriceps. At the same time, press down with your torso through the arm into the hand, and onto your shin. This activates your psoas (and iliacus), tilting the pelvis over the forward leg and, by lumbopelvic rhythm, drawing the lumbar out of hyperflexion. Feel how this connection stabilizes your pelvis and lumbar and awakens the forward leg in the pose.
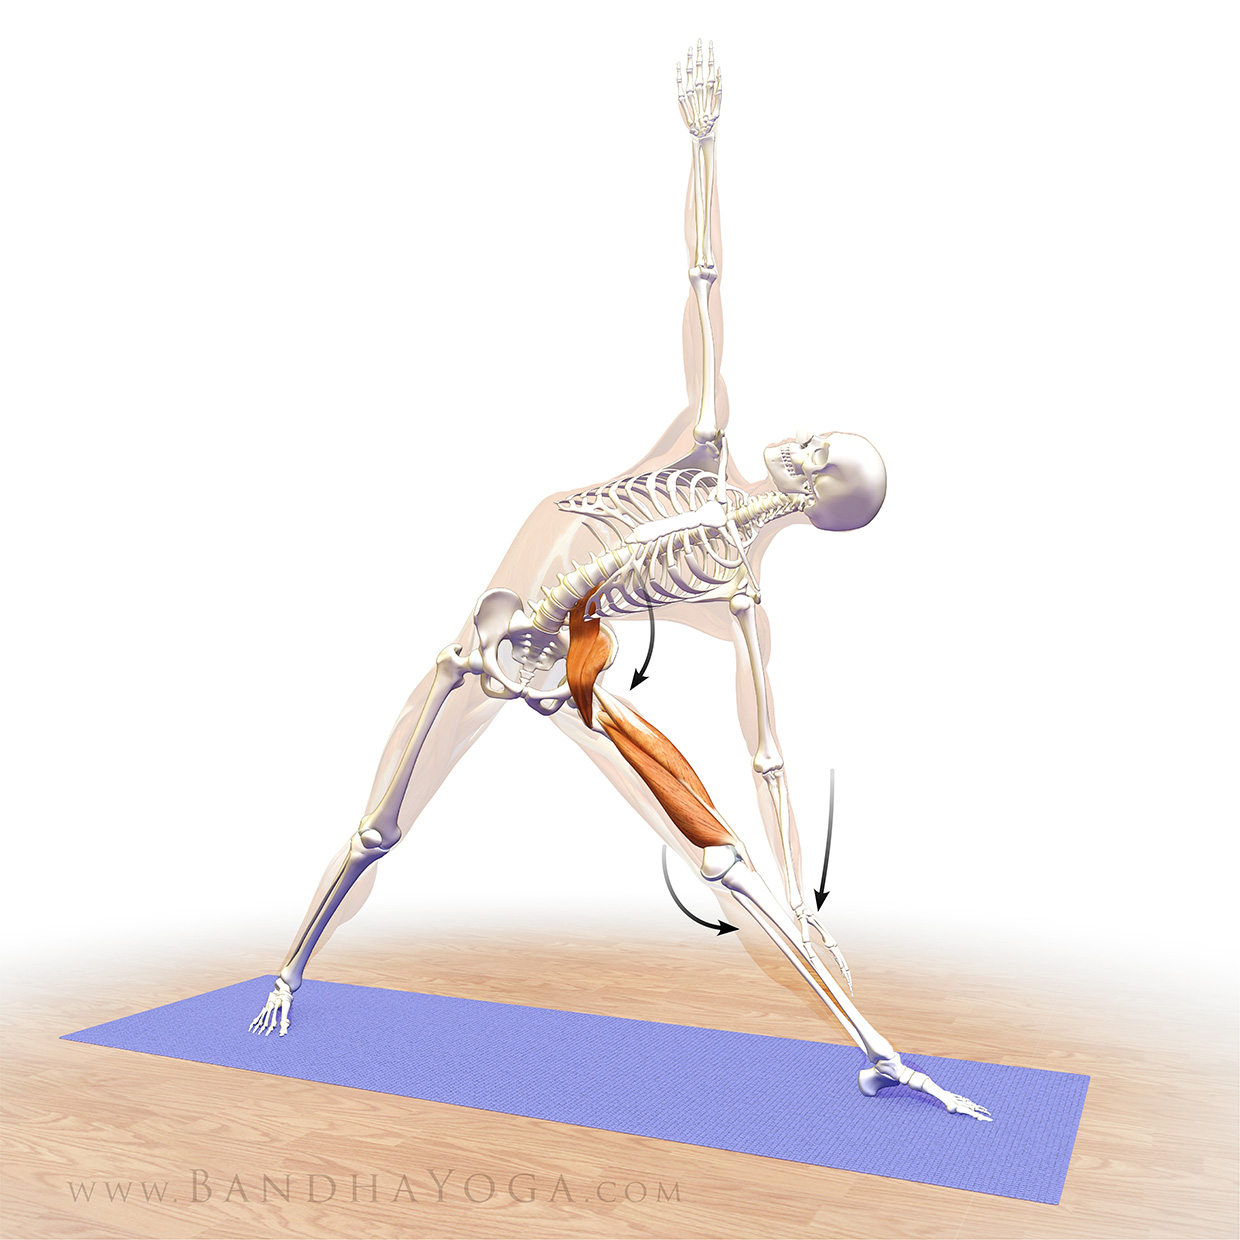 |
| Figure 1:Co-activating the psoas and quads in Trikonasana |
In the beginning, it may be difficult to get the hang of activating your psoas. Get a feel for this by bending the knee and pressing down on the thigh through your elbow as shown here. Click here for an entire series of poses you can use to awaken your psoas.
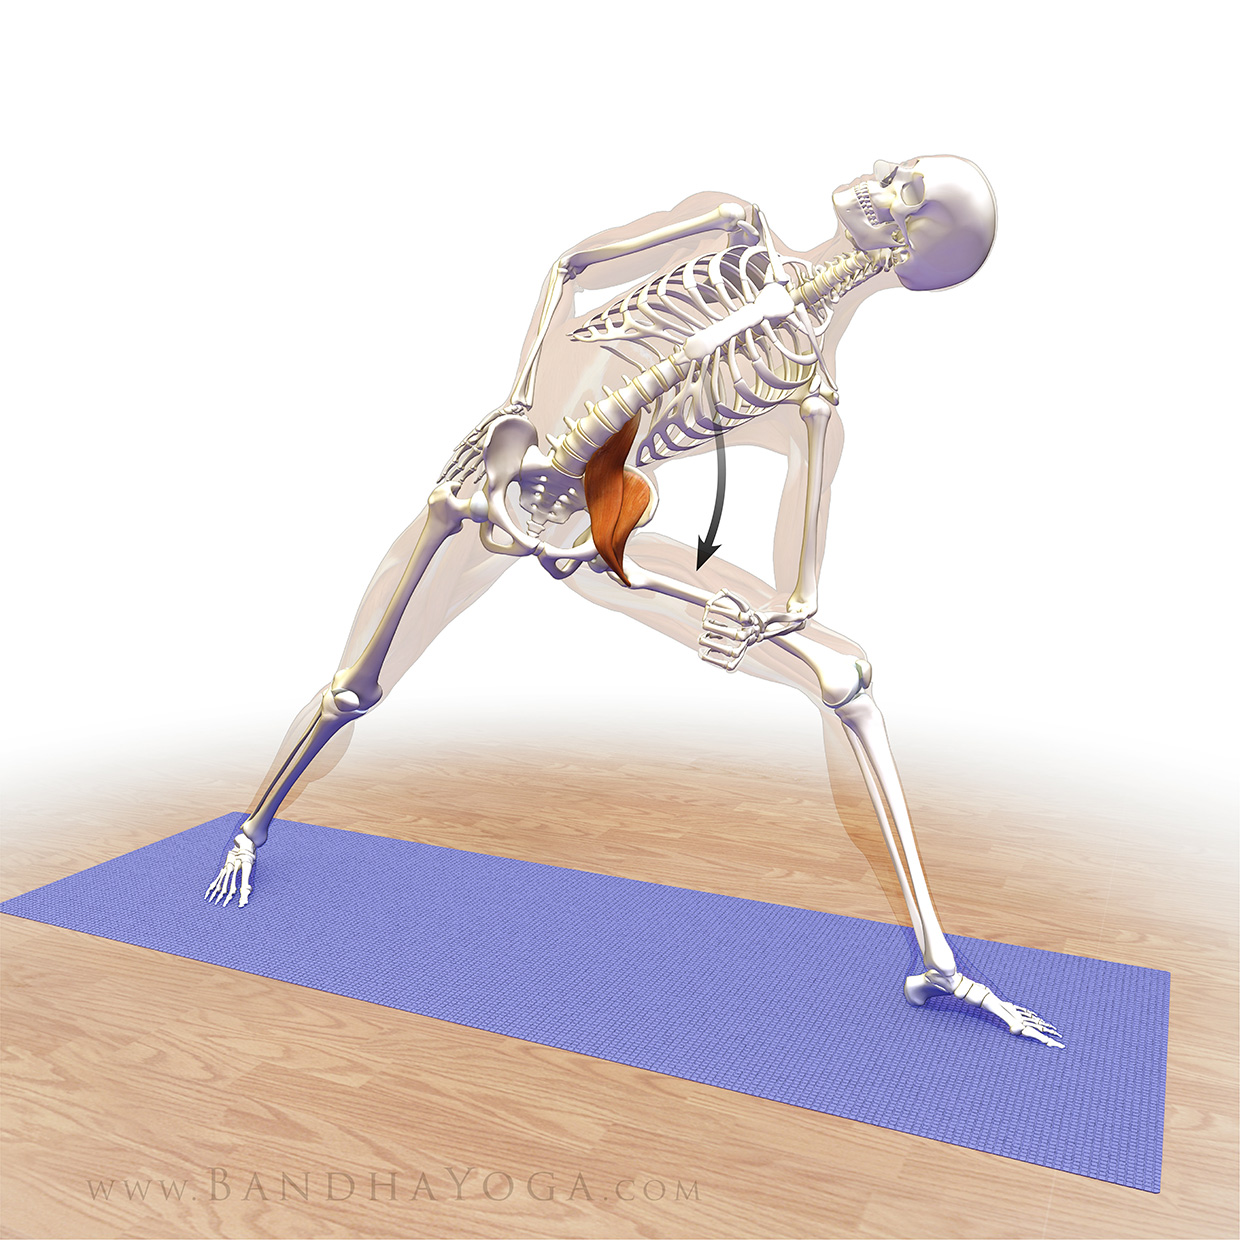 |
| Figure 2: Activating your psoas (and iliacus). |
I hope you enjoy this cue. Think about what's happening biomechanically while you work with this. Thanks as well to everyone for your support of the folks in Panama City who were affected by Hurricane Michael. Check back next week to see how to integrate the back leg into this cue for Trikonasana.
All the Best,
Ray Long, MD
↧
Trikonasana Part Two: Your Sacroiliac Joint
Hello Friends,
In this post, we continue our journey through Trikonasana (Triangle Pose) with a cue that connects the forward leg psoas with the back leg glutes, thus stabilizing your pelvis.
First, take a quick look at the cue from my previous post on co-contracting the psoas and quads of your forward leg. Engage the forward leg psoas and quads and then add contraction of the rear leg gluteus maximus (and quadriceps) as shown here in figure 1.
The psoas creates a force that tilts the forward leg side of the pelvis (hemipelvis) forward (anteversion) while the gluteus maximus creates a retroversion force on the back leg side hemipelvis. You will feel how combining these opposing forces stabilizes your pelvis. Figures 2 and 3 illustrate this concept.
Click on the image below to learn more about the sacroiliac joint.
Engage the muscles that create the form of the asana and the asana will emerge, along with its benefits. Learn more about this concept, along with other powerful cues for your practice from the Yoga Mat Companion Series and The Key Muscles and Key Poses of Yoga book series.
Thanks for stopping by and also thanks to all who helped out with Hurricane Michael Relief. Check in next week for the next cue for Trikonasana…
Best,
Ray Long, MD
In this post, we continue our journey through Trikonasana (Triangle Pose) with a cue that connects the forward leg psoas with the back leg glutes, thus stabilizing your pelvis.
First, take a quick look at the cue from my previous post on co-contracting the psoas and quads of your forward leg. Engage the forward leg psoas and quads and then add contraction of the rear leg gluteus maximus (and quadriceps) as shown here in figure 1.
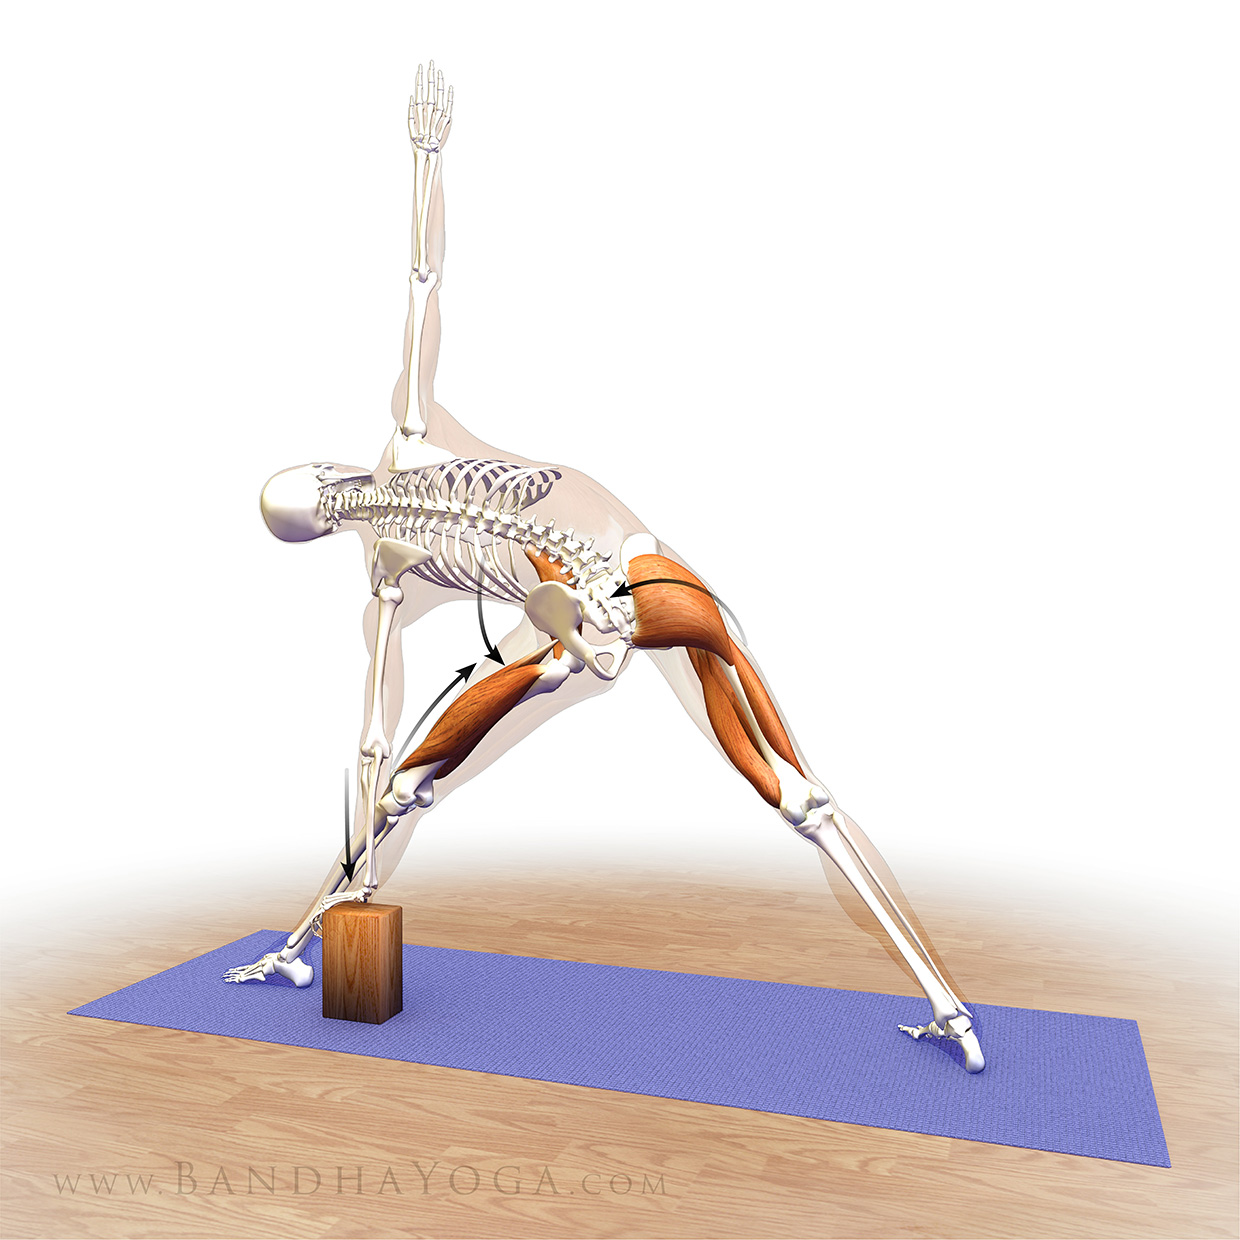 |
| Figure 1: Co-contracting the psoas and glutes in Trikonasana. |
The psoas creates a force that tilts the forward leg side of the pelvis (hemipelvis) forward (anteversion) while the gluteus maximus creates a retroversion force on the back leg side hemipelvis. You will feel how combining these opposing forces stabilizes your pelvis. Figures 2 and 3 illustrate this concept.
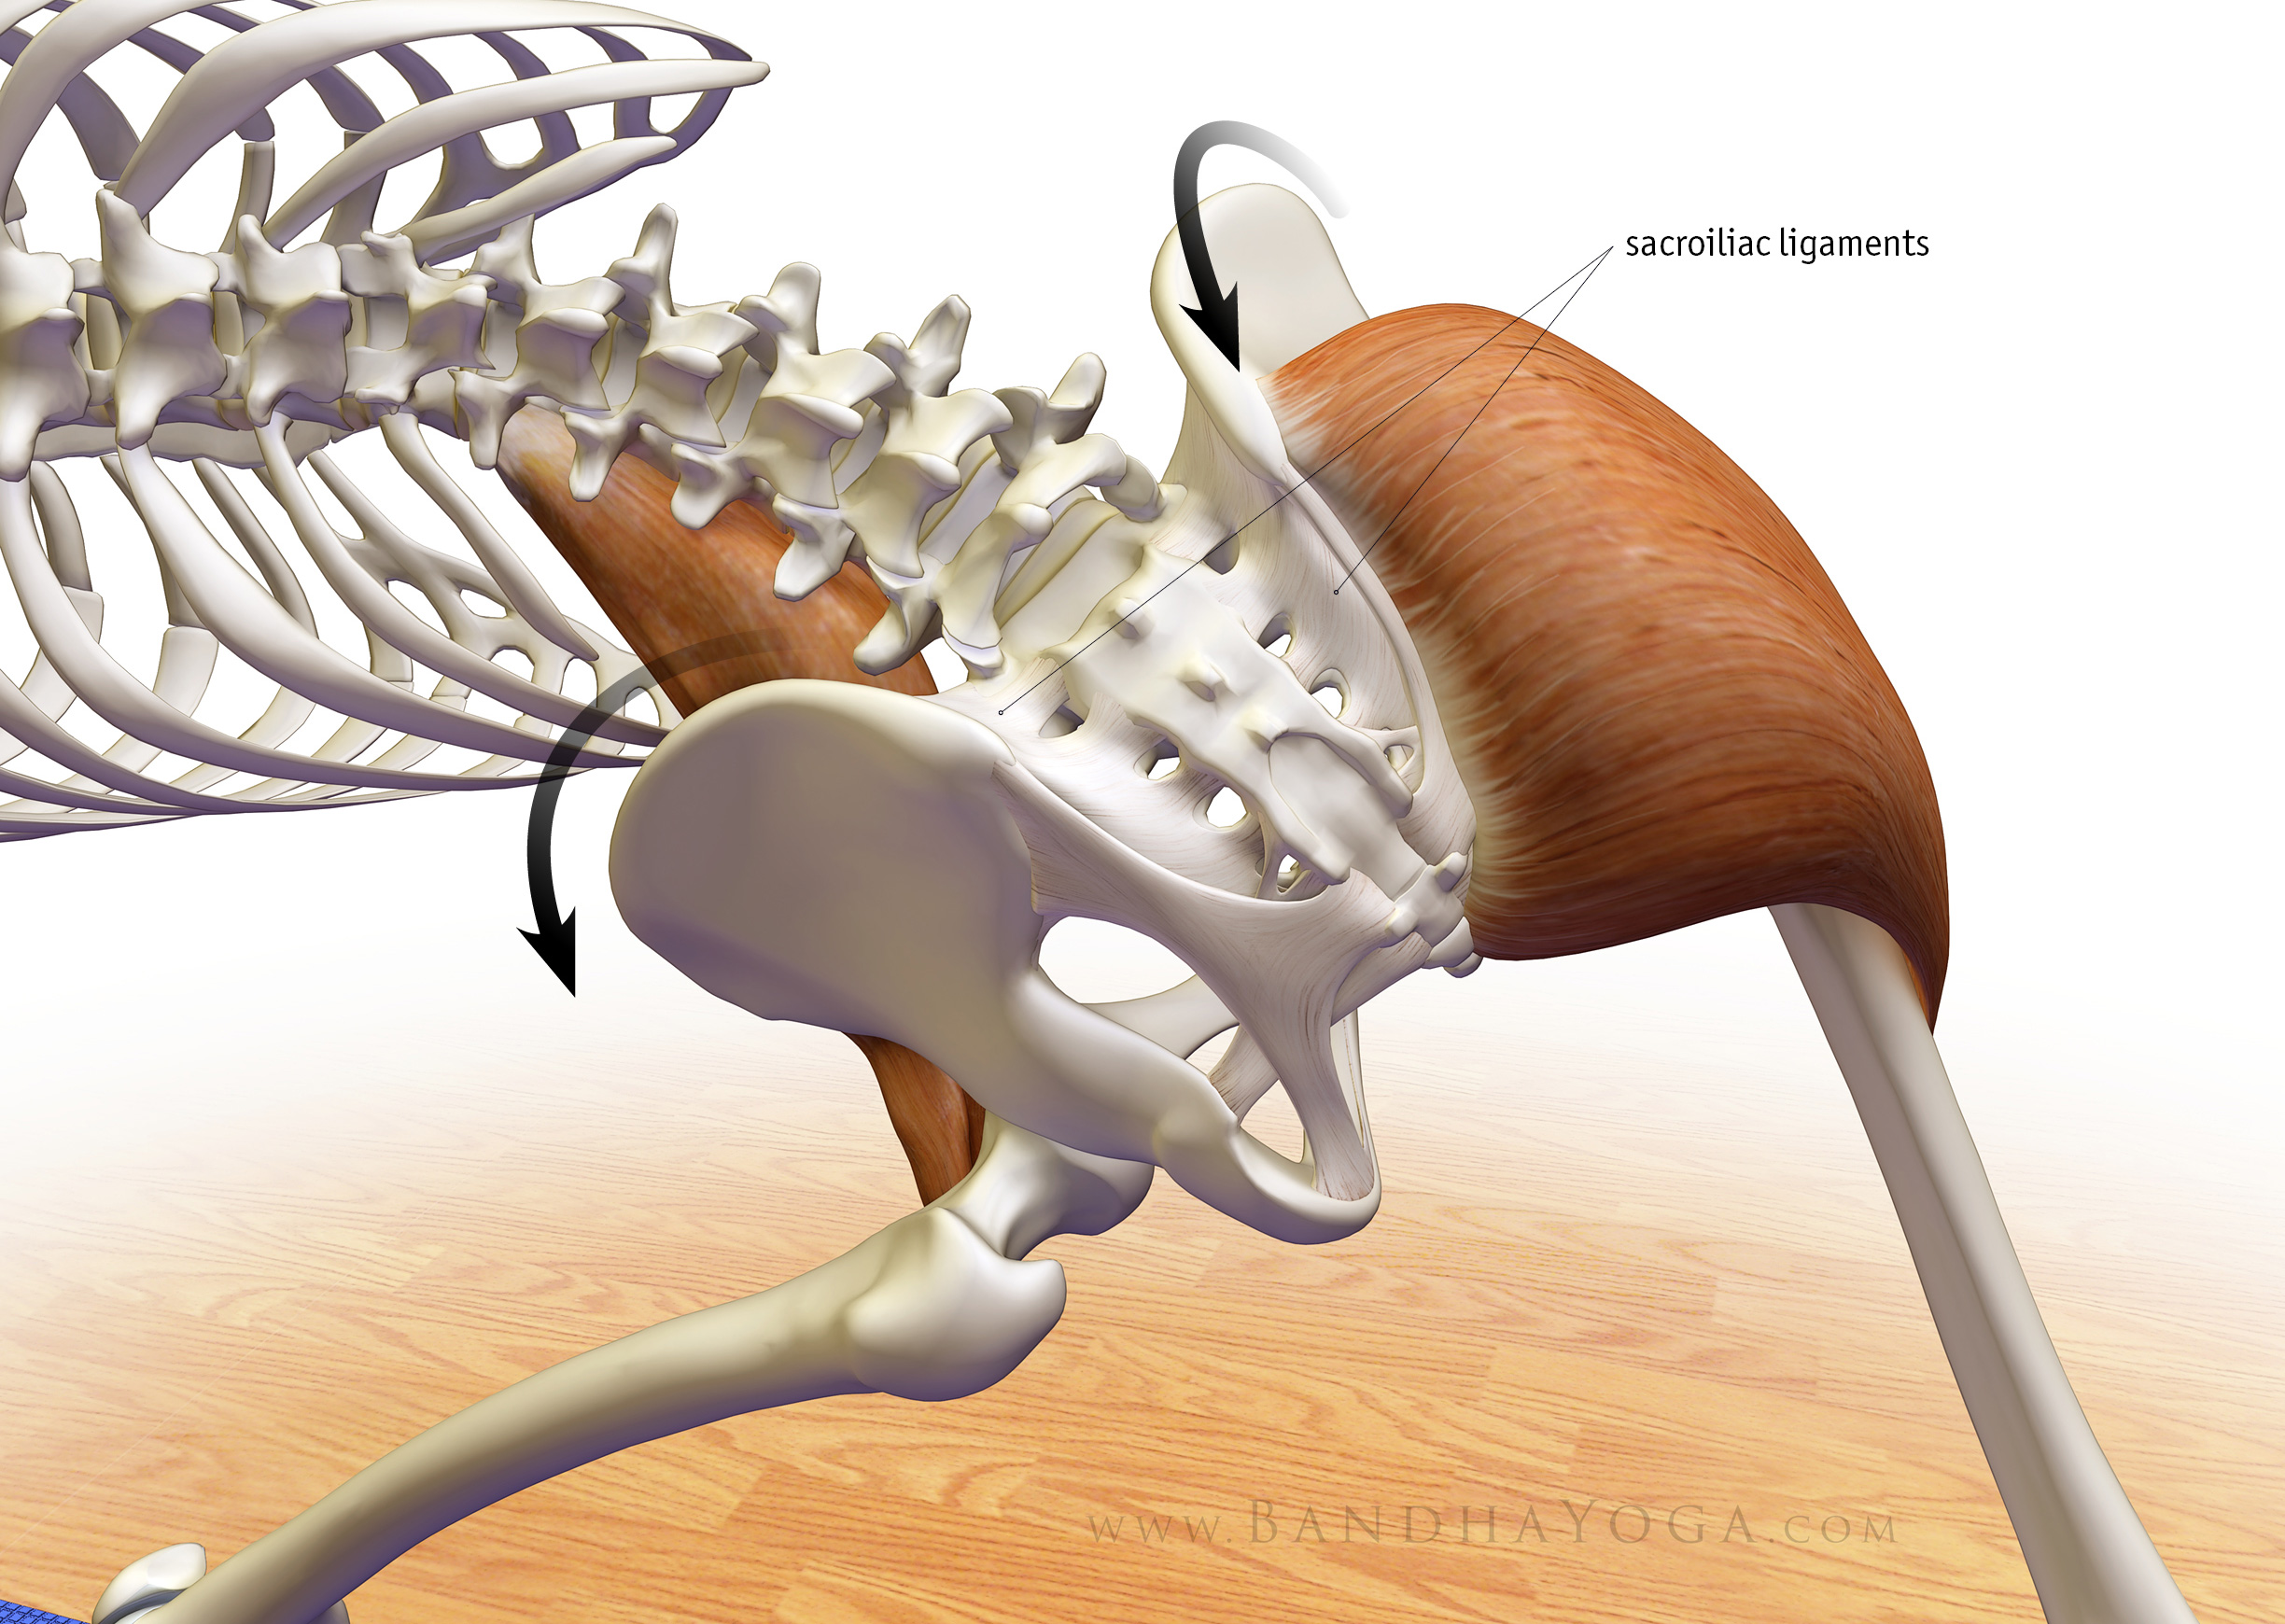 |
| Figure 2: The opposing forces of the glutes and psoas and the posterior SI ligaments stabilizing the pelvis. |
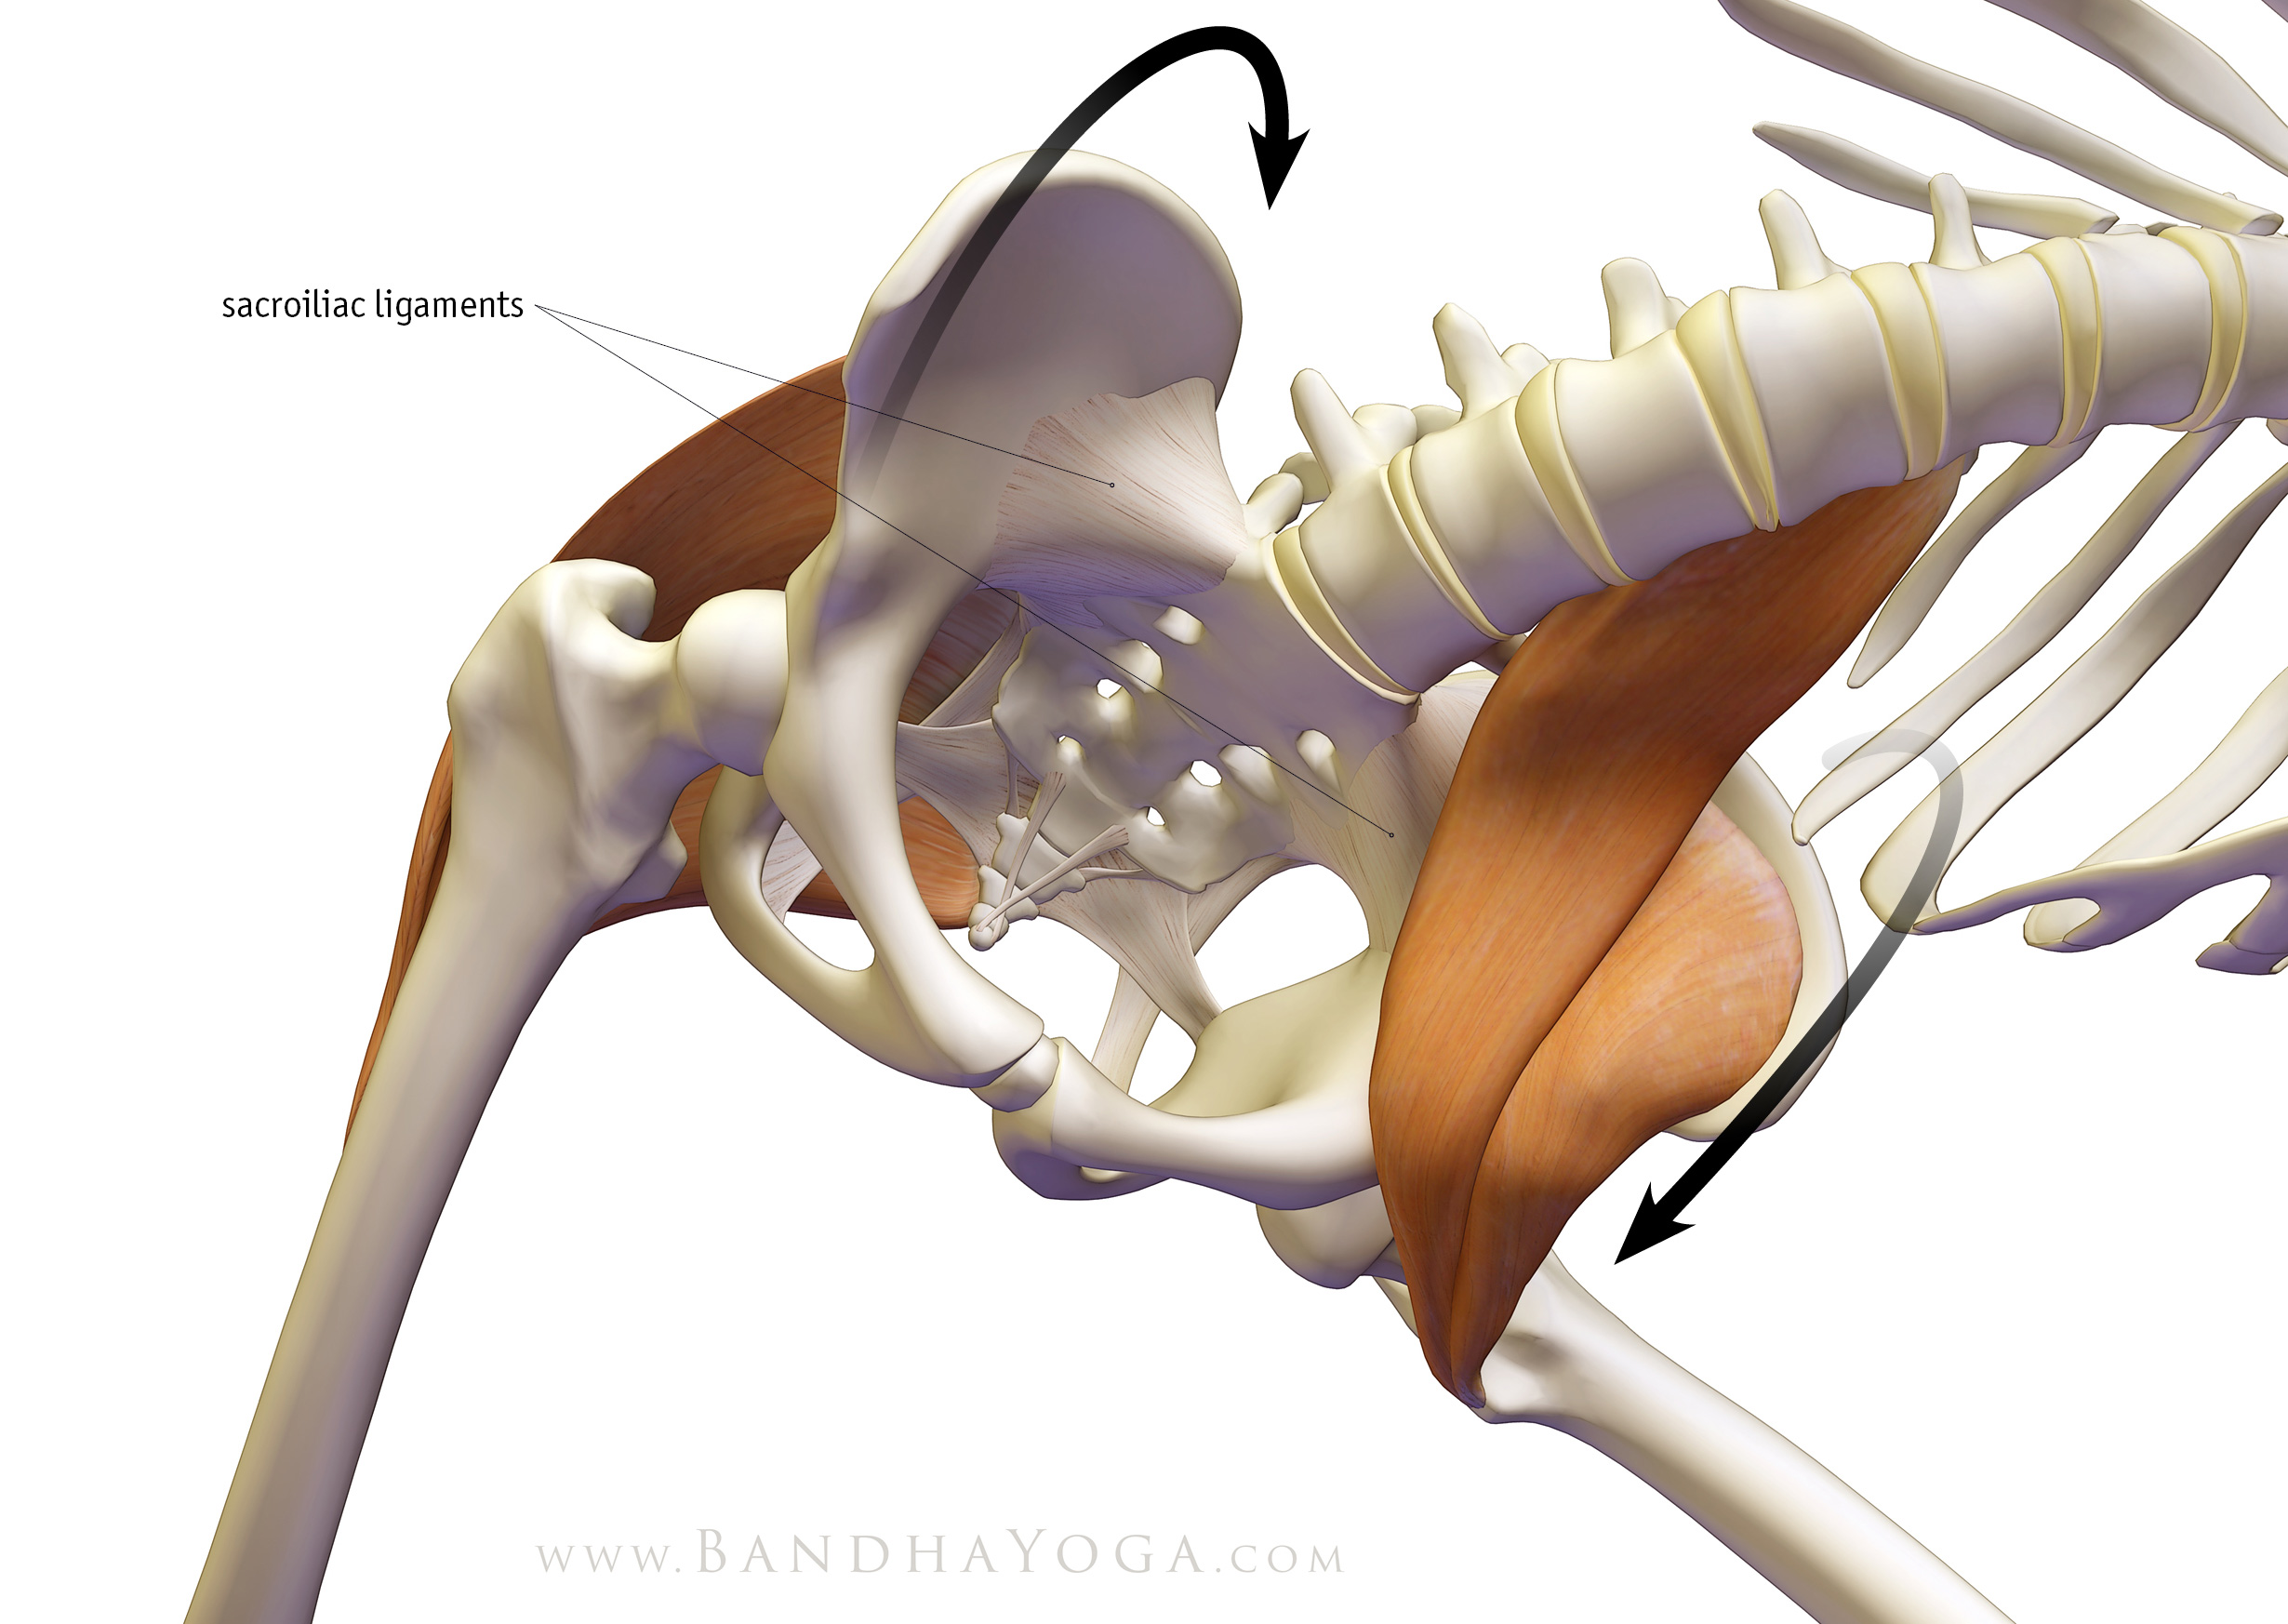 |
| Figure 3: Opposing forces of the psoas and glutes and the anterior SI ligaments stabilizing the pelvis. |
Click on the image below to learn more about the sacroiliac joint.
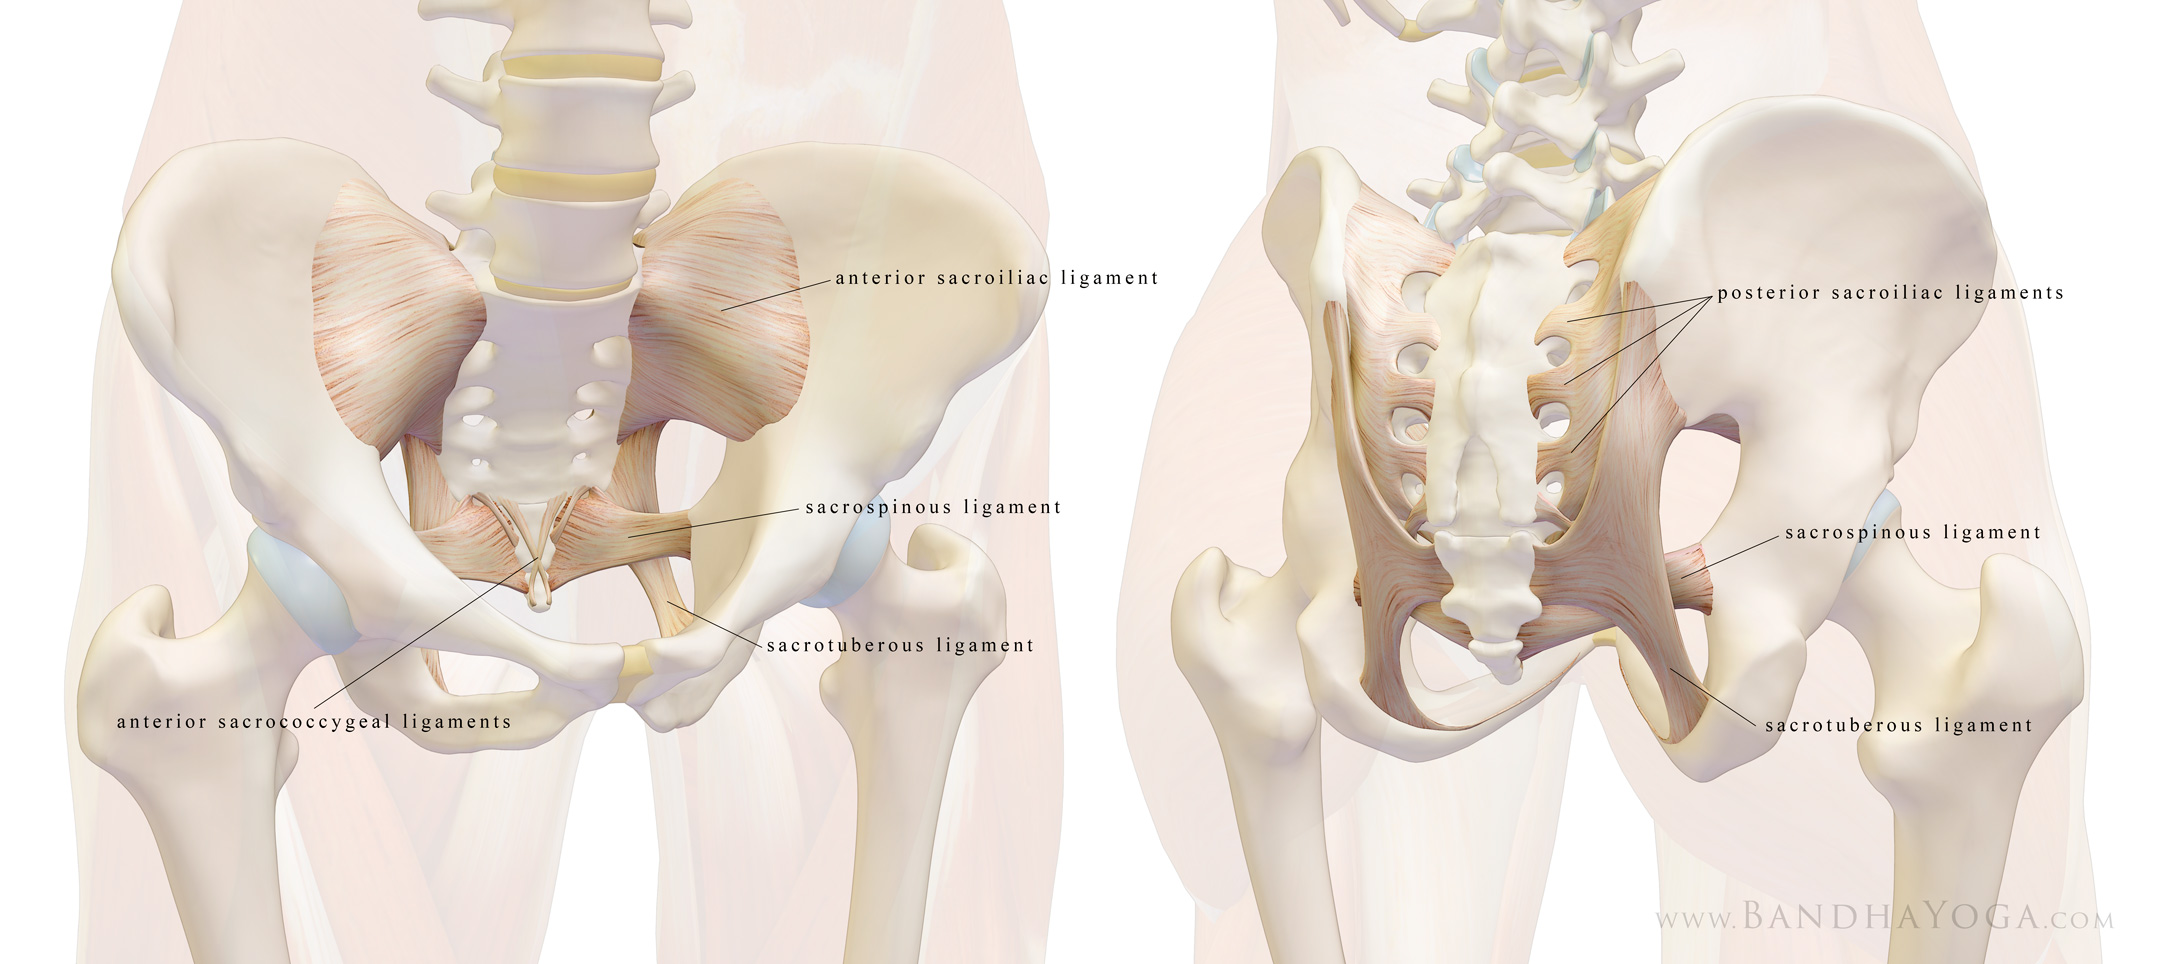 |
| The ligaments of the sacroiliac joint. |
Engage the muscles that create the form of the asana and the asana will emerge, along with its benefits. Learn more about this concept, along with other powerful cues for your practice from the Yoga Mat Companion Series and The Key Muscles and Key Poses of Yoga book series.
Thanks for stopping by and also thanks to all who helped out with Hurricane Michael Relief. Check in next week for the next cue for Trikonasana…
Best,
Ray Long, MD
↧
Trikonasana Part Three: Foot Arch Mastery
Hello Friends,
William Blake said you can see the world in a grain of sand. Similarly, fundamental principles you master in one asana are portable to others. With this in mind, let’s look at the key elements for activating your foot arch in the front leg foot in Trikonasana (Triangle Pose). Here’s the cue…
First, press the outer edge of your foot into the mat. This engages the tibialis anterior and posterior muscles of the lower leg (figure 1).
Maintain that action as you press the ball of your foot into the mat. This engages the peroneus longus and brevis muscles on the outside of your lower leg (figure 2).
Co-activating the muscles that invert (supinate) and evert (pronate) your foot creates an opposing force between these two antagonistic actions that stabilizes your ankle.
These same muscles work together (as synergists) to lift your foot arch (figures 3 and 4).
Click here to learn about another antagonist/synergist combination.Click here to learn more about your foot arch…
Review the last two posts to see how to connect the foot arch to your core.
I hope you enjoyed this blog post. Page through the Key Muscles and Key Poses of Yoga and the Yoga Mat Companion Series to learn more about anatomy and biomechanics for yoga. See you next week when I will post another tip on anatomy and biomechanics for yoga.
Best,
Ray Long, MD
William Blake said you can see the world in a grain of sand. Similarly, fundamental principles you master in one asana are portable to others. With this in mind, let’s look at the key elements for activating your foot arch in the front leg foot in Trikonasana (Triangle Pose). Here’s the cue…
First, press the outer edge of your foot into the mat. This engages the tibialis anterior and posterior muscles of the lower leg (figure 1).
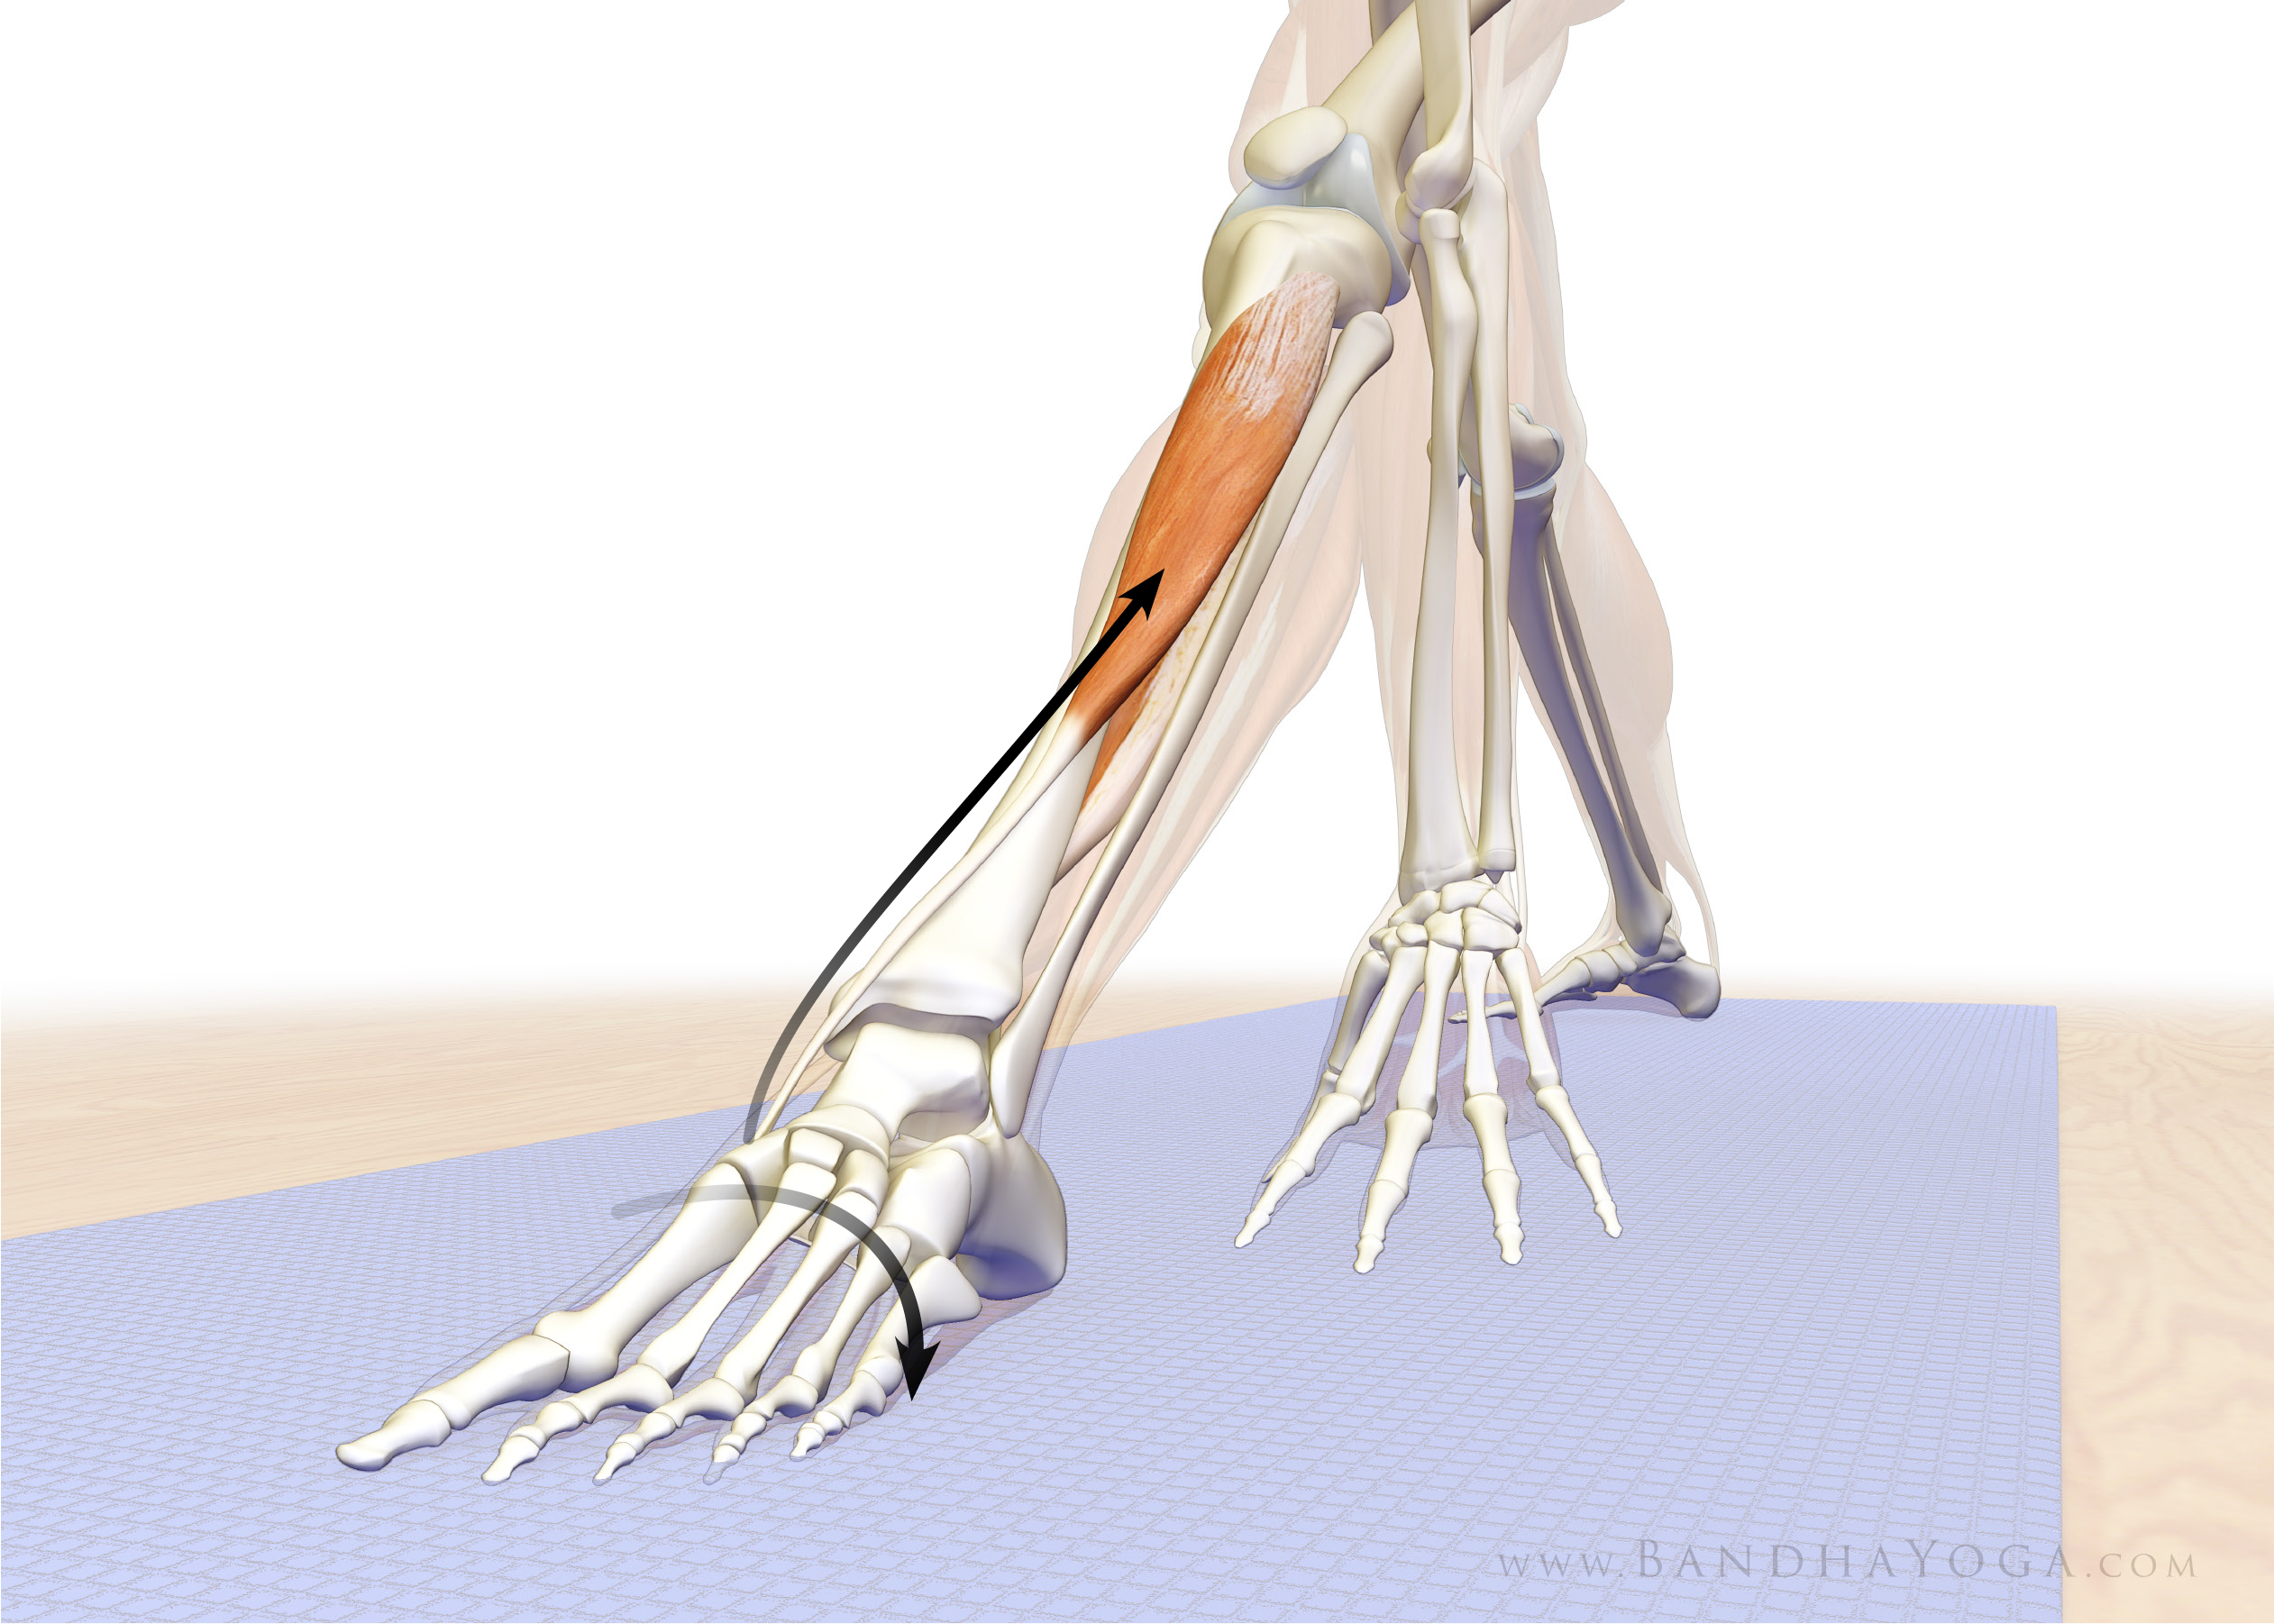 |
| Figure 1 |
Maintain that action as you press the ball of your foot into the mat. This engages the peroneus longus and brevis muscles on the outside of your lower leg (figure 2).
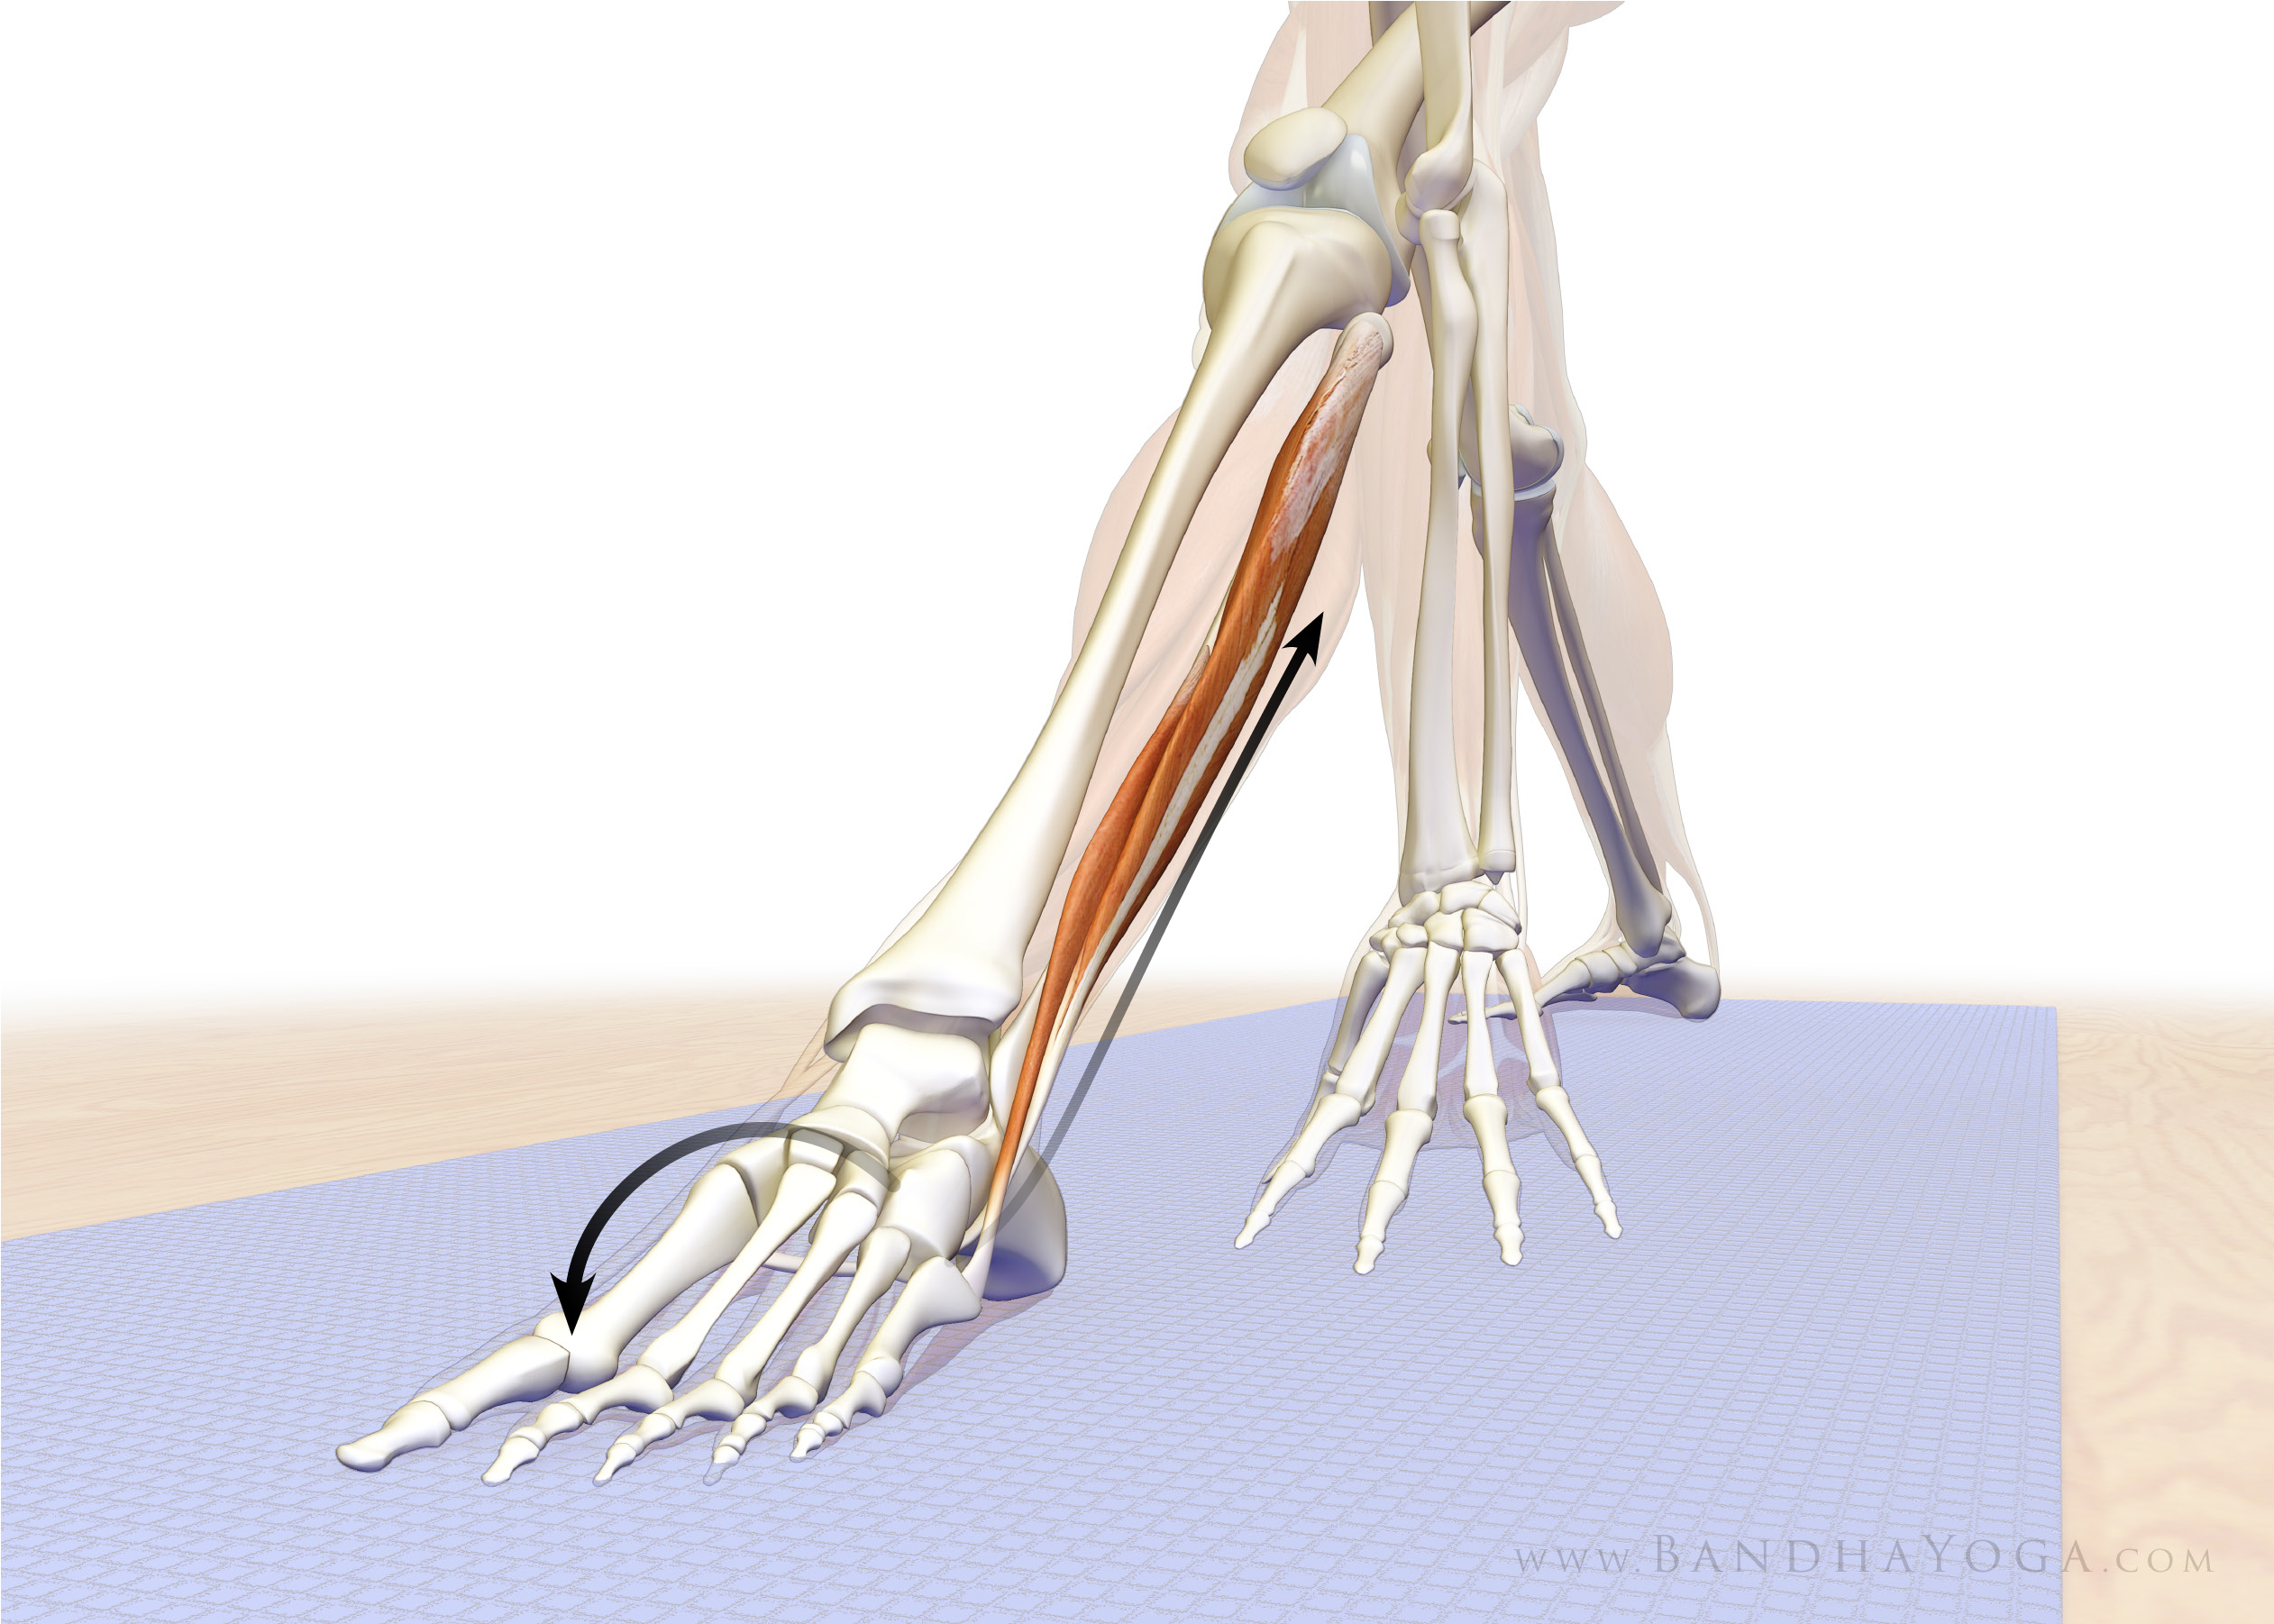 |
| Figure 2 |
Co-activating the muscles that invert (supinate) and evert (pronate) your foot creates an opposing force between these two antagonistic actions that stabilizes your ankle.
These same muscles work together (as synergists) to lift your foot arch (figures 3 and 4).
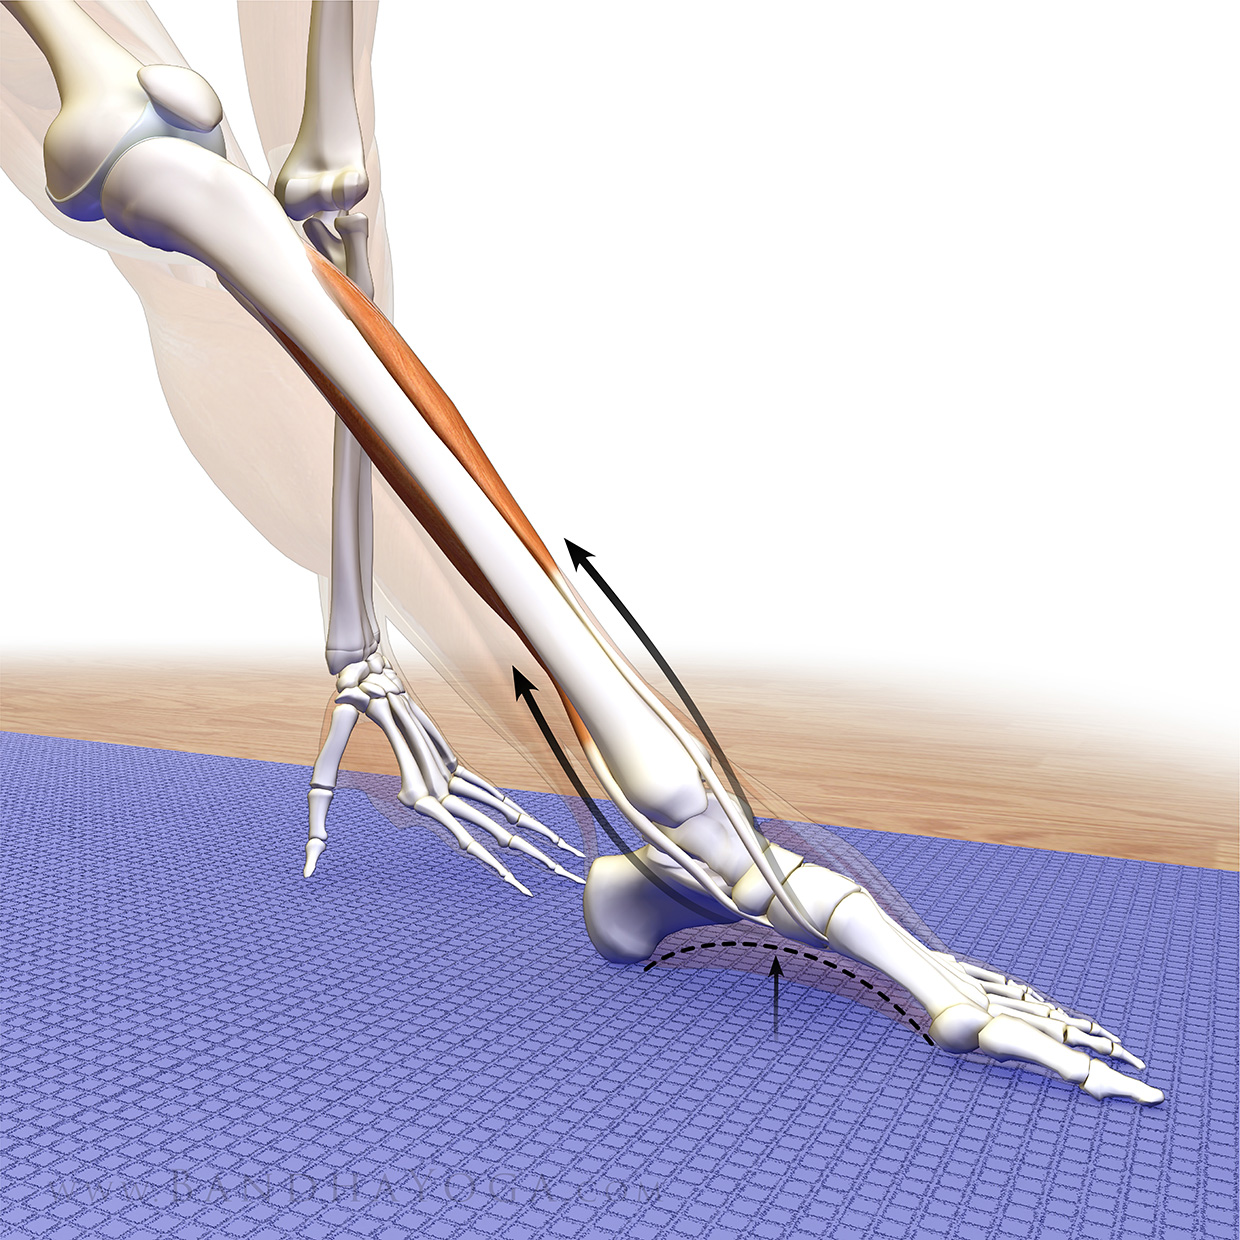 |
| Figure 3 |
 |
| Figure 4 |
Click here to learn about another antagonist/synergist combination.Click here to learn more about your foot arch…
Review the last two posts to see how to connect the foot arch to your core.
I hope you enjoyed this blog post. Page through the Key Muscles and Key Poses of Yoga and the Yoga Mat Companion Series to learn more about anatomy and biomechanics for yoga. See you next week when I will post another tip on anatomy and biomechanics for yoga.
Best,
Ray Long, MD
↧
Connect Your Feet to Your Shoulders in Side Forearm Plank Pose
We recently covered the some key poses to strengthen your core, along with biomechanical cues to refine your work in Forearm Plank pose and Bird Dog pose. Side Forearm Plank is another awesome pose to strengthen your core while protecting your wrists. You do this one by placing your forearm on the mat and attempting to drag it towards your feet, while engaging the core muscles on your sides to stabilize the lumbar pelvic complex. Keep your supporting arm (the humerus bone) straight up and down (at a right angle to the floor). This way the passive strength of the bone aids to support your body weight. Click here for more on this concept in Vasisthasana.
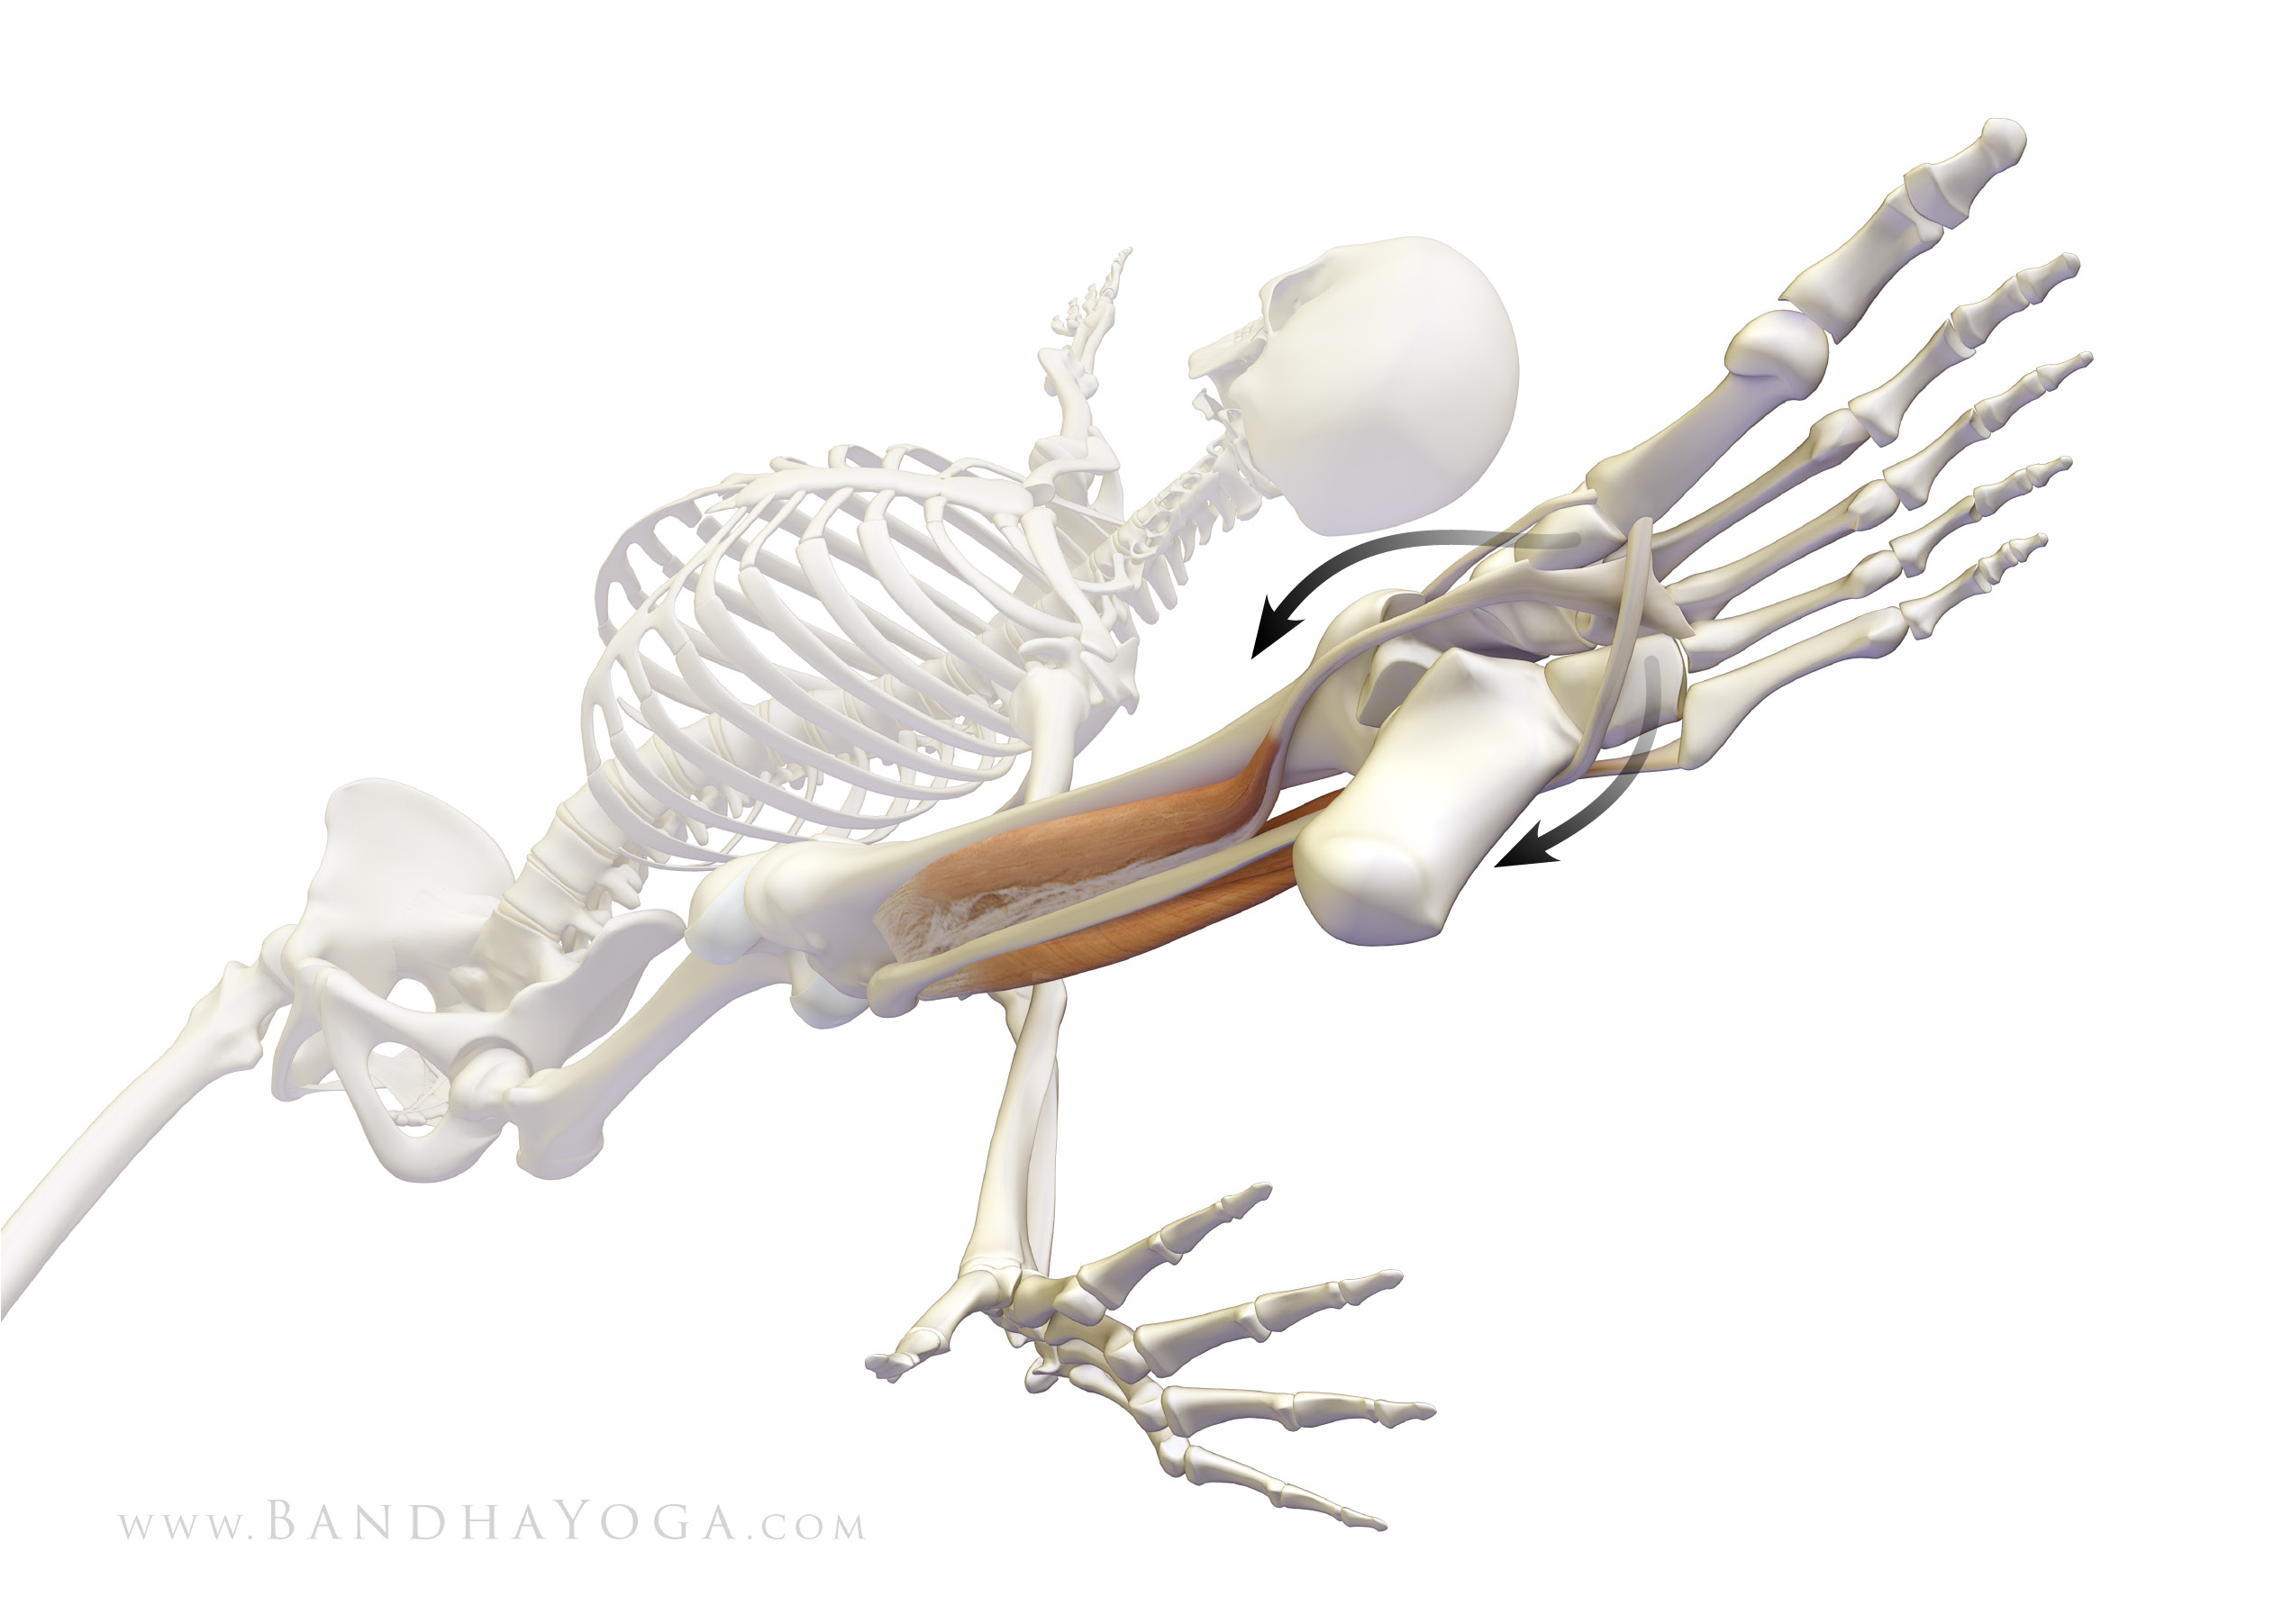
Begin by stabilizing the shoulders. Do this by attempting to externally rotate your forearm on the mat. At the same time, attempt to internally rotate your forearm on the mat as well. It’s a bit like a windshield wiper that’s fixed in place. This cue “co-activates” the infraspinatus and teres minor (external rotation) and the subscapularis (internal rotation) muscles of your rotator cuff. Feel how this stabilizes your shoulder. Folks that are new to this pose can use the preparatory version to work with this cue. Figure 1 shows the prep pose and Figure 2 illustrates the action of the forearms.
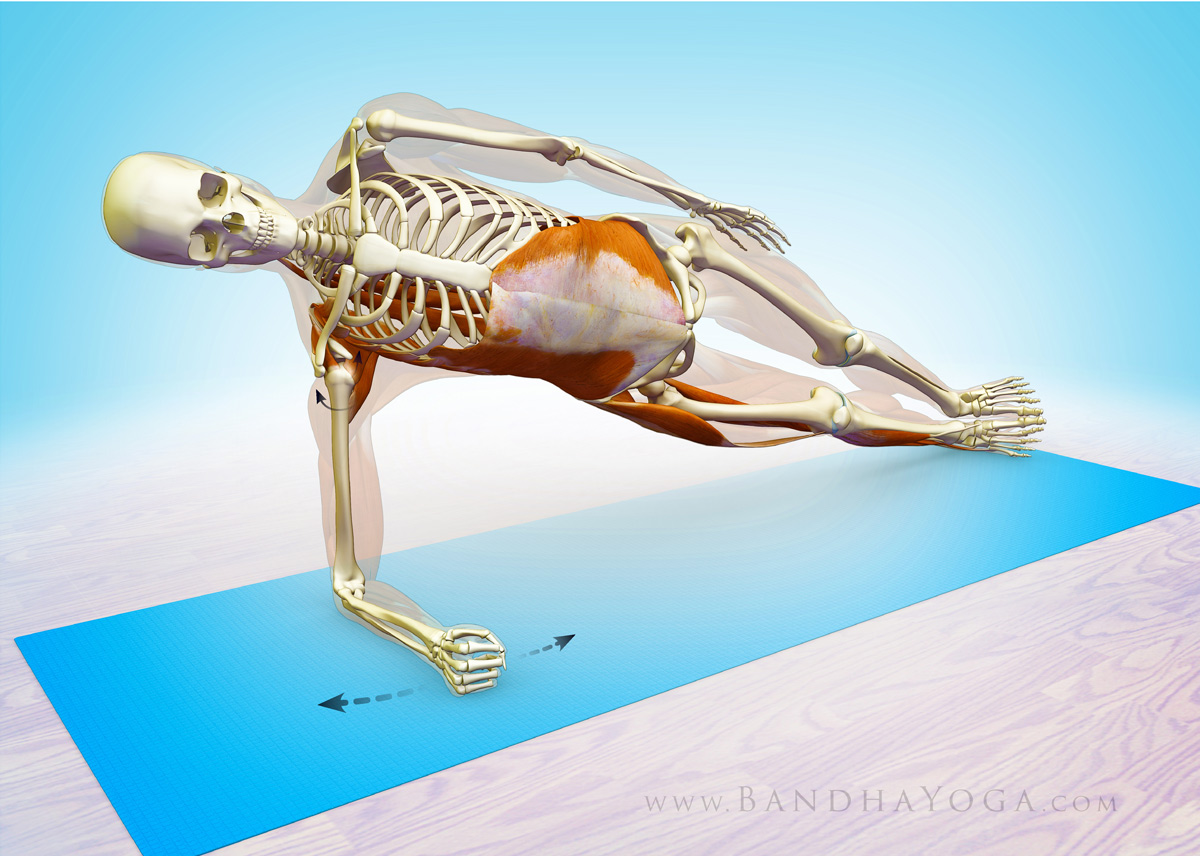
Next, press the edge of your lower side foot into the mat and gently draw it upwards toward the shin to “evert” your foot. These cues activate a series of muscles—including the “lateral subsystem”--to connect your shoulders and legs to your core. Figure 3 shows the cue for attempting to drag the forearm and the feet towards each other (while engaging the side abs).
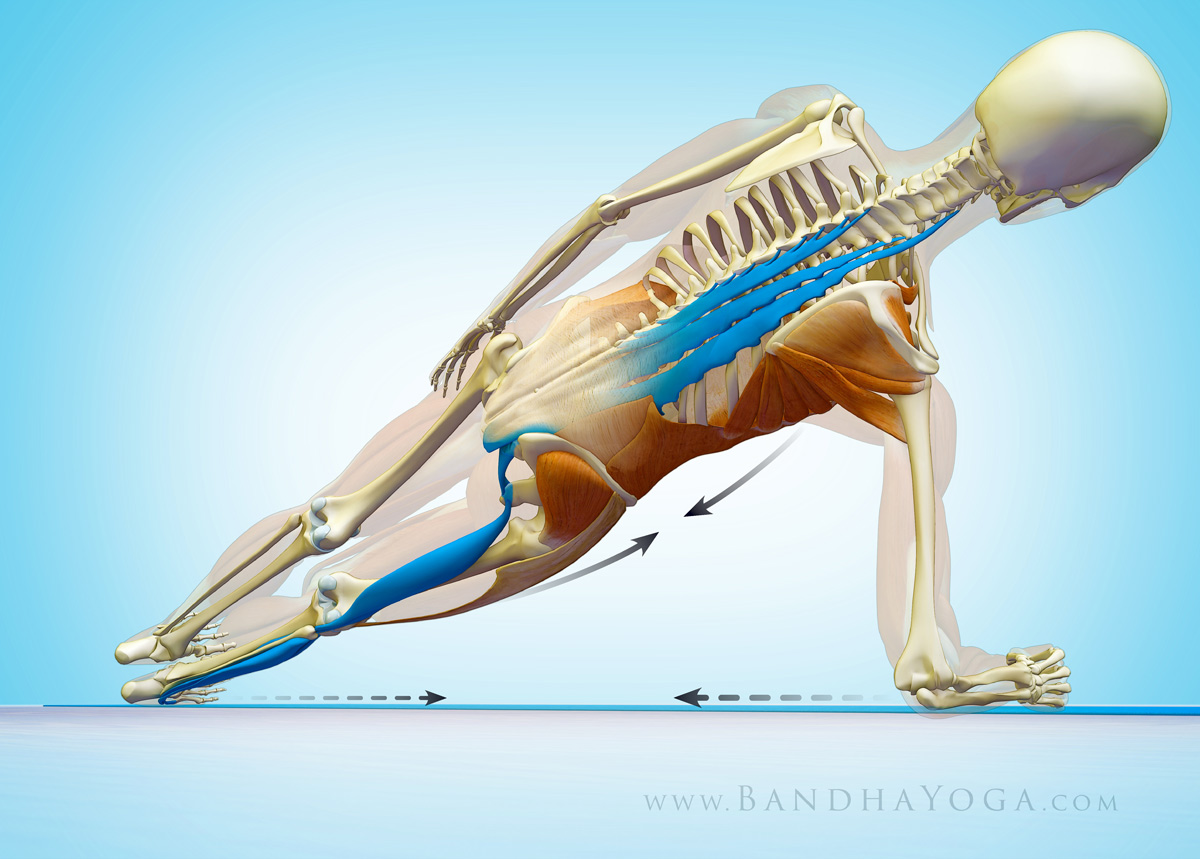
Now let’s check out the myofascial connections in side forearm plank. When you press the side of your foot into the mat, you activate the peroneus muscles as well as the abductor muscles up at your hip (the TFL and gluteus medius). These muscles have a fascial connection to your abs, specifically the external oblique (which attaches to the rim of the pelvis). The external oblique connects to your shoulders via the serratus anterior muscle. The serratus anterior is a scapular stabilizer that works in concert with the rotator cuff. So the whole operation helps to integrate your feet, legs, pelvis and lumbar--all the way up to the shoulders.
So let’s talk about the deep longitudinal subsystem…
Your deep longitudinal subsystem is made up of the peroneus longus muscle (on the outside of your lower leg), the biceps femoris of your hamstrings and your sacrotuberous ligament (up in the pelvis), the thoracolumbar fascia and the erector spinae muscles (in your back). The biceps femoris creates a link between the lower extremities and the trunk via the sacrotuberous ligament. This ligament helps to transmit force across your sacrum, and, via the thoracolumbar fascia on up the trunk to your deep back muscles. Check Figure 3 for a color coded illustration of this connection. Click here to see this connection in the lower legs in Reverse Pigeon Pose.
This subsystem is part of the global movement system and is thought to be important in force transmission between your trunk and the ground—as in walking. We’ll have more posts on the other subsystems and how to work with them in yoga soon. Click here to see how the abductor muscles of the hip work in your poses. Click here to learn more about the thoracolumbar fascia and its importance in yoga.
Figure 4 shows the myofascial connection between the external oblique muscle (of the abs) and the serratus anterior of the shoulder girdle.
Thanks for checking in! Click here to browse through our books. Or by clicking the links on the right. These books have lots of practical cues with key info on anatomic sequencing to integrate into your practice!
Namaste’
Ray Long, MD
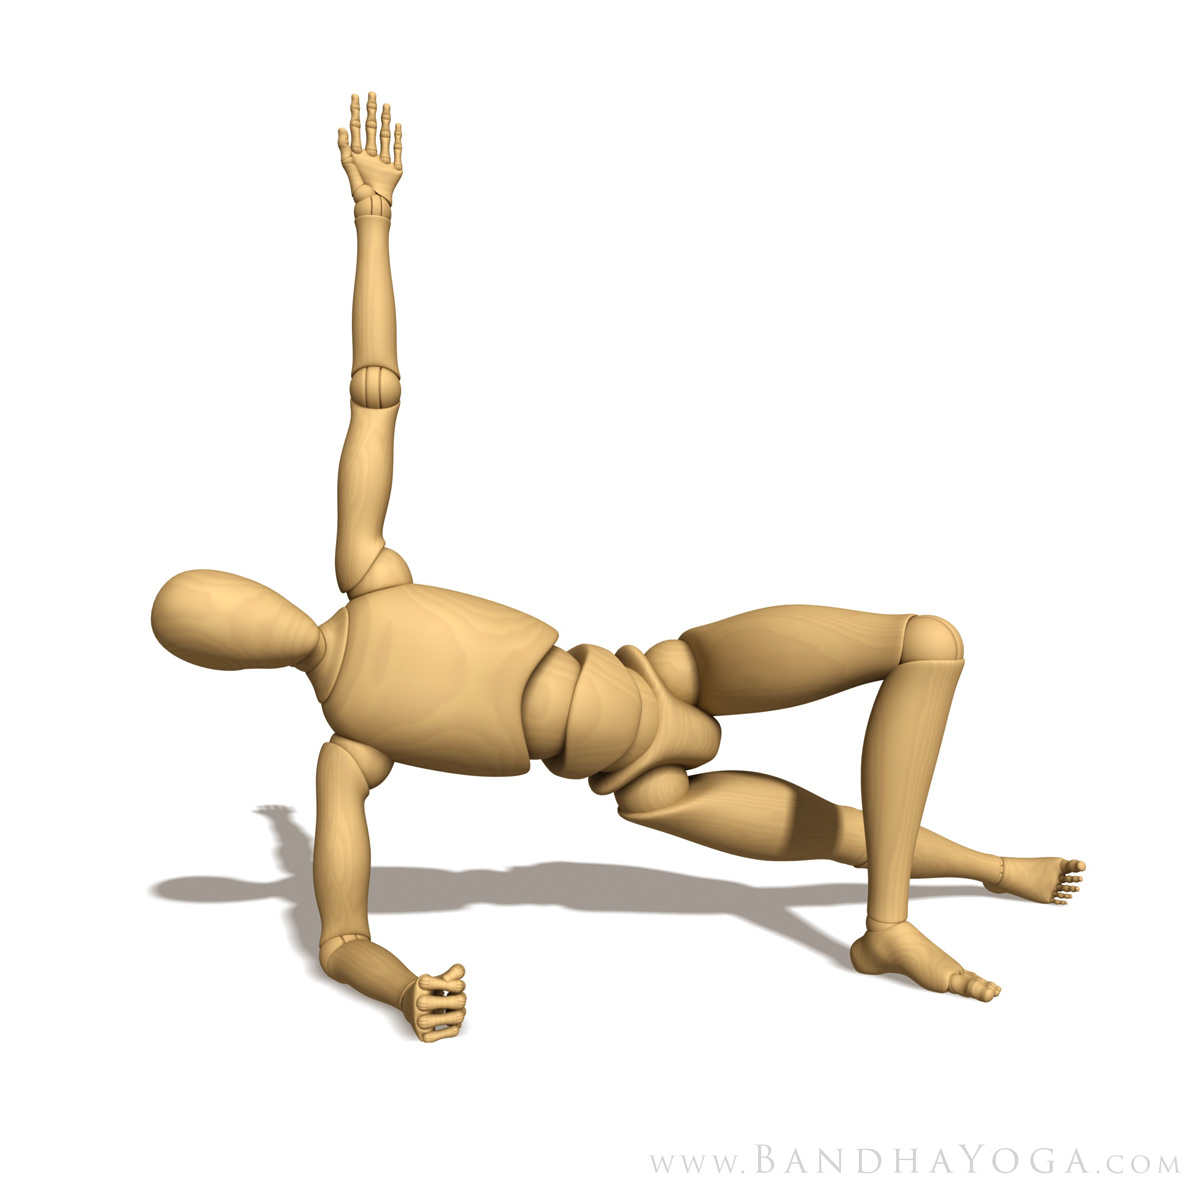 |
| Figure 1: Side Forearm Plank Preparatory Pose |
Begin by stabilizing the shoulders. Do this by attempting to externally rotate your forearm on the mat. At the same time, attempt to internally rotate your forearm on the mat as well. It’s a bit like a windshield wiper that’s fixed in place. This cue “co-activates” the infraspinatus and teres minor (external rotation) and the subscapularis (internal rotation) muscles of your rotator cuff. Feel how this stabilizes your shoulder. Folks that are new to this pose can use the preparatory version to work with this cue. Figure 1 shows the prep pose and Figure 2 illustrates the action of the forearms.
 |
| Figure 2: This illustrates the cue for co-activating the external and internal shoulder rotators (the infraspinatus, teres minor and subscapularis of the rotator cuff). |
Next, press the edge of your lower side foot into the mat and gently draw it upwards toward the shin to “evert” your foot. These cues activate a series of muscles—including the “lateral subsystem”--to connect your shoulders and legs to your core. Figure 3 shows the cue for attempting to drag the forearm and the feet towards each other (while engaging the side abs).
Now let’s check out the myofascial connections in side forearm plank. When you press the side of your foot into the mat, you activate the peroneus muscles as well as the abductor muscles up at your hip (the TFL and gluteus medius). These muscles have a fascial connection to your abs, specifically the external oblique (which attaches to the rim of the pelvis). The external oblique connects to your shoulders via the serratus anterior muscle. The serratus anterior is a scapular stabilizer that works in concert with the rotator cuff. So the whole operation helps to integrate your feet, legs, pelvis and lumbar--all the way up to the shoulders.
 |
| Figure 3: This illustrates the cue of everting the lower foot and dragging the elbow towards it. It also shows the deep longitudinal subsystem. |
So let’s talk about the deep longitudinal subsystem…
Your deep longitudinal subsystem is made up of the peroneus longus muscle (on the outside of your lower leg), the biceps femoris of your hamstrings and your sacrotuberous ligament (up in the pelvis), the thoracolumbar fascia and the erector spinae muscles (in your back). The biceps femoris creates a link between the lower extremities and the trunk via the sacrotuberous ligament. This ligament helps to transmit force across your sacrum, and, via the thoracolumbar fascia on up the trunk to your deep back muscles. Check Figure 3 for a color coded illustration of this connection. Click here to see this connection in the lower legs in Reverse Pigeon Pose.
This subsystem is part of the global movement system and is thought to be important in force transmission between your trunk and the ground—as in walking. We’ll have more posts on the other subsystems and how to work with them in yoga soon. Click here to see how the abductor muscles of the hip work in your poses. Click here to learn more about the thoracolumbar fascia and its importance in yoga.
Figure 4 shows the myofascial connection between the external oblique muscle (of the abs) and the serratus anterior of the shoulder girdle.
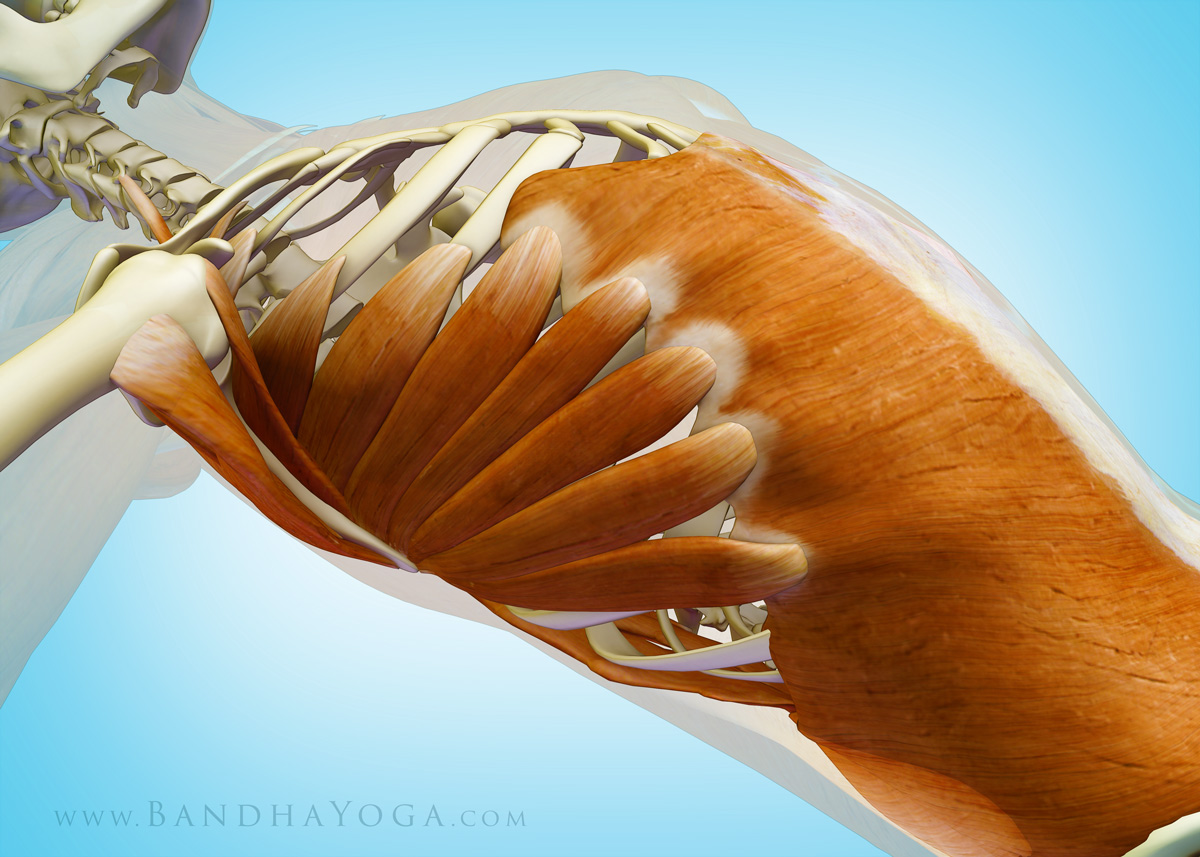 |
| Figure 4: This illustrates the myofascial connection between the external oblique muscle of the abdomen and the serratus anterior of the shoulder girdle. |
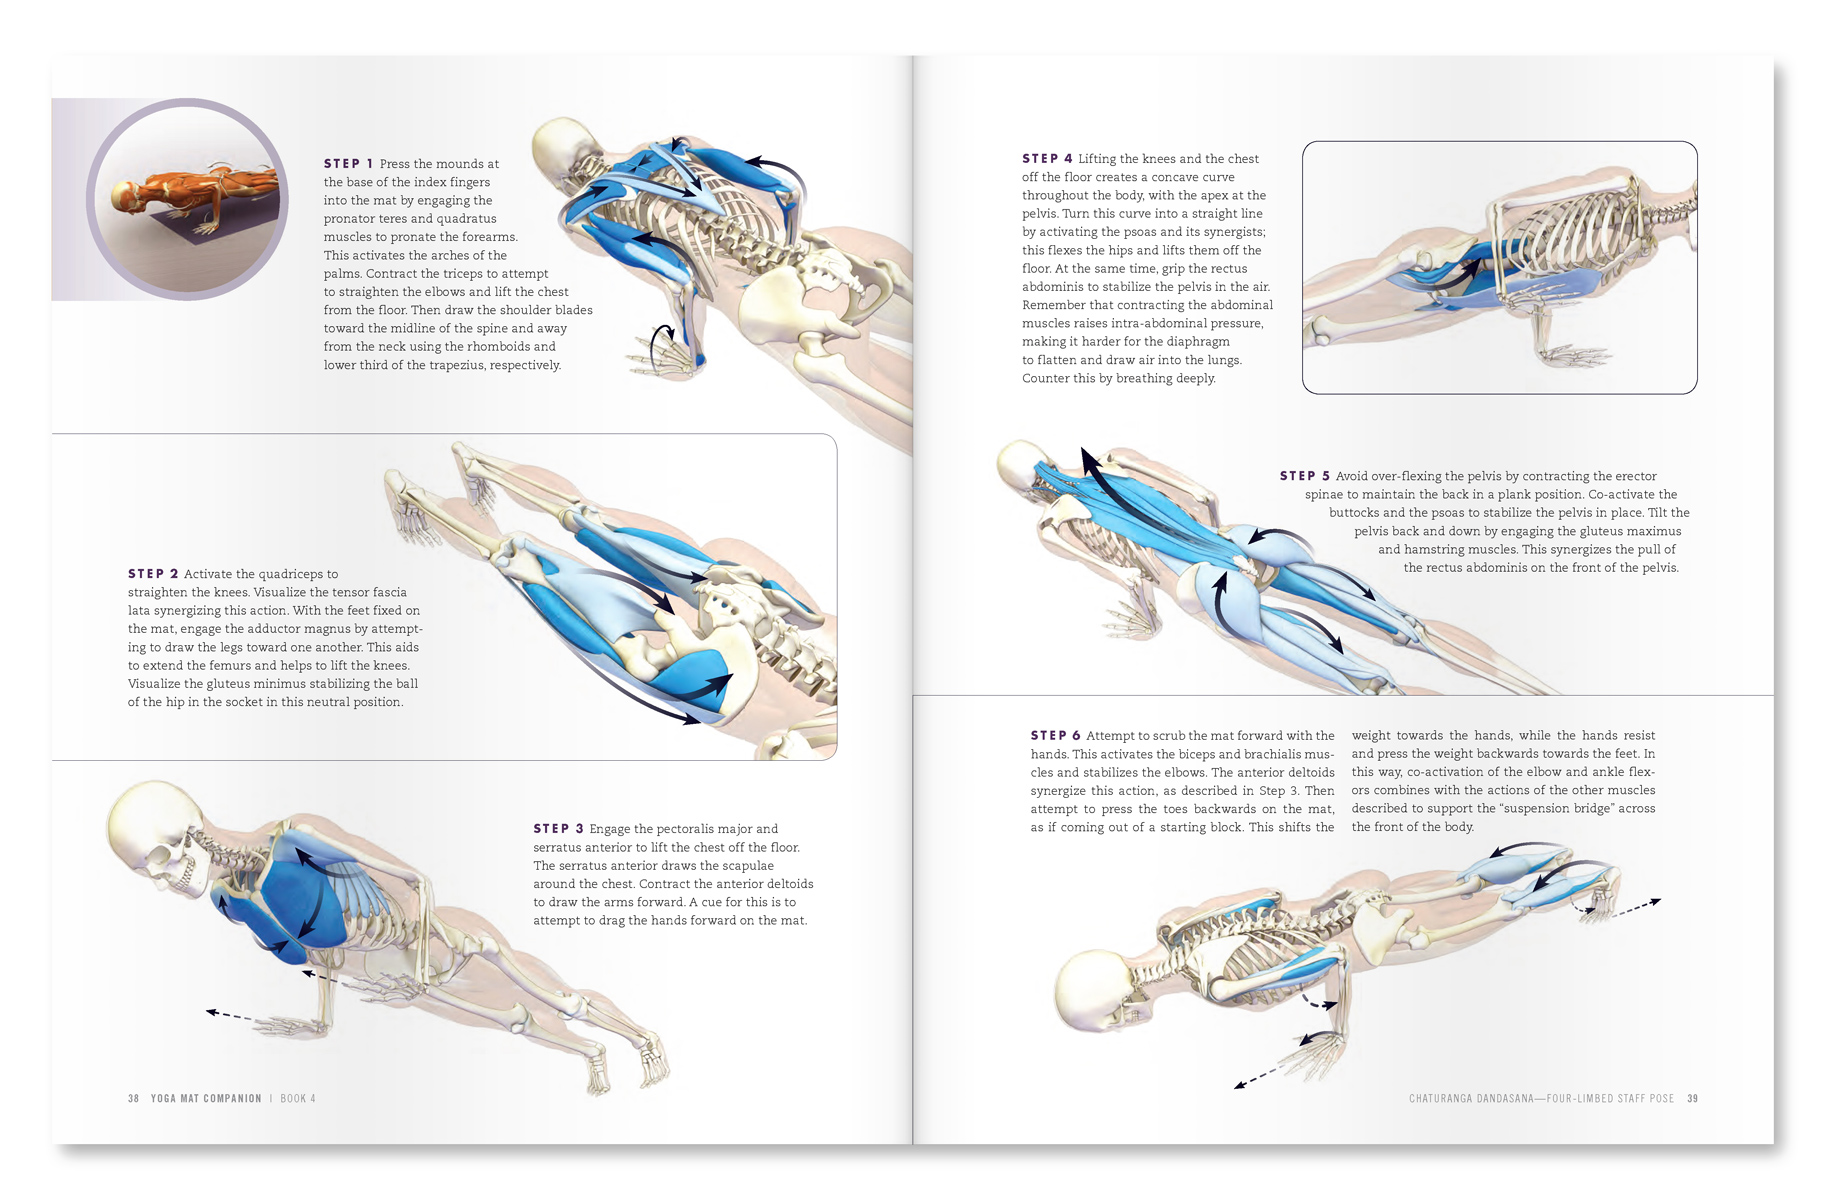 |
| An excerpt from "Yoga Mat Companion 4 - Anatomy for Arm Balances and Inversions". |
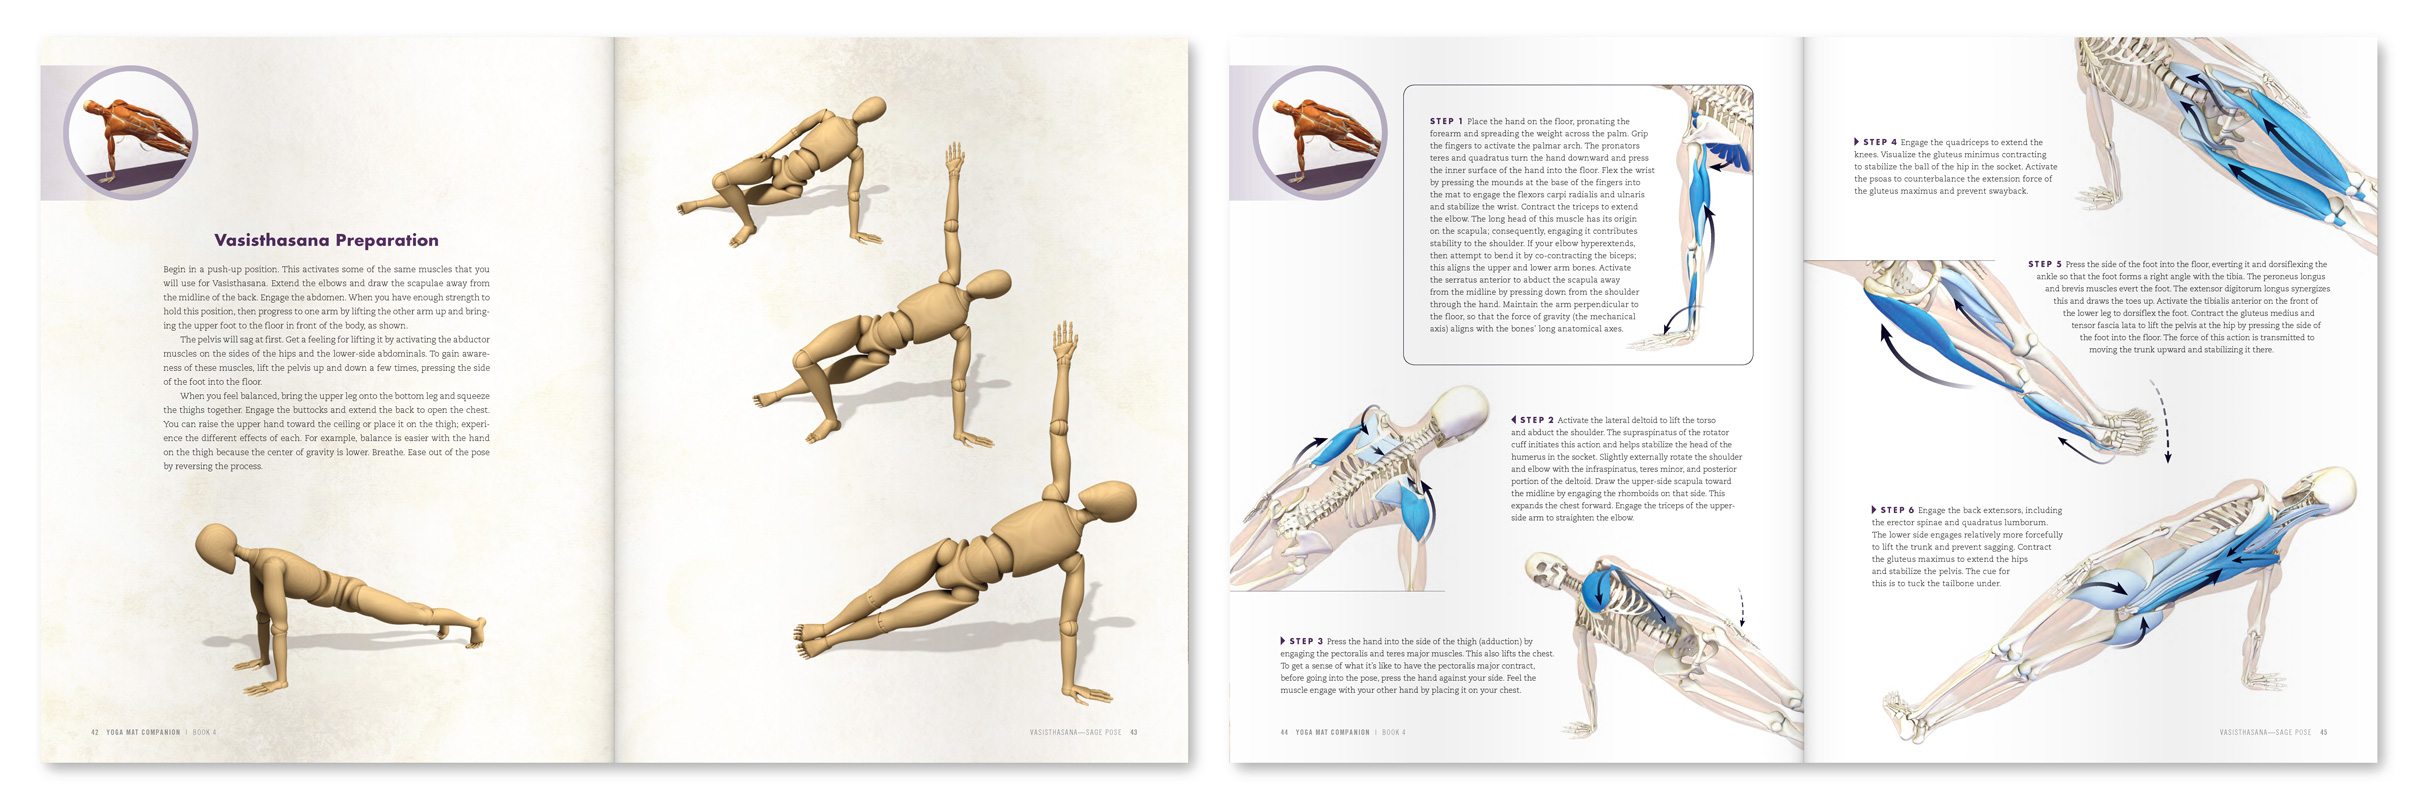 |
| An excerpt from "Yoga Mat Companion 4 - Anatomy for Arm Balances and Inversions". |
Thanks for checking in! Click here to browse through our books. Or by clicking the links on the right. These books have lots of practical cues with key info on anatomic sequencing to integrate into your practice!
Namaste’
Ray Long, MD
↧
↧
More Pages to Explore .....


